Free Pattern
Step-by-Step
Crochet
WearablesUnicorn Swirl Ice Cream Beanie Crochet Pattern
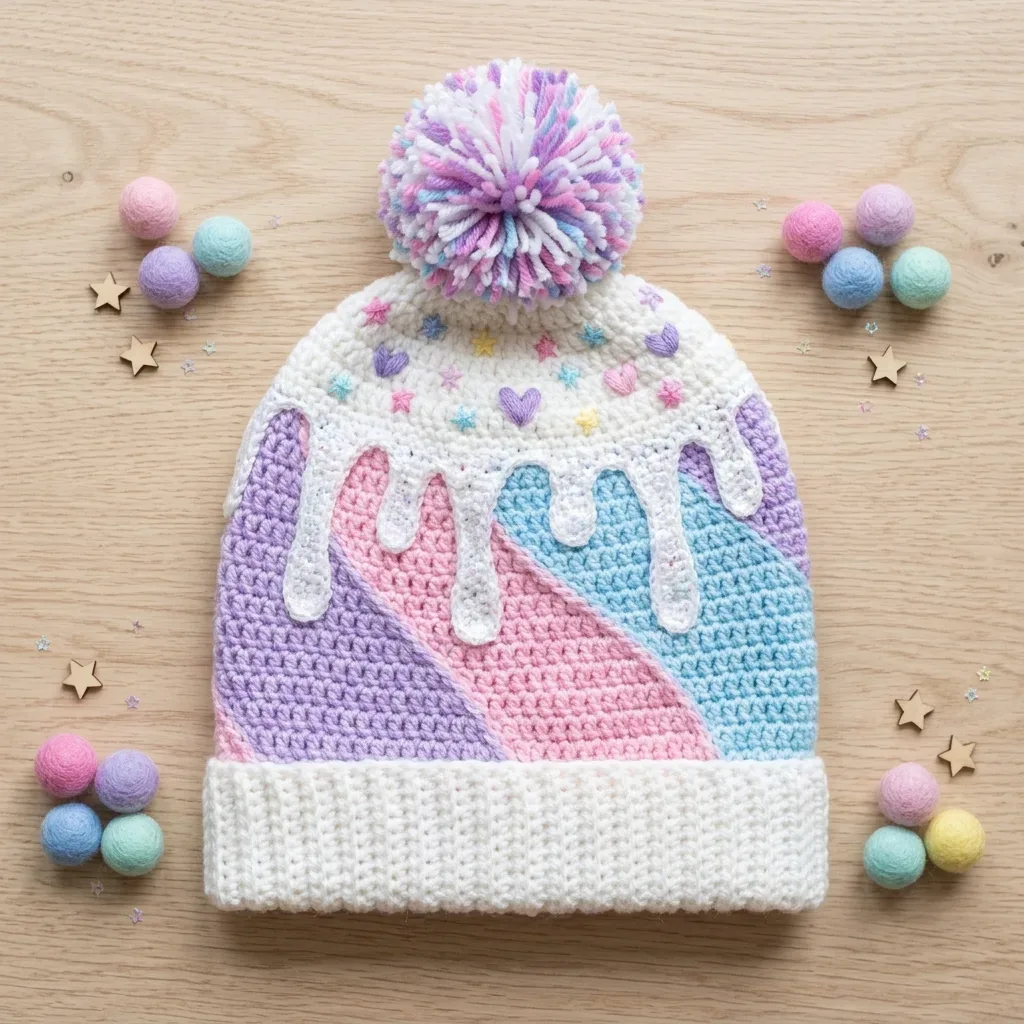
Make this dreamy Unicorn Swirl Ice Cream Beanie with a spiral color technique, drip border, and tiny embroidered hearts and stars. Free pattern!
Level IntermediateTime 4-6 HoursHook 6.0 mmYarn Worsted
Pattern highlights
- Start by crocheting the ribbed brim as a flat strip, slip stitching through the back loop only for a stretchy, knit-look band.
- Join the brim into a ring, then begin the hat body by placing three stitch markers to mark each color section.
- Work the swirl body in single crochet, shifting every marker one stitch to the left at the start of each round.
- Continue through the crown shaping rounds, decreasing gradually while the three colors keep spiraling around the hat.
- Set the hat aside and crochet the drip border separately as a flat strip with dangling chained drip points.
- Attach the finished drip strip around the lower edge of the hat body to create the ice cream cone effect.
- Thread embroidery floss and stitch 6 to 8 tiny hearts and 10 to 14 small stars scattered across the upper crown.
- Finish by making a multicolor pompom and securing it to the top of the crown to complete the beanie.
About This Pattern
The Unicorn Swirl Ice Cream Beanie is a playful mashup of two of the cutest things in the crochet world: soft-serve swirls and unicorn sparkle. A stretchy ribbed brim gives way to a three-color spiral panel that wraps gently around the head, finished off with a scalloped drip border and tiny embroidered hearts and stars scattered across the crown. It's perfect for anyone who loves a project with personality, and it makes an unforgettable gift for a kid, a friend, or yourself.
This pattern leans intermediate thanks to its moving color-change technique and simple hand embroidery, but every individual step is approachable on its own. You'll work back loop only slip stitches for the ribbing, single crochet throughout the body, and a shifting stitch marker system that creates the swirl without any complicated stitch counting. Expect around 4 to 6 hours total, spread across the ribbing, the spiral body, crown shaping, and the drip applique and embroidery finishing touches.
The finished beanie is a cozy, close-fitting hat with a dense, elastic ribbed edge that hugs the head comfortably, topped with a fluffy multicolor pompom. The pastel swirl, drip border, and hand-stitched hearts and stars give it a genuinely magical, one-of-a-kind look that photographs beautifully. Whether you're making it for a birthday, a photo shoot prop, or just because, this beanie is the kind of handmade piece people stop to ask about.
Variations
This pattern is endlessly remixable once you understand the swirl mechanic. For a mermaid version, swap Color B, C, and D for seafoam green, aqua, and coral, and use iridescent or self-striping sock-weight-look yarn like Paintbox Yarns Simply DK held double for extra shimmer. For a galaxy theme, try deep purple, midnight blue, and black for the swirl panels with a silver or white Color A brim, then embroider tiny star bursts (skip the hearts) scattered generously across the crown instead of the 6-14 called for here. Want a bolder unicorn look? Use white, hot pink, and turquoise for a candy-brights palette, and make the pompom in a rainbow multicolor yarn for extra sparkle. To size down for a toddler, work your ribbing chain shorter (test a swatch first, since the pattern's ribbing round count stays the same but chain length controls circumference) and reduce your crown shaping rounds proportionally, checking fit as you go rather than guessing. Sizing up for an adult works the same way in reverse. If you want a no-embroidery version for a quicker finish, simply skip the hearts and stars step entirely — the swirl and drip border alone carry plenty of visual interest. Yarn-wise, Pound of Love and Caron Simply Soft both give crisp stitch definition for the diagonal swirl lines, while a subtly variegated pastel yarn used for just Color A can add unexpected depth to the brim and drip strip without disrupting the three-panel color logic. You could even work the drip border in a single accent color instead of matching Color A for a two-tone ice cream cone effect.
I designed this beanie because I wanted a project that felt like dessert and daydream at the same time, and honestly, watching that swirl travel around the hat round after round never gets old. What I love most is how the construction is broken into totally separate, manageable pieces — you're never juggling three colors of yarn while also decreasing for the crown, because the swirl body and the crown shaping happen as their own distinct stages. The moving stitch marker trick makes the spiral feel like magic even though it's really just shifting one stitch at a time. And then there's the fun part: the drip border with its dangling points, and scattering tiny lazy-daisy hearts and six-point stitch stars across the crown with embroidery floss. It's the kind of detail work that turns a simple sc beanie into something people assume took you all week. If you've been wanting an excuse to try color-shifting spirals or embroidery on crochet fabric, this hat is the friendliest way in.
Common mistakes
- Working the ribbing into both loops
- Double check every stitch of Part One goes into the back loop only — this is what creates the stretchy, knit-look texture. If your ribbing looks flat and dense rather than ridged, unravel and confirm you're only catching the back loop.
- Forgetting to move the stitch markers
- The spiral only forms if you shift every marker one stitch to the left at the start of each new round in Part Two. Set a habit of moving all three markers before you make your first stitch of the round, not after.
- Losing track of which marker belongs to which color
- Use a different marker color or shape for Color B, C, and D so you never accidentally shift the wrong section's starting point. Mismatched markers are the most common reason the swirl looks uneven after a few rounds.
- Pulling drip points too tight
- Keep your tension relaxed on the slip stitches and single crochets worked back down each drip chain, since over-tightening curls the points instead of letting them dangle naturally like the pattern intends.
- Placing embroidered hearts and stars
- Stick to the upper crown zone specified in the pattern — above the drip strip and below the pompom placement — so your design stays balanced and doesn't crowd either finished edge.
- Using a heavily textured or chunky yarn substitute
- Stick with a smooth worsted weight like Pound of Love or Caron Simply Soft so the diagonal swirl panels stay crisp and the drip applique lies flat instead of looking stiff or fuzzy.
Intermediate
Progress Tracker
0 of 0 rounds
Tap a round to tick it off — your place is saved on this device.
Materials
- Lion Brand Pound of Love is my top pick. It is 100% acrylic, widely available in gorgeous pastels, machine washable, and holds stitch definition perfectly.
- Caron Simply Soft is another excellent budget option. It has a slight sheen that enhances the ice cream aesthetic, and it comes in tons of pastel colors.
- Paintbox Yarns Simply DK held double gives you a silkier finish if you prefer that look. Just make sure you check your gauge since you are creating a worsted weight equivalent by doubling.
- Avoid chunky or heavily textured yarns. They will obscure your beautiful diagonal panels and make the drip applique look stiff instead of flowy.
Yarn
- Worsted weight (category 4), approximately 300 yards total
- Color A (White): 90 yards for the brim, crown, and drip applique
- Color B (Lavender): 70 yards for one swirl panel
- Color C (Pink): 70 yards for one swirl panel
- Color D (Sky Blue): 70 yards for one swirl panel
- Color E (Multicolor pastel): 20 yards for the pompom
Hook
- US size J / 6.0 mm crochet hook
Notions
- Yarn needle with a blunt tip
- At least 3 stitch markers
- Embroidery floss in pink, lavender, yellow, blue, and white
- Embroidery needle
- Pompom maker or two cardboard circles, 3 inch diameter
- Scissors
- Blocking mat and pins (optional but helpful)
Part One: Ribbed Brim
Ribbed Brim (Slip Stitch Rib): This creates that stretchy, knit-look ribbing at the bottom of the hat. You chain the required number, then slip stitch in the back loop only across every row. The result is dense, elastic fabric that hugs the head nicely.
With Color A (white) and your J hook, chain 11.
- Round 1Slip stitch in the 2nd chain from hook and in each chain across. (10 sl st)(10)
- Round 2Chain 1, slip stitch in the back loop only of each stitch across. Turn. (10 sl st)Repeat Row 2 until your brim strip measures 21 inches / 53 cm long. This will be approximately 74 rows, but check your own measurement since gauge can vary.Seaming: Fold the strip so the short ends meet. Slip stitch or whip stitch through the corresponding stitches of both ends to form a circle. Weave in your ends.(10)
Checkpoint: Your brim strip should measure 21 inches long and about 2.5 inches wide.
You now have a ring with 74 rows along its length. Each row end becomes one attachment stitch for the body.
Part Two: Hat Body
Diagonal Color Change: This is the magic behind the swirl effect. You divide your hat into three equal color sections. Each round, you shift where each color starts by one stitch counterclockwise. The color change point travels around the hat, creating that beautiful spiral.
Now you will work single crochet rounds up from the brim ring, attaching to the top edge. The brim provides approximately 74 stitches around the top edge. To reach your working count of 72 stitches, you will work the first round with 2 evenly spaced decreases.
- Round 1(Setup): Join Color B at the seam of the brim. Working into the edge of the brim rows, single crochet evenly around, placing 1 sc per row end and working 2 dec evenly spaced. Slip stitch to first sc to join. (72 sc)Place stitch markers: Mark stitch 1 (beginning of Color B section), stitch 25 (beginning of Color C section), and stitch 49 (beginning of Color D section).Understanding the color placement: For Rounds 1 through 24, you work 24 stitches in each color per round. Starting on Round 2, shift all three marker positions 1 stitch to the left each round. By Round 24, each color section will have rotated a full 24 stitches around the hat.
- Round 2Chain 1. Single crochet in Color B across 24 stitches (stitches 1 to 24). Change to Color C, single crochet across 24 stitches (stitches 25 to 48). Change to Color D, single crochet across 24 stitches (stitches 49 to 72). Slip stitch to join. Move each marker 1 stitch counterclockwise. (72 sc)
- Round 3through 24: Repeat Round 2, shifting the three color sections by 1 stitch counterclockwise each round. (72 sc each round)Checkpoint: After Round 24, your hat body (not counting the brim) should measure approximately 6 inches tall. The diagonal swirl should be clearly visible.(72)
Part Three: Drip Applique
Drip Stitch (for the applique): The drip border is worked flat as a strip with dangling drip points. Each drip point is made by chaining, then working slip stitches and single crochets back down the chain. It creates those adorable ice cream drips.
The drip applique is crocheted flat as a long strip with dangling drip points, then sewn onto the hat. Work in Color A only.
Foundation chain: Chain 73.
- Round 1Single crochet in 2nd chain from hook and in each chain across. (72 sc)
- Round 2(Drip Points): This row creates the hanging drip shapes. Drip Point Method: Chain 6, slip stitch in 2nd chain from hook, single crochet in next chain, half double crochet in next chain, single crochet in next chain, slip stitch in next chain (base chain), slip stitch in the next sc of the foundation row.Between drip points, work 2 to 4 slip stitches along the base row to create the flat top of the drip border.Drip placement for 72 stitch circumference:Fasten off, leaving a long sewing tail.
Slip stitch in first 2 stitches. Work Drip Point. Slip stitch in next 3 stitches. Work Drip Point. Slip stitch in next 4 stitches. Work Drip Point. Slip stitch in next 2 stitches. Work Drip Point. Slip stitch in next 4 stitches. Work Drip Point. Slip stitch in next 3 stitches. Work Drip Point. Slip stitch in next 2 stitches. Work Drip Point. Slip stitch in next 4 stitches. Work Drip Point. Slip stitch in next 3 stitches. Work Drip Point. Slip stitch in next 2 stitches. Work Drip Point. Slip stitch in next 4 stitches. Work Drip Point. Slip stitch in next 3 stitches. Work Drip Point. Slip stitch in next 2 stitches. Work Drip Point. Slip stitch in remaining 2 stitches.
Total: 13 drip points arranged irregularly to mimic a natural drip effect.
Attaching the Drip Applique: Pin the drip applique along the outside of the hat, positioning the top ridge at approximately Round 22 to 23 (about 1 inch below where crown decreases begin). The drip points hang downward over the colorful body. Seam the short ends together before pinning, or overlap by 0.5 inch. Whip stitch the top edge to the hat body using Color A. Lightly tack the bottom ridge to keep it flat. Do not sew down the individual drip points. They should dangle freely.
Crown Shaping
From Round 25 onward, continue the color swirl pattern while working crown decreases.
- Round 25Continuing swirl pattern, work (sc in 10 sts, dec) 6 times around. Move markers. (66 sc)
- Round 26Work even in swirl pattern, moving markers. (66 sc)
- Round 27Work (sc in 9 sts, dec) 6 times around. Move markers. (60 sc)
- Round 28Work even in swirl pattern, moving markers. (60 sc)
- Round 29Work (sc in 8 sts, dec) 6 times around. Move markers. (54 sc)
- Round 30Work even in swirl pattern, moving markers. (54 sc)
- Round 31Work (sc in 7 sts, dec) 6 times around. Move markers. (48 sc)
- Round 32Work even in swirl pattern, moving markers. (48 sc)
- Round 33Work (sc in 6 sts, dec) 6 times around. Move markers. (42 sc)
- Round 34Work even in swirl pattern, moving markers. (42 sc)
- Round 35Work (sc in 5 sts, dec) 6 times around. Move markers. (36 sc)
- Round 36Work (sc in 4 sts, dec) 6 times around. Move markers. (30 sc)
- Round 37Work (sc in 3 sts, dec) 6 times around. Move markers. (24 sc)
- Round 38Work (sc in 2 sts, dec) 6 times around. (18 sc)
- Round 39Work (sc in 1 st, dec) 6 times around. (12 sc)
- Round 40Work (dec) 6 times around. (6 sc) Cut yarn leaving a 12 inch tail. Thread your yarn needle with the tail. Pass the needle through each of the 6 remaining stitches, pulling them off the hook. Cinch tightly and secure with several stitches. Weave in the end on the inside.
Checkpoint: Your finished hat body from brim join to crown tip should measure approximately 10 inches. The crown should close smoothly with no gap at the top.
Assembly
- Step 1Fill a basin with cool water and a drop of wool wash. Submerge your completed hat and gently press to saturate. Remove and press out water gently without wringing. Roll in a clean towel to remove excess moisture. Place on a hat form or stuff loosely with plastic bags to shape. Allow to dry fully flat, away from direct heat.
- Step 2The drip applique and embroidery will lie much more neatly after blocking.
Important notes
💡 Place your three stitch markers at the very start of Round 1 in Part Two, and get in the rhythm of shifting them one stitch left before every new round — it becomes automatic after two rounds.
💡 Keep your three swirl colors in separate bowls or yarn bags so they don't tangle as you carry them up through each round of the hat body.
💡 Weave in color-change ends as you go rather than saving them all for the finish, since the swirl technique creates more color joins than a typical single-color hat.
💡 Block your finished beanie over a bowl or balloon close to head-size before attaching the drip border, hearts, stars, and pompom — it makes the crown shaping lie smoother for embroidery.
💡 Test your embroidery floss colors on a scrap swatch of Color A first, since pastel floss can look different against white acrylic than it does in the skein.
📏 Gauge: 14 sc x 16 rows = 4 inches / 10 cm worked in single crochet in the round, blocked. Gauge matters here because it affects fit — make a quick swatch before diving in. If your stitches are looser than stated, go down half a hook size; if tighter, go up half a hook size.
📏 Finished size: Adult medium, approximately 21 inches / 53 cm circumference (unstretched brim) and 10 inches / 25.5 cm tall from brim fold to crown before the pompom. The hat stretches to fit head circumferences of 21 to 23 inches.
FAQ
What size head does this beanie fit?
The pattern is written as a standard adult/teen fit beanie using worsted weight yarn and a J/6.0mm hook. For a smaller or larger fit, adjust your ribbing chain length and crown shaping rounds proportionally and check against a head measurement as you go.
Can I skip the embroidered hearts and stars?
Absolutely — the swirl body and drip border already make a striking hat on their own. Simply finish after Part Three and the crown shaping, then attach your pompom.
Do I need to know how to embroider to add the hearts and stars?
No prior embroidery experience is needed. The hearts are a simple two-loop lazy daisy variation and the stars are just six straight stitches from a center point, both explained step by step in the pattern.
Why does the pattern use stitch markers instead of just counting stitches?
The moving marker system tracks where each of the three swirl colors starts each round, which is far easier and more accurate than mentally counting stitches while managing three yarns at once. Just remember to shift each marker one stitch left every round.
What yarn works best for making the swirl panels look crisp?
A smooth worsted weight acrylic like Pound of Love or Caron Simply Soft holds stitch definition well, which keeps the diagonal color lines of the swirl sharp and clear. Avoid chunky or heavily textured yarns, which blur the panel lines and stiffen the drip applique.