
Free Pattern
Step-by-Step
Crochet
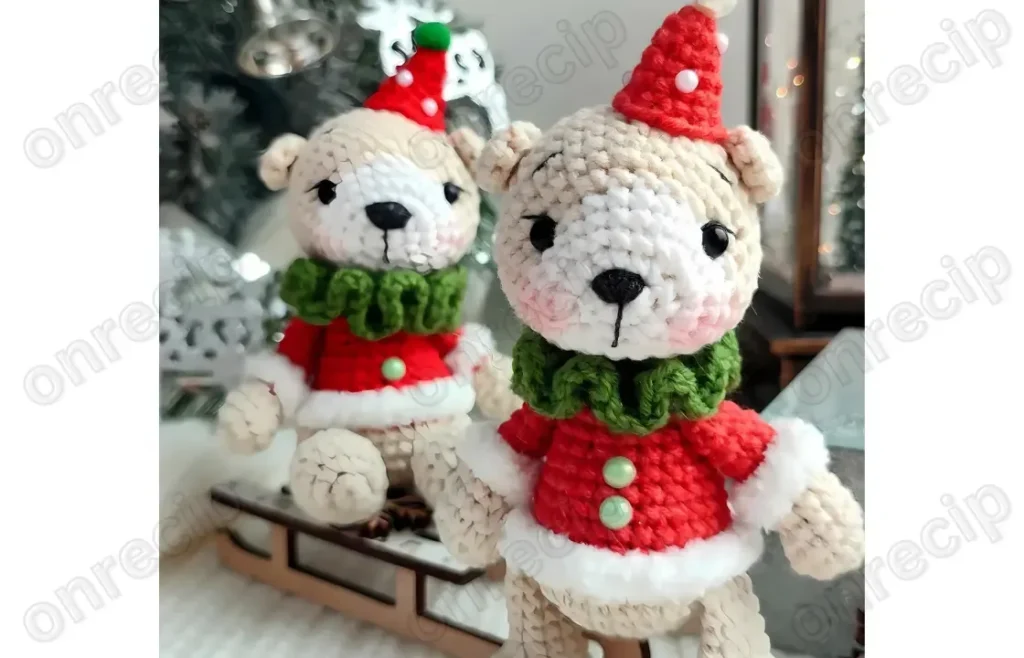
AmigurumiWinter bear amigurumi with a hat and collar
A crochet bear pattern with sculpted eyes, a knitted hat, and a matching collar.
- Level
- Intermediate
- Time
- 4-6 hours
- Hook
- 6 mm
- Yarn
- DK
Pattern highlights
- Work the ears flat and set them aside for sewing once the head is finished.
- Crochet the body as the longest single piece, since it holds most of the bear's shape.
- Make the arms and legs separately, each with its own increase and decrease pattern for shaping.
- Sculpt the eye area before gluing on the plastic eyes, then embroider the nose and eyebrows.
- Add the hat and collar last, once the head and body are assembled.
- Sew ears into place and join all the pieces together to finish the bear.
About This Pattern
A dressed bear like this earns its own shelf in a crochet collection. Plain amigurumi bears are common; one wearing a knitted hat and collar is not. This pattern adds two extra pieces to the usual head, body, arms, and legs, so the bear reads more as a finished character than a beginner test piece. I like that the hat and collar are optional additions rather than afterthoughts stitched onto a generic pattern. They give the toy a small wardrobe before it even leaves the hook.
Finished, this is a seated-looking bear with a rounded head, tapered limbs, and a face built from sculpted thread and embroidery rather than shortcuts. The body carries the most rounds of any part, so it is the piece that holds the bear's overall shape. Add the hat and collar and the whole thing looks less like a toy stitch test and more like a small, dressed character ready for a shelf.
Worth knowing
What I like about this one is the eye sculpting step — it is a technique, not just decoration, and it happens before any embroidery. Marking two points 8-9 stitches apart and cinching the thread between them is fussier than gluing eyes onto a flat head, but it gives the face real structure. The color change partway through the head, from white to beige, is a clean way to build a muzzle without extra pieces. Add flat-worked ears, tapered arms with a clear decrease row, and a body that runs to seventeen rounds, and you get a bear built with more construction thinking than most quick amigurumi patterns bother with.
Common mistakes
- Marking eye points too close together Space points 1 and 2 the full 8-9 stitches apart, or the sculpted brow line looks pinched rather than natural.
- Pulling the sculpting thread too tight Tighten gradually and check the face from the front before knotting off, since over-pulling can dent the head.
- Gluing eyes before sculpting is finished Finish both sculpted points first, then glue the eyes so their spacing matches the pinched brow.
- Sewing ears on before checking placement Pin both ears in place and compare them from the front before stitching them down.


Intermediate
Progress Tracker
0 of 0 rounds
Tap a round to tick it off — your place is saved on this device.
The kit
- YarnArt Jeans No. 05 (Beige)
- YarnArt Jeans No. 90 (Red)
- YarnArt Jeans No. 01 (White)
- YarnArt Jeans No. 69 (Green)
- Alize Softy No. 55 (White)
- Hook: No. 2.5
- Filler
- Black eyes, 6mm, 2 pcs
- Black thread for embroidering the face
- Needles, pins, scissors, glue
- Any decorations
Head
Work with white yarn.
Round 16 sc in MR
Round 2inc in every stitch (12 sc)
Round 3(tr inc) * 3, 3 sc, (tr inc) * 3, 3 sc (24 sc)
Rounds 4–5work 2 rows without changes (24 sc) Change to beige yarn.
Round 6(3 sc, inc) * 6 (30 sc)
Round 72 sc, inc, (4 sc, inc) * 5, 2 sc (36 sc)
Rounds 8–13work 6 rows without changes (36 sc)
Round 142 sc, dec, (4 sc, dec) * 5, 2 sc (30 sc)
Round 15(3 sc, dec) * 6 (24 sc)
Round 161 sc, dec, (2 sc, dec) * 5, 1 sc (18 sc)
Round 17(1 sc, dec) * 6 (12 sc)
Round 18(dec) * 6 (6 sc) Fasten off, cut the yarn.
Ears
Work with beige yarn.
Round 17 sc in MR
Round 2work 1 row without changes (7 sc) Fasten off, leaving a long tail for sewing. Make a second ear in the same way.
Face Embroidery
Start with eye sculpting. Between the 5th and 6th rows, mark two points (1 and 2) about 8-9 stitches apart.
Step by step Insert the needle with thread at the base of the head, bring it out at point 1, and insert it one stitch to the left, pulling the needle out at the base of the head again. Tighten the thread to create the sculpt. Repeat the same for the other side: insert at point 2, and one stitch to the right.
Glue on the eyes, embroider the eyelashes, nose, downstroke, and eyebrows. Sew the ears in the desired position.
Arms
Work with beige yarn.
Round 16 sc in MR
Round 2inc in every stitch (12 sc)
Round 3work 1 row without changes (12 sc)
Round 44 sc, (dec) * 2, 4 sc (10 sc)
Round 53 sc, (dec) * 2, 3 sc (8 sc)
Round 6work 1 row without changes (8 sc) Change to red yarn.
Round 7work in BBL (8 sc)
Rounds 8–11work 4 rows without changes (8 sc) Lightly stuff the arm halfway. Fold in half and crochet 4 sc across. Fasten off and cut the yarn.Attach Alize Softy white yarn to the FBL of row 6 and crochet sc into each FBL. Fasten off and cut the yarn. Make the second arm in the same way.
Legs
Work with beige yarn.
Round 16 sc in MR
Round 2(tr inc) * 2, 1 sc, (tr inc) * 2, 1 sc (14 sc)
Round 3(2 sc, inc) * 2, 1 sc, (2 sc, inc) * 2, 1 sc (18 sc)
Rounds 4–5work 2 rows without changes (18 sc) + a few more stitches to reach the center (4 sc for me).(4)
Round 63 sc, (dec) * 6, 3 sc (12 sc)
Round 73 sc, (dec) * 3, 3 sc (9 sc)
Rounds 8–11work 4 rows without changes (9 sc) Lightly stuff the leg halfway. Fold in half and crochet 4 sc across. Fasten off and cut the yarn. Make the second leg in the same way.
Body
Work with beige yarn.
Round 16 sc in MR
Round 2inc in every stitch (12 sc)
Round 3(1 sc, inc) * 6 (18 sc)
Round 41 sc, inc, (2 sc, inc) * 5, 1 sc (24 sc)
Round 5(3 sc, inc) * 6 (30 sc)
Round 6attach legs: 6 sc, 4 sc (with the leg), 11 sc, 4 sc (with the leg), 5 sc (30 sc)
Round 7work 1 row without changes (30 sc) Change to red yarn.
Round 8work in BBL (30 sc)
Round 9work 1 row without changes (30 sc)
Round 10(3 sc, dec) * 6 (24 sc)
Rounds 11–12work 2 rows without changes (24 sc)
Round 131 sc, dec, (2 sc, dec) * 5, 1 sc (18 sc)
Round 14work 1 row without changes (18 sc)
Round 15attach arms at the sides: 4 sc, 4 sc (with the arm), 5 sc, 4 sc (with the arm), 1 sc (18 sc)
Round 16work 1 row without changes (18 sc) Change to beige yarn.
Round 17(1 sc, dec) * 6 (12 sc)
Round 18work 1 row without changes (12 sc) Fasten off, leaving a long tail for sewing. Sew the body to the head.
Hat
Work with red yarn.
Round 16 sc in MR
Round 2work 1 row without changes (6 sc)
Round 3(1 sc, inc) * 3 (9 sc)
Round 41 sc, inc, (2 sc, inc) * 2, 1 sc (12 sc)
Round 5work 1 row without changes (12 sc)
Round 6(3 sc, inc) * 3 (15 sc) Fasten off, leaving a long tail for sewing. Sew the hat to the bear’s head and decorate as desired.
Your bear is ready!
Author: Lukina Yulia @crochet_toys_yulia / translate by onrecip Enjoy!
Collar
Chain 18, starting in the 3rd stitch from the hook, crochet 3-4 dc into each stitch. Fasten off, leaving a tail for sewing. Fit it to the bear and sew the ends.
Finishing
- Stuff the head and body firmly before closing the last round, so the sculpted eye area holds its shape.
- Weave in yarn ends and any leftover working tails once all pieces are complete.
- Sew the ears, hat, and collar into position last, positioning them by eye before stitching them down.
- It is important to stuff the toy gradually and firmly during the crochet process. The size of the toy, using the listed materials, will be 14 cm.
Why it works
The head's round 3 splits its increases into two groups of three tr inc, separated by plain stitches, which builds the cheek and muzzle curve rather than a uniform sphere.
The ears are worked as a flat disc — 7 sc in a magic ring followed by one plain round — with no shaping, so they stay small and cupped rather than domed.
The arms increase to twelve stitches in round 2, then decrease at round 4 (4 sc, dec x2, 4 sc), giving them a rounded shoulder that narrows toward the wrist.
What it becomes
- A shelf bear for a kid's room, paired with other soft amigurumi animals.
- A handmade gift for a new baby, sized to sit alongside a knitted blanket.
- A photo prop for craft fairs or shop displays, since the hat and collar add personality.
Original pattern: https://onrecip.com/free-winter-bear-amigurumi-crochet-pattern/
FAQ
Why sculpt the eye area before attaching the plastic eyes?
The thread tension pulls the face inward slightly, creating a brow that plastic eyes alone cannot fake. Skipping this step leaves the face looking flatter than intended.
Can I leave off the hat and collar?
Yes, the bear stands on its own without them. They are separate pieces added at the end, so the base bear works fine plain.
What yarn weight pairs well with a 2.5mm hook here?
A finer weight like sport or DK gives the dense fabric amigurumi needs at this hook size. Anything heavier will leave visible gaps between stitches.
Why does the body have so many more rounds than the other parts?
seventeen rounds, the body is the piece holding the bear's overall proportions, unlike the two-round ears. It is worth taking slowly since a stitch count error here affects the whole shape.