Free Pattern
Step-by-Step
Crochet
WearablesWoodland Creatures Bucket Hats Crochet Pattern
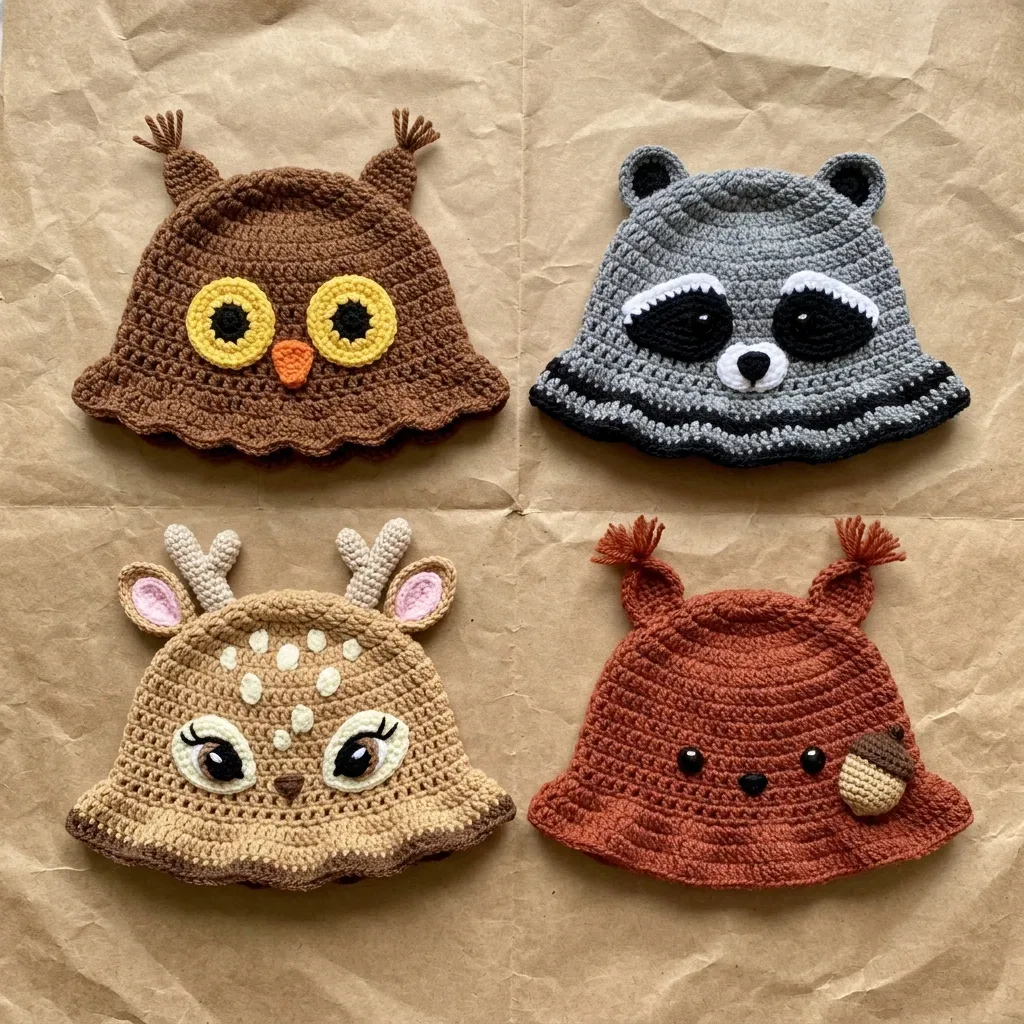
Crochet an owl, raccoon, deer, or squirrel bucket hat with this fun woodland pattern featuring cute appliques and a flared brim for adults.
Level IntermediateTime 6-9 HoursHook 12 mmYarn Worsted
Pattern highlights
- Begin at the top of the hat and crochet the crown as a flat circle using increase rounds until it reaches the right diameter.
- Work the brim transition rounds, adding evenly spaced increases so the brim begins flaring outward from the hat sides.
- Finish the edge with the brim scallop edging for a decorative, structured finish along the outer rim.
- Set the hat aside and crochet the animal appliques separately, working each small piece in its own rounds and colors.
- the owl, make the eyes, beak, ear tufts, and ear bases; for the raccoon, make the mask, highlights, and nose.
- the deer, crochet the antlers and layered ears; for the squirrel, crochet the tufted ears and dimensional acorn.
- Pin each applique in place on the hat, then sew everything on neatly by hand to bring the chosen animal's face to life.
About This Pattern
This pattern gives you four adorable bucket hats in one — an owl, a raccoon, a deer, and a squirrel — all built from the same easy top-down hat body but dressed up with completely different appliqued faces. Each hat starts as a flat crown, grows into straight sides, and finishes with a flared brim, so you get one reliable base shape with endless personality on top. It's perfect for crocheters who love a cozy wearable but want something more memorable than a plain beanie.
The hat body itself is worked entirely in single crochet in continuous rounds, so the shaping is genuinely beginner-friendly. The intermediate rating comes from the details: crocheting small circular appliques like the owl's eyes and ear tufts, the raccoon's mask and highlights, the deer's antlers and spotted ears, or the squirrel's tufted ears and dimensional acorn, then sewing them on cleanly. Expect to spend a solid weekend on this project between the hat body and its face pieces.
Finished, each hat fits an average adult head of 22 to 23 inches around, standing about 9 inches tall with a 2 inch flared brim for shade and structure. The result feels sturdy, huggable, and unmistakably handmade — the kind of piece that gets stopped-on-the-street compliments. Make one for yourself, or stitch up all four as gifts for the animal lovers in your life.
Variations
I love how one simple hat shape turns into four totally different characters just by swapping out the appliques. The hat body itself is nothing but single crochet worked in continuous rounds, so your hands get to move fast and mindlessly through the crown, sides, and brim transition — it's the kind of stitching you can do while watching TV. Then the real fun starts: those tiny circular appliques for the owl's big yellow eyes, the raccoon's black-and-white mask, the deer's branched antlers, or the squirrel's dimensional acorn are small enough to finish in one sitting, and watching a flat pile of little pieces turn into a recognizable face once you sew them on is so satisfying. I also love that the brim scallop edging gives every version a finished, boutique look without any extra fuss. Whether you're a fan of wise owls, mischievous raccoons, gentle deer, or cheeky squirrels, there's a version here that feels like it was made just for you — and honestly, once you've made one, you'll want to make all four.
Common mistakes
- Losing track of the round count while working the hat body in continuous rounds without a joining slip stitch.
- Place a stitch marker in the first stitch of every round and move it up as you go — this is essential since there's no seam to reference for where a round begins.
- Appliques like the owl eyes, raccoon nose, or squirrel ears coming out uneven in size because tension loosens over multiple small pieces.
- Crochet all matching pairs back to back in the same sitting and check them against each other before weaving in ends, so both eyes or both ears match exactly.
- Stitch counts drifting during the crown increases, leading to a rippled or cupped crown instead of a flat circle.
- Count your stitches at the end of every single increase round before moving on — catching an error one round early saves you from unraveling multiple rounds later.
- Sewing the appliques on with visible, sloppy stitches that pull the fabric and distort the hat's shape.
- Use a whipstitch or mattress stitch with yarn that matches the applique edge, pin pieces in place first, and sew through only the front loops of the hat body to keep stitches invisible from the outside.
- Skipping the gauge swatch and ending up with a hat that's too tight or too loose for a 22 to 23 inch head.
- Work the suggested chain-20 swatch in rows, block it lightly, and measure the center 4x4 inch area — size up your hook if your stitch count runs smaller than 18 stitches over 4 inches.
- Rushing the brim transition and scallop edging, causing the brim to curl inward instead of flaring outward.
- Work the increase rounds in the brim transition exactly as written and block the finished brim flat, pinning it in its flared position while damp so it dries with the correct shape.
Intermediate
Progress Tracker
0 of 0 rounds
Tap a round to tick it off — your place is saved on this device.
Materials
- Main Color (MC): Approximately 200 yards (183 meters) of worsted weight yarn in your chosen animal’s primary color
- Contrast Colors (CC): Small amounts of 15 to 30 yards (14 to 27 meters) each as listed below
MC
- medium brown (200 yards)
- CC1: golden yellow (20 yards) for eyes
- CC2: black (10 yards) for eye pupils
- CC3: orange (5 yards) for beak
MC
- medium gray (200 yards)
- CC1: black (25 yards) for mask and ear trim
- CC2: white (15 yards) for inner mask highlights
- CC3: dark charcoal or black (10 yards) for brim stripe accent
MC
- warm tan or light brown (200 yards)
- CC1: cream or off white (20 yards) for spots and face shading
- CC2: pink (10 yards) for inner ears
- CC3: dark brown (10 yards) for eyes and antler detail
- CC4: black (5 yards) for pupils
Optional
- two 12 mm brown safety eyes
MC
- rust or terracotta orange brown (200 yards)
- CC1: tan or light brown (15 yards) for face center and acorn cap
- CC2: medium brown (10 yards) for acorn body
- CC3: black (5 yards) for eyes
Optional
- two 10 mm black safety eyes
- Lion Brand Pound of Love works beautifully here. It is worsted weight, 100% acrylic, machine washable, and offers excellent stitch definition with a wide color range.
- Paintbox Yarns Simply DK held doubled creates a soft, slightly lighter fabric. If you go this route, hold two strands together throughout and definitely check your gauge before starting.
- Cascade 220 gives beautiful drape and stitch clarity if you prefer wool. Just note this yarn requires hand washing.
- Avoid highly textured, bouclé, or fuzzy yarns. The facial feature appliques will not show clearly against busy fabric.
- US size J (6 mm) crochet hook
- Stitch marker, locking type preferred
- Yarn needle for seaming and weaving ends
- Scissors
- Straight pins for applique placement
Optional
- hat form or balloon for blocking
Optional
- polyfill or yarn scraps for light stuffing
Crown
Begin with MC. Make a magic ring.
Step by step: Outer ear with MC (gray): Make a magic ring.
Step by step: With CC1 (cream), make a magic ring.
Step by step: With CC1 (tan), make a magic ring.
Step by step: Acorn body with CC2 (medium brown): Make a magic ring.
- Round 1Work 6 sc into the magic ring. Pull ring closed. (6 sc)Inc in each st. Join. Fasten off, leaving a tail. (12 sc) Sew the black inner ear onto the gray outer ear. Attach finished ears to hat crown approximately 2.5 inches apart.
- Round 2Inc in each st around. (12 sc)Step by step: Working in BLO: sc in each st. (12 sc).Sc in each st. Join with sl st. Fasten off, leaving a long tail. (12 sc) Place cap over top of acorn body and sew in place. Add a short stem by cutting a 3 inch length of CC2, folding in half, and pulling through the top center of the cap as a loop.Step by step: Sew completed acorn to lower center of tan face circle.(Sc 1, inc) rep 6 times. Fasten off, leaving a tail. (18 sc) Inner ear with CC1 (black): Make a magic ring.
- Round 3(Sc 1, inc) rep 6 times. (18 sc)Step by step: Sc in each st. (18 sc); (Sc 1, sc2tog) rep 6 times. (12 sc) Stuff lightly with yarn scraps.(Sc2tog) rep 6 times. (6 sc) Pull tail through remaining 6 sts and cinch closed. Fasten off.Step by step: Acorn cap with CC1 (tan): Make a magic ring.(Sc 2, inc) rep 6 times. Join with sl st. Fasten off. (24 sc) Sew to front center of hat, positioned approximately 3.5 to 4 inches up from the brim.
- Round 4(Sc 2, inc) rep 6 times. (24 sc)
- Round 5(Sc 3, inc) rep 6 times. (30 sc)(Sc 4, inc) rep 6 times. Join with sl st. Fasten off. (36 sc) Sew to front center of hat with the top approximately 5 inches up from the brim.
- Round 6(Sc 4, inc) rep 6 times. (36 sc)
- Round 7(Sc 5, inc) rep 6 times. (42 sc)
- Round 8(Sc 6, inc) rep 6 times. (48 sc)
- Round 9(Sc 7, inc) rep 6 times. (54 sc)
- Round 10(Sc 8, inc) rep 6 times. (60 sc)
- Round 11(Sc 9, inc) rep 6 times. (66 sc)
- Round 12(Sc 10, inc) rep 6 times. (72 sc) Checkpoint: Lay your work flat. The circle should measure approximately 6.5 inches (16.5 cm) in diameter. If it is significantly off, adjust your hook size and restart.
Owl Eye (Make 2)
Eye Layer 1, Black Pupil: With CC2 (black), make a magic ring.
- Round 1Work 6 sc into ring. Join with sl st. Fasten off, leaving a 6 inch tail. (6 sc) Eye Layer 2, Yellow Iris: With CC1 (golden yellow), make a magic ring.
- Round 1Work 6 sc into ring. (6 sc)
- Round 2Inc in each st around. Join with sl st. (12 sc)
- Round 3(Sc 1, inc) rep 6 times. Join with sl st. Fasten off, leaving a 12 inch tail for sewing. (18 sc)Assembly: Place the black pupil onto the center of the yellow iris with wrong sides together. Whipstitch around the outer edge of the black circle through both layers. The finished eye measures approximately 1.25 inches (3 cm) in diameter.
Owl Beak
With CC3 (orange), make a magic ring.
- Round 1Work 3 sc into ring. (3 sc)
- Round 2Inc in first st, sc 1, inc in last st. (5 sc)
- Round 3Sc in each st. Fasten off, leaving a tail for sewing. (5 sc) Do not stuff.
Owl Ear Tufts (Make 2)
With MC (brown), make a magic ring.
- Round 1Work 4 sc into ring. (4 sc)
- Round 2Inc in each st. (8 sc)
- Round 3Sc in each st. (8 sc)
- Round 4(Sc2tog) rep 4 times. (4 sc) Stuff lightly. Close the 4 remaining stitches by pulling the yarn tail through all 4 loops and cinching tight. Leave a long tail for attaching.Fringe: Cut 4 to 6 lengths of MC approximately 2 inches long. Fold in half and use a crochet hook to pull them through the top of each ear tuft as fringe. Fray the ends slightly.
Owl Ear Base (Make 2)
With MC, ch 2.
- Round 1Work 3 sc into the second ch from hook. (3 sc)
- Round 2Turn. Inc in first st, sc 1, inc in last st. (5 sc)
- Round 3Turn. Inc in first st, sc 3, inc in last st. (7 sc) Fasten off, leaving a long tail. Do not stuff.
Raccoon Mask
With CC1 (black), ch 18.
- Round 1Sc in second ch from hook and in each ch across. (17 sc)
- Round 2Ch 1, turn. Inc in first st, sc 15, inc in last st. (19 sc)
- Round 3Ch 1, turn. Sc across. (19 sc)
- Round 4Ch 1, turn. Inc in first st, sc 2, inc, sc 5, inc, sc 5, inc, sc 2, inc in last st. (24 sc)
- Round 5Ch 1, turn. Sc across. (24 sc) Fasten off CC1.
Inner Mask Highlight (Make 2)
With CC2 (white), make a magic ring.
- Round 16 sc into ring. (6 sc)
- Round 2Inc in each st. (12 sc)
- Round 3(Sc 1, inc) rep 6 times. Join with sl st. Fasten off. (18 sc) Sew one white circle onto each half of the black mask, leaving the center bridge clear.
Eyes: Embroider a horizontal oval approximately 0.5 inches wide in the center of each white circle using black yarn, or insert 12 mm black safety eyes before sewing to the mask.
Raccoon Nose
With CC1 (black), make a magic ring.
- Round 14 sc into ring. (4 sc)
- Round 2Inc in each st. Join. Fasten off. (8 sc) Sew centered at the bottom of the mask.
Deer Antlers (Make 2)
With CC3 (dark brown), ch 8.
- Round 1Sc in second ch from hook and in each ch to end. (7 sc)
- Round 2Turn, ch 1, sc 5. Leave 2 sts unworked to begin the branch shape. (5 sc)
- Round 3Turn, ch 1, sc in each st across. (5 sc)
- Round 4Turn, ch 1, sc 3. (3 sc)
- Round 5Turn, ch 1, sc 3. (3 sc) Fasten off. Rejoin yarn at the base of Row 2 on the unworked 2 stitches. Work 3 sc across those stitches and 1 chain space to form a short side branch. Fasten off.
Pin antlers to hat top approximately 2 inches from center, angled outward. Sew securely.
Deer Ears (Make 2 outer, 2 inner)
Outer ear with MC (tan): Ch 5.
- Round 1Sc in second ch from hook and in next 3 ch. (4 sc)
- Round 2Turn, ch 1, inc, sc 2, inc. (6 sc)
- Round 3Turn, ch 1, inc, sc 4, inc. (8 sc)
- Round 4Turn, ch 1, sc across. (8 sc)
- Round 5Turn, ch 1, sc2tog, sc 4, sc2tog. (6 sc)
- Round 6Turn, ch 1, sc2tog, sc 2, sc2tog. (4 sc) Fasten off. Inner ear with CC2 (pink): Repeat Rows 1 through 4, stopping after Row 4. Fasten off.Sew pink inner ear onto tan outer ear, aligning bottom edges. Fold the bottom slightly inward and sew beside each antler base.
Squirrel Ears (Make 2)
With MC (rust), ch 4.
- Round 1Sc in second ch from hook, sc 2. (3 sc)
- Round 2Turn, ch 1, inc, sc 1, inc. (5 sc)
- Round 3Turn, ch 1, inc, sc 3, inc. (7 sc)
- Round 4Turn, ch 1, sc across. (7 sc)
- Round 5Turn, ch 1, sc2tog, sc 3, sc2tog. (5 sc)
- Round 6Turn, ch 1, sc2tog, sc 1, sc2tog. (3 sc) Fasten off. Using CC1 (tan), embroider a smaller almond shape of satin stitch onto the center of each ear.Fringe: Cut 4 lengths of MC approximately 1.5 inches long. Fold in half and pull 2 loops through the tip of each ear as a fringe tuft.Attach ears to hat crown approximately 2 inches from center on each side.
Hat Body
- Round 13Sc in BLO in each st around. (72 sc) Working in the back loop only for this one round creates a crisp turning ridge between the crown and sides.
- Round 14through Rnd 29: Sc in each st around. (72 sc each round) Work these 16 rounds even without increasing or decreasing.Checkpoint: The hat body from Round 13 through Round 29 should measure approximately 3.5 inches (9 cm) tall.
Brim Transition
- Round 30(Sc 5, inc) rep 12 times. (84 sc)
- Round 31(Sc 6, inc) rep 12 times. (96 sc)
- Round 32(Sc 7, inc) rep 12 times. (108 sc)
- Round 33Sc in each st around. (108 sc)
Note for Raccoon variation: On Round 32, change to CC1 (black) for the final yarn over of the last stitch. Work Round 33 entirely in CC1 to create the dark brim stripe. Then fasten off CC1 and rejoin MC for the edging.
Brim Scallop Edging
Slip stitch to join the round at the start of Round 34.
- Round 34(Scallop Round): (Skip 2 sts, 5 dc in next st, skip 2 sts, sl st in next st) rep 18 times. Join with sl st to beginning sl st.Fasten off and weave in ends.
Note for Owl and Deer: Work the scallop edging as written. The owl’s scallops create a ruffled feather appearance.
Note for Squirrel and Raccoon: Work a plain brim instead. After Round 33, work 3 additional rounds of sc in each st around, then fasten off. This creates a cleaner, flatter brim edge.
Assembly
- Step 1Weave in all yarn ends securely using a yarn needle. For ends near appliques, weave through several stitches in different directions.
- Step 2For wet blocking, soak the completed hat in cool water for 10 minutes. Gently squeeze out excess water without wringing. Place the hat on a hat form, an inflated balloon, or a bowl of the appropriate size. Shape the brim flat and allow to dry completely.
Important notes
💡 Use a US J (6 mm) hook and worsted weight yarn as specified — a smaller hook will make the hat body stiff and hard to size correctly against the 18 stitch, 20 round gauge over 4 inches.
💡 Since the hat body is worked in continuous rounds with no joining slip stitch, a locking stitch marker in the first stitch of each round is non-negotiable for keeping your place.
💡 Crochet all appliques for one hat design before starting assembly so you can lay pieces out and check proportions — eyes, ears, and masks look different sewn on than they do sitting flat.
💡 Weave in ends on small appliques like the owl beak or raccoon nose extra securely, since these tiny pieces get handled a lot during sewing and ends can work loose.
💡 For the deer, insert the 12 mm safety eyes before sewing on any surrounding pieces like the antlers or ears, since those parts can make positioning the eyes accurately much harder afterward.
💡 Keep contrast color yarn amounts organized in small labeled bags per animal — with up to four contrast colors per design, it's easy to mix up which yarn belongs to which applique.
FAQ
Can I make this hat for a smaller head, like a teen or petite adult?
Yes — since the crown starts as a flat circle before the sides begin, you can work one or two fewer increase rounds to reduce the diameter, then continue with fewer straight single crochet rounds if needed for height. Just be sure to swatch first so your reduced stitch count still lines up with the gauge.
Do I need to know how to crochet appliques before starting this pattern?
Basic comfort with small circular pieces worked in the round helps, but each applique is only a few rounds long, so it's a great pattern to practice on. The hat body itself is simple single crochet, giving you low-pressure practice time before tackling the more detailed face pieces.
Which animal design is easiest for a first attempt at this pattern?
The squirrel tends to be the most approachable, since its ears and acorn are straightforward small pieces without the layered detail of the raccoon's mask with highlights or the deer's antlers and multiple spot appliques. The owl is a close second thanks to its simple eye and beak shapes.
What yarn works best if I want a softer, more huggable finished hat?
A worsted weight acrylic-wool blend gives nice structure for the brim while still feeling soft against the head. Stick to worsted weight to match the pattern's gauge of 18 stitches and 20 rounds over 4 inches with a US J hook.
How do I keep the brim from curling instead of flaring outward?
Work the brim transition's increase rounds exactly as written, since those increases are what create the flare, and finish with the scallop edging for extra structure. Lightly steam block the brim flat and let it dry fully before wearing to help it hold its shape.