
Free Pattern
Step-by-Step
Crochet
TopsAlternating stitch sleeveless top with shaped waist
A fitted sleeveless top shaped with alternating stitches, increases, and a slip stitched neckband.
- Level
- Intermediate
- Time
- 4-6 hours
- Hook
- 4.5 mm
- Yarn
- Worsted
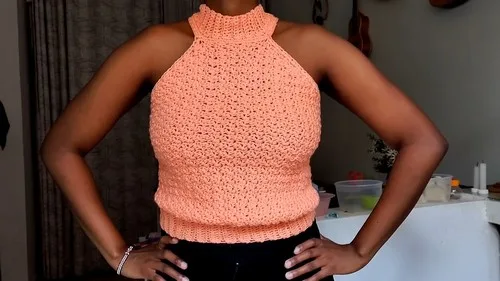
Pattern highlights
- Chain a foundation long enough to reach from under the armpit to your desired length.
- Work rows of alternating single and double crochet, keeping the stitches lined up as you go.
- Increase at the bust to widen the fabric before settling into a flat middle section.
- Decrease steadily until the stitch count returns to where the top began.
- Chain and single crochet a narrow strip, then slip stitch it around the neckline.
- Weave in ends and try the top on to check the fit.
About This Pattern
A sleeveless top like this one sits at the practical end of my pattern collection. It's not a novelty piece or a toy. It's something to wear on a warm afternoon, made with the same care as a blanket or a hat. I like that it starts with a simple chain and grows into shape through the stitches themselves, no separate pieces to sew. It's the kind of project that rewards patience over flash.
The body is built from alternating single and double crochet, a combination that gives the fabric a subtle texture without any fancy stitch work. Shaping comes from an increase row that widens the bust, then a decrease section that pulls the waist back in. The middle segment is worked flat for a stretch of rows before the pattern reverses itself, stitch for stitch. A short neckband finishes the edge, worked separately and joined with slip stitch.
Finished, the top has a fitted shape through the body with a waist that pulls in and releases again toward the hem. The neckline sits close, edged in a tidy band rather than left raw. It's the kind of piece that looks tailored even though every row was worked flat, back and forth. A good project for someone who wants a wearable with real shaping, not just a rectangle.
Worth knowing
What I like about this top is that the shaping isn't an afterthought. The increase row at the bust sits right inside the alternating stitch pattern. So does the decrease section at the waist, so the texture never breaks. There's no seaming a fitted bodice from flat pieces here. It just grows into shape as you go. The neckband is a small satisfying finish. It's worked as its own strip, then slip stitched into place row by row. That continues until the whole neckline is covered. It's a slow, rhythmic project, nothing fussy about it. But the fit at the end feels custom, not generic.
Common mistakes
- Losing the alternating stitch pattern Count single and double crochet as you go so the columns stay lined up row to row. It's easy to drift after a few rows.
- Uneven increase row Work the single, double, single increase into the very first stitch only, not spread across several. Check your count before moving to the next row.
- Skipping the turning chain Always chain 1 and flip before starting the next row. Forgetting it shifts the whole stitch pattern out of alignment.
- Mismatched decrease pairing Decrease one single crochet and one double crochet together, not two of the same type. That keeps the taper even on both sides.
- Neckband pulling too tight Keep the slip stitch join loose as you work it around the neckline. A tight join will pucker the fabric instead of lying flat.

Intermediate
Progress Tracker
0 of 0 rounds
Tap a round to tick it off — your place is saved on this device.
The kit
- Medium weight yarn
- 4.5 mm crochet hook
- Darning needle
- Measuring tape
- Scissors
- Stitch markers (4)
Foundation Chain
Make a slip knot.
Foundation ChainChain 35 (or enough to measure from under your armpit to desired length of the top).(35)
Body Panels
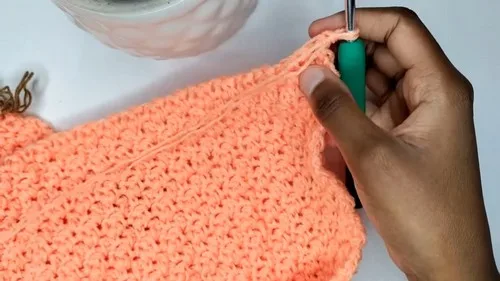
Row 1Skip the first chain. Single crochet in the back bump of the second chain. Double crochet in the next chain. Alternate single and double crochet to the end.
Row 2Chain 1 and flip your work. Continue alternating single and double crochet, aligning the stitch types from the previous row.
Row 3 (Increase)Chain 1 and flip. In the first stitch, work single crochet, double crochet, and single crochet (increase of 2 stitches). Continue alternating stitches.
Row 4 (No Increase)Chain 1 and flip. Alternate single and double crochet across.Repeat Rows 3 and 4 until ⅓ of your shoulder-to-shoulder measurement is reached (approx. 15 rows).
Middle Segment
Rows 1-12Work 12 rows of alternating single and double crochet (4 inches total).
Third Segment (Decrease):
Row 1Alternate single and double crochet.
Row 2Single crochet decrease, double crochet decrease, continue alternating.
Row 3Alternate stitches.Repeat Rows 2 and 3 until you’re back to your original 34 stitches.Make a second identical panel.Slip stitch both sides through the back loops only.Neckline Attach yarn at any of the 4 stitch marker points. Chain 25 (approx. 5.5 inches) and slip stitch to the opposite stitch marker.Single crochet 17 stitches along the neckline edge.Chain 25 and slip stitch to the opposite side again.Single crochet 17 stitches on the remaining edge.Slip stitch to close the round.Single crochet around the entire neckline.
Joining Panels Place panels right sides together.
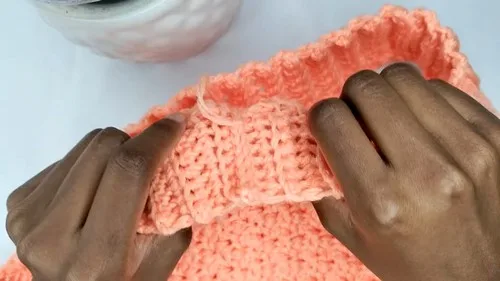
Neckband
Chain 7.
Single crochet in the second chain from hook and across (6 stitches).
Slip stitch into next 3 neckline stitches.
Flip and work back loop single crochet across.
Repeat until all neckline stitches are covered.
Join neckband ends with slip stitches.
Armholes Attach yarn at the panel seam.
Single crochet around the armhole.
Decrease if necessary to maintain a snug fit.
Repeat for the second armhole.
Waistband Work 10 foundationless single crochet stitches (approx. 2.5 inches).
Back loop single crochet across for multiple rows until the band fits snugly.
Slip stitch the ends together using back loops.
Mark waistband and bottom of the top into quarters.
Align the quarters and whip stitch the waistband to the top.
Finishing Touches Weave in all ends using a darning needle.
Try on the top and make adjustments if necessary.
Assembly
Step 1Weave in all ends using a darning needle.
Step 2Try on the top and make adjustments if necessary.
From the collection
Finishing
- Weave in all ends with a darning needle once the top and neckband are complete.
- Steam or wet block lightly to even out the alternating stitch texture.
- Try the top on and make any small adjustments before wearing.
Why it works
The increase row comes right after the opening rows, widening the bust at the first stitch.
The middle segment runs flat for a set stretch of rows. Then the decrease section mirrors it, pulling the waist back in.
The neckband is made as its own short strip. It's then slip stitched into the neckline, stitch by stitch.
What it becomes
- A layering piece for warm days, worn over a light camisole or alone.
- Pairs well with high-waisted jeans or a simple skirt for an everyday look.
- A handmade gift for someone refreshing their wardrobe for the season.
Original pattern: https://crocheteverything.com/diy-crochet-sleeveless-top-pattern-for-a-flawless-fit/
FAQ
Can I make the top longer or shorter?
Yes. The starting chain sets the length from armpit to hem, so add or subtract stitches there. The rest of the shaping stays the same.
What yarn works best for this top?
The pattern calls for medium weight yarn with a 4.5 mm hook. A smooth cotton or cotton-blend gives the alternating stitch the most definition.
Do I need advanced stitch skills?
No. It's built from single crochet and double crochet, alternated in a set order. The shaping comes from where you increase and decrease, not from complex stitches.
How does the neckband attach to the body?
It's crocheted as its own short strip, then slip stitched into the neckline stitches. You work it in sections until the whole edge is covered.