
Free Pattern
Step-by-Step
Crochet
AmigurumiAmigurumi Mouse Crochet Pattern: Adorable Little Softie
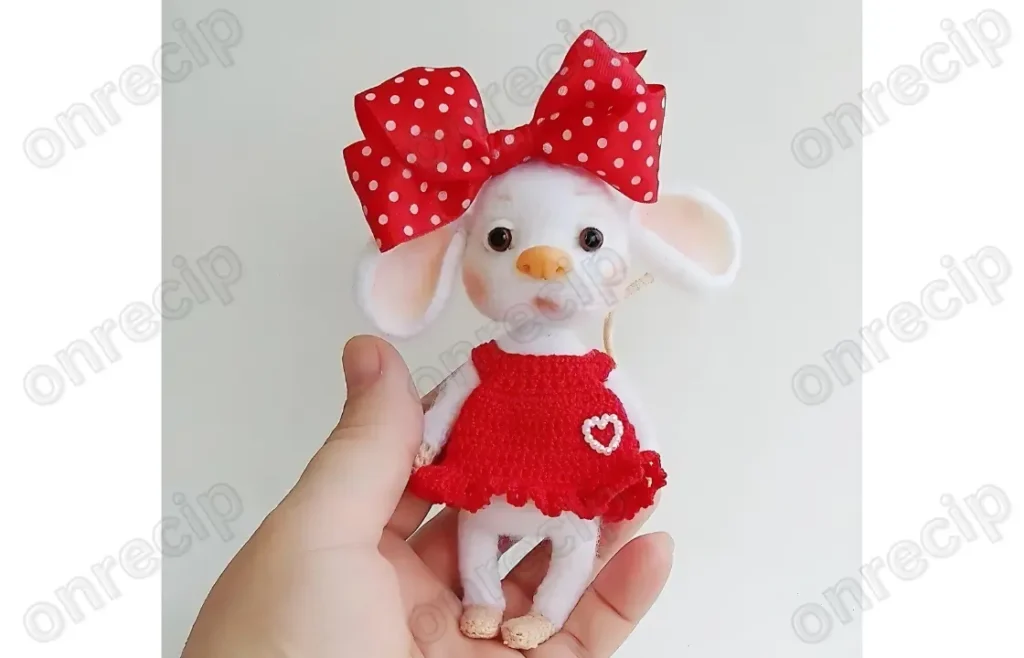
Make a sweet amigurumi mouse with this detailed crochet pattern covering head, body, ears, arms, and legs, perfect for gifting or your shelf.
Level IntermediateTime 4-6 HoursHook 1 mmYarn Fingering
Pattern highlights
- Begin the head with a magic ring and work steady increase rounds until it reaches its full rounded shape.
- Fasten off the head with a long tail left free for sewing it onto the body later.
- Crochet the body separately, building it up round by round to match the head in proportion.
- Make the upper arms quickly in the round, working just a couple of rounds after the starting increases.
- Start the lower legs from a small foundation chain, shaping the first round before continuing straight up.
- Finish one leg and set it aside, then keep the yarn attached on the second leg to flow directly into the body.
- Stuff the head, body, arms, and legs firmly before sewing all the pieces together.
- Add the ears, shape the eyes and mouth for personality, and attach a tail to complete the mouse.
About This Pattern
This amigurumi mouse pattern brings to life a charming little creature with a round head, plump body, tiny ears, and delicate limbs that just beg to be squeezed. What makes this design so special is how expressive it becomes with just a few placement choices for the eyes and mouth, letting every mouse you make have its own personality. It's perfect for amigurumi lovers who want a project that feels achievable in a weekend but still results in a genuinely impressive, gift-worthy softie.
You'll work almost the entire piece in continuous spiral rounds using basic single crochet, increases, and decreases, with the legs and arms starting from a simple foundation chain rather than a magic ring. Expect to spend a few focused evenings on this one — the head alone spans seventeen rounds of careful shaping. If you've made a few amigurumi before and feel confident reading round-by-round stitch counts, this pattern will feel like a satisfying, steady build rather than a steep learning curve.
The finished mouse is small enough to perch on a shelf or tuck into a gift bag, with a soft, huggable body that begs little hands to hold it. Depending on your yarn and hook choice, it lands somewhere between a petite 12 cm and a slightly larger 15 cm, making it flexible for different display spots or recipients. Whether you keep it simple or dress it up, this little mouse makes a thoughtful handmade gift or a delightful addition to your own amigurumi shelf.
Variations
There's something so satisfying about watching this little mouse take shape round by round — the head alone grows from a tiny six-stitch ring into a full, rounded shape over seventeen rounds, and every increase feels like real progress. I love how the lower legs start from a flat little foundation chain instead of the usual magic ring; it's a fun change of pace and gives the feet a slightly different, more grounded shape. The upper arms are wonderfully quick too, just a handful of rounds each, so you get that instant gratification of finishing a whole piece in one sitting. My favorite part is customizing the face — shifting the eyes a stitch or two apart completely changes the mouse's expression, and shaping the mouth between the last few rounds lets you decide if your mouse looks curious, sleepy, or mischievous. And because the ears are sewn on wherever you like, no two mice you make will ever look quite the same. It's a project that rewards patience but never feels tedious, and holding that finished little softie in your hands makes every round worth it.
Common mistakes
- Losing track of stitch counts
- Use a stitch marker at the start of each round and count out loud as you go, especially through the increase-heavy early rounds.
- Crocheting the lower legs too loosely
- Keep tension tight and firm throughout, and consider sizing down your hook slightly if your stitches look gappy.
- Forgetting to leave a long yarn tail
- Leave at least 12-15 inches of yarn after the final round of the head so you have plenty to sew it securely onto the body.
- Cutting the yarn on the second leg
- Remember only the first leg gets fastened off; the second leg's yarn continues directly into crocheting the body, so don't snip it early.
- Placing the eyes too close together or too high on the head.
- Test eye placement with pins between rounds 9 and 10 before securing, stepping back to check the expression looks balanced.
- Skipping firm stuffing in the arms
- Stuff the limbs a little more firmly than you think you need to so they hold their shape and don't go floppy over time.


Intermediate
Progress Tracker
0 of 0 rounds
Tap a round to tick it off — your place is saved on this device.
Materials
Yarn
- YarnArt Bella Baby (yields a mouse about 12 cm tall)
- YarnArt Jeans (alternative, yields a mouse about 15 cm tall)
Hook
- Clover 1 mm (use with YarnArt Bella Baby)
- Clover 1.5 mm (alternative, use with YarnArt Jeans)
Notions
- Stuffing (fiberfill), for filling the head, body, arms, and legs
- Wire or frame (optional), for posable arms and legs, or for a wire-wrapped tail
Head
- Round 16 sc into KA. (6)
- Round 26 inc. (12)
- Round 3(1 sc, inc) x 6. (18)
- Round 4(2 sc, inc) x 6. (24)
- Round 5(3 sc, inc) x 6. (30)
- Round 630 sc. (30)
- Round 7(4 sc, inc) x 6. (36)
- Round 8-936 sc. (36)
- Round 10(5 sc, inc) x 6. (42)
- Round 1142 sc. (42)
- Round 12(6 sc, inc) x 6. (48)
- Round 13-1648 sc. (48)
- Round 17(2 sc, dec) x 12. (36)
- Round 18(dec, 1 sc) x 12. (24)
- Round 1924 sc. (24)
- Round 20(1 sc, dec) x 12. (18)
- Round 2118 sc. (18)Fasten off, leaving yarn for sewing the head to the body.
Upper Arms (2 pieces)
Make 2Continue crocheting in a spiral after Round 1.
Fasten off and cut yarn after Round 12; make 2 pieces.
- Round 1Ch 4, starting from the second chain from the hook: (inc, 1 sc) x 2, inc. (8)
- Round 2-128 sc. (8)
Lower Legs (2 pieces)
Make 2For the 1st leg, fasten off and cut the yarn after reaching the desired length.
Use the yarn from the 2nd leg to continue crocheting the body; do not cut it.
- Round 1Ch 5, starting from the second chain: inc, 3 sc, 3 sc in the last stitch, 2 sc. (9)
- Round 2onward: 9 sc around each round, continuing in a spiral until the leg reaches the desired length (about 15-17 rounds total).
Body
Place a stitch marker at the center back to mark the start of the round.
After Round 2, you may insert a frame and stuff the legs; do not stuff the feet.
Join the upper arms in Round 18.
Insert a frame into the arms and stuff them lightly after Round 19; stuff the body as you crochet.
Fasten off and secure the yarn after Round 24.
- Round 1Ch 6 to connect both legs, then work 9 sc across the second leg, 6 sc across the chain, 9 sc across the first leg, 3 sc across the chain. (30)
- Round 230 sc. (30)
- Round 312 sc, 6 inc, 12 sc. (36)
- Round 4-1036 sc. (36)
- Round 11(4 sc, dec) x 6. (30)
- Round 12-1630 sc. (30)
- Round 179 sc, 6 dec, 9 sc. (24)
- Round 186 sc on the back, 8 sc on the arm, 12 sc on the chest, 8 sc on the other arm, 6 sc on the back. (40)
- Round 195 sc, dec, 6 sc, dec, 10 sc, dec, 6 sc, dec, 5 sc. (36)
- Round 20(4 sc, dec) x 6. (30)
- Round 21(3 sc, dec) x 6. (24)
- Round 2224 sc. (24)
- Round 23(2 sc, dec) x 6. (18)
- Round 2418 sc. (18)
Ears (2 pieces)
Make 2- Round 16 sc into KA. (6)
- Round 26 inc. (12)
- Round 3(1 sc, inc) x 6. (18)
- Round 4(2 sc, inc) x 6. (24)
- Round 5(3 sc, inc) x 6. (30)
- Round 6(4 sc, inc) x 6. (36)
- Round 736 sc. (36)Fasten off, leaving yarn for sewing the ears onto the head.
Assembly
- Step 1Shape the eyes between rows 9 and 10 of the head, about 6-8 stitches apart; placement can be adjusted as preferred.
- Step 2Shape the mouth between rows 15-17 of the head; placement can be adjusted as preferred.
- Step 3Sew the ears around row 6-7 of the head, or wherever preferred.
- Step 4The limbs can be started with a different color yarn and switched back to the main color when needed.
- Step 5The tail can be crocheted and sewn on, or made by wrapping wire with yarn; customize as desired.
- Step 6Clothing is optional and can be added to taste; no specific pattern is given.
- Step 7If not using a frame, reduce the lower legs to about 5-6 rounds to fit the foot size, and stuff the legs and entire mouse more firmly.
Important notes
Both yarn and hook combinations listed will work, but keep in mind the finished size changes noticeably between the two — choose based on whether you want a petite 12 cm mouse or a larger 15 cm one.
The upper arms and lower legs are small, fast pieces, so it's worth making both at once to keep your gauge and tension consistent between the pair.
Since the lower legs start with a foundation chain rather than a magic ring, take care to work into the correct starting chain stitch to avoid an uneven first round.
Save a generous yarn tail after finishing the head specifically for sewing it onto the body — this makes attachment far easier than starting fresh with new yarn.
Eye and mouth placement is intentionally flexible in this pattern, so don't be afraid to experiment with pins before committing to stitches or safety eyes.
If you plan to dress your mouse in tiny clothing, consider this before final stuffing, as some outfits are easier to fit onto a slightly less firm body.
The finished size depends on the yarn and hook used; using YarnArt Bella Baby with a 1 mm hook gives a mouse about 12 cm tall, while YarnArt Jeans with a 1.5 mm hook gives about 15 cm tall.
Pattern by Marina Chirkova.
Original pattern: https://onrecip.com/free-crochet-amigurumi-mouse-pattern/
FAQ
What size hook and yarn should I use for a beginner-friendly result?
The YarnArt Bella Baby with a 1 mm hook gives the classic smaller 12 cm mouse, but if very fine hooks feel tricky, the YarnArt Jeans with a 1.5 mm hook produces a slightly larger, easier-to-handle 15 cm version with the same stitch pattern.
Do I need safety eyes or can I embroider the face?
This pattern leaves eye placement flexible between rounds 9 and 10, so either safety eyes or embroidered eyes work well; just decide before you stuff the head firmly, since safety eyes need to be inserted while it's still open.
Why does only one leg get cut and the other doesn't?
The second leg's working yarn is intentionally left uncut so you can continue directly into crocheting the body without joining new yarn, creating a seamless transition between leg and body.
Can I make the ears bigger or smaller than the pattern suggests?
Absolutely, since the ears are sewn on at your preferred spot around rows 6-7 of the head, you have room to adjust their size or angle slightly for a different look while keeping the same basic shaping technique.
How much yarn do I need in total for one mouse?
The exact amount depends on your yarn weight and hook choice, but because the pattern uses fine yarns like YarnArt Bella Baby or YarnArt Jeans, one small skein is typically more than enough for a single mouse with color to spare.