Free Pattern
Step-by-Step
Crochet
AccessoriesAutumn maple butterfly earrings crochet pattern
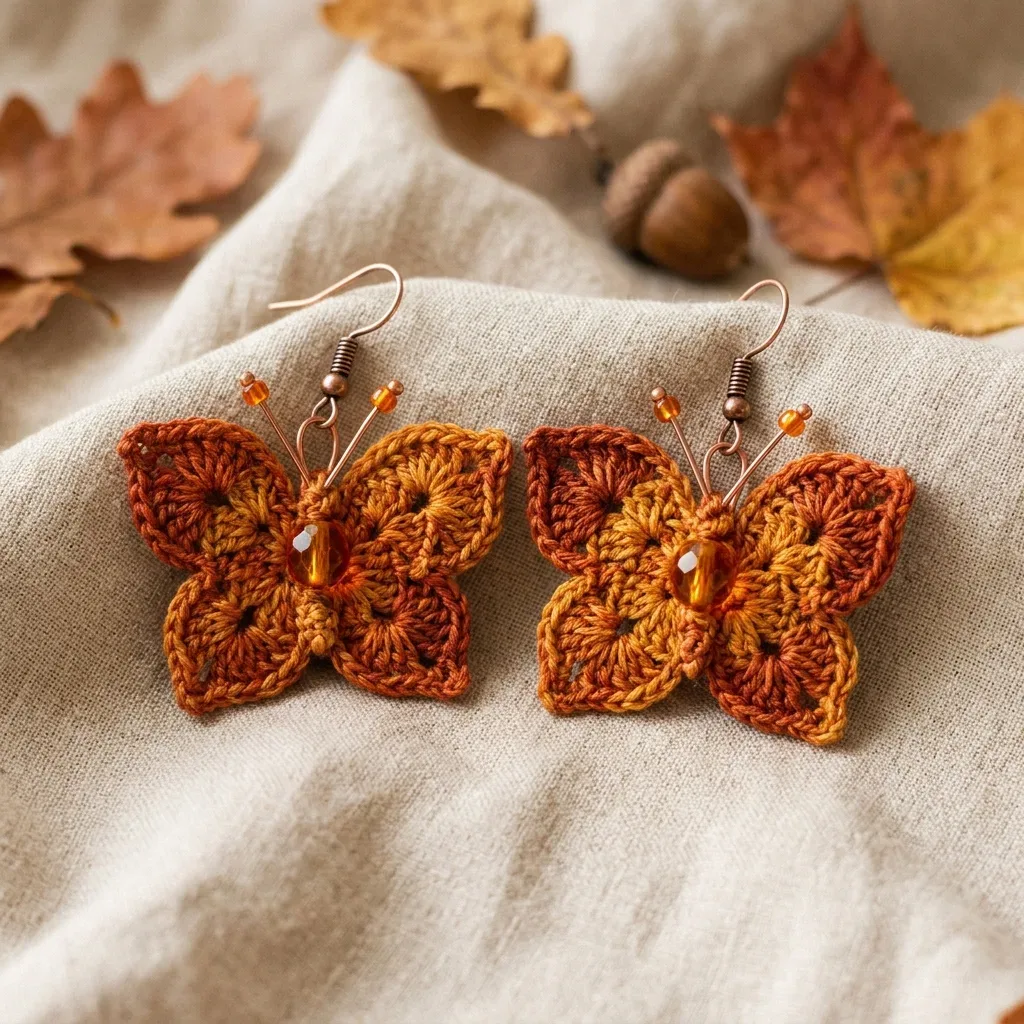
A small thread butterfly motif turned into a pair of stiffened, beaded autumn earrings.
- Level
- Intermediate
- Time
- 2-3 hours
- Hook
- 1.65 mm
- Yarn
- Size 10 Thread
Pattern highlights
- Start with a magic ring, then chain four stitches to set up the first upper wing without closing the ring yet.
- Work the right upper wing's fan of stitches into the ring, ending with the treble stitches at the outer tip.
- Return along the same edge with an edging round that adds shell stitches and picots for texture.
- Move into the right lower wing directly from the center ring, without fastening off between sections.
- Repeat the same upper and lower wing sequence on the left side to complete all four wings.
- Weave in both tails at the center back where the wings meet.
- Thread a bead through the center line, then stiffen the motif and attach ear wires.
About This Pattern
I keep a running list of thread projects that feel like jewelry rather than yardage, and this pair earns a spot near the top. A butterfly motif this small asks for patience, not stash. It slots in beside my other miniature crochet experiments, the ones worked in cotton thread rather than yarn. If you've made lace doilies or thread snowflakes before, the scale here will feel familiar, just condensed into two wings and a bead.
The construction leans on shell stitches and picots worked into a tight magic ring, then an edging round that turns a plain fan of stitches into something with texture. Each wing starts as a simple sequence of single, half double, double, and treble crochet, then gets dressed up on the return pass. The continuous joined construction means you never fasten off between wings, so the whole motif grows from one working thread.
What comes off the hook is a compact, four-winged butterfly no bigger than a coin, stiffened flat and hung from a copper ear wire. The upper wings carry the treble tips and double picots; the lower wings stay rounder and smaller. Seed beads catch light along the edges, and a single bead anchors the center line where all four wings meet.
Worth knowing
There's something satisfying about watching a handful of stitches turn into a wing shape in two short rounds. The shell stitches puff out at the center of each lobe, the picots peek out at the tips, and suddenly a flat fan reads as a butterfly. I like that the upper and lower wings use almost the same recipe, just scaled down, so your hands learn the pattern fast. The continuous joined construction keeps you moving forward instead of fastening off and rejoining four separate times. And because it is thread, not yarn, the whole pair works up quickly, so you get a finished, wearable object in one sitting rather than one skein at a time.
Common mistakes
- Magic ring left too loose Pull the ring closed firmly before starting the edging round, or the wing center will show a gap.
- Losing track in the edging round Work slowly and match each new stitch to the parent stitch below it, since the round travels back over stitches just made.
- Picots pulled too tight Leave a little slack in the chain before slip stitching the picot closed, or the tip disappears into the seam.
- Shell stitches crowded or uneven Work all five double crochets into the same stitch with even tension so the shell bump reads as one bump, not five separate points.
- Skipping the stiffener Fabric stiffener or spray starch keeps the wings flat and crisp; without it the motif can droop and lose its shape as an earring.
Intermediate
Progress Tracker
0 of 0 rounds
Tap a round to tick it off — your place is saved on this device.
The kit
Yarn
- Size 10 crochet cotton thread or fingering-weight yarn in a variegated autumn colorway. You will need approximately 15 yards per earring, so 30 yards total for the pair. Look for colorways that blend rust, burnt orange, and golden amber for that authentic fall leaf look.
Suggested Yarns
- Lizbeth Size 10 Crochet Cotton in Autumn Splendor
- Scheepjes Catona 50 in Rust (388) and Caramel (179) held together
- DMC Petra Size 5 in shades 5976 and 5977
Hook
- Steel crochet hook size 7 (1.65 mm) for size 10 cotton thread, or size B-1 (2.25 mm) for fingering-weight yarn. Adjust to achieve gauge.
Notions
- 2 copper fish-hook ear wires
- 8 small orange or amber glass seed beads (size 11/0)
- 4 to 6 small amber seed beads
- Tapestry needle
- Wire cutters and round-nose jewelry pliers
- Scissors
- Fabric stiffener or spray starch (optional but strongly recommended)
Upper Wing 1 (Right Upper Wing)
Round 1of Wing 1: Into the MR, work the following sequence: sc 1, hdc 1, dc 3, tr 2, dc 3, hdc 1, sc 1. Pull the MR closed firmly. (12 sts in MR)This row of stitches forms the curved outer edge of the right upper wing. The treble stitches sit at the outermost tip.(12)
Round 2of Wing 1 (edging): Chain 1, do not turn. Working back along the outside of the stitches just made: sl st into first sc, sc into hdc, hdc into first dc, shell stitch (5 dc) into center dc, hdc into next dc, picot into first tr, sc into second tr, picot, hdc into next dc, shell stitch (5 dc) into next dc, hdc into next dc, sc into hdc, sl st into last sc. Slip stitch back toward the MR center. (22 surface sts plus 2 picot loops)
Checkpoint: Your right upper wing should now be a rounded fan shape, approximately 0.9 inches wide at its widest and 0.75 inches tall. The outer edge has two shell bumps separated by picot tips at the top point.
Lower Wing 1 (Right Lower Wing)
The lower wings use a slightly shorter stitch sequence to create a smaller, rounder wing lobe.
Do not fasten off. From the center ring, chain 3.
Round 1of Lower Wing 1: Into the MR, work: sc 1, hdc 2, dc 3, hdc 2, sc 1. (9 sts in MR for this wing segment)
Round 2of Lower Wing 1 (edging): Chain 1, do not turn. Working back along the outside: sl st into first sc, sc into first hdc, hdc into second hdc, shell stitch (5 dc) into center dc, hdc into next dc, shell stitch (5 dc) into next dc, hdc into next hdc, sc into last hdc, sl st into last sc. Slip stitch back toward center MR. (20 surface sts)
Checkpoint: The right lower wing should be a compact rounded lobe, approximately 0.75 inches wide and 0.6 inches tall, noticeably smaller than the upper wings.
Center Setup
Make a magic ring (MR). Chain 4. This chain-4 counts as the foundation chain to begin the first upper wing. Do not close the ring yet.
Upper Wing 2 (Left Upper Wing)
Round 1Do not fasten off. Slip stitch back to the magic ring center. Chain 4 to begin the second upper wing, positioned on the opposite side of the first wing.
Round 2Repeat Round 1 and Round 2 of Wing 1 exactly, working into the same MR center.
Round 3After completing Round 2 of Wing 2, slip stitch back to the center ring.
Checkpoint: Both upper wings are now complete. The piece should resemble the top half of a butterfly, approximately 1.75 inches wide across the two wings. The wings should lie flat.
Lower Wing 2 (Left Lower Wing)
Round 1Do not fasten off. Slip stitch back to the center ring. Chain 3 to begin the left lower wing.
Round 2Repeat Round 1 and Round 2 of Lower Wing 1 exactly, working into the same MR center.
Round 3After completing Round 2 of Lower Wing 2, slip stitch back to the center ring.Fasten off, leaving a 6-inch tail for weaving in and anchoring the body bead.
Total Motif Checkpoint
Your full butterfly motif should measure approximately 1.75 inches wide across the upper wings and 1.5 inches tall from top to bottom. The motif should lie flat with no cupping. If it cups, block firmly or redo with a slightly larger hook.
Assembly
Step 1Step 1: Weave in Ends: Thread your starting tail and finishing tail onto a tapestry needle. Weave each tail through several stitches at the center ring on the wrong side. Knot securely but do not trim yet.
Step 2Step 2: Attach Body Bead: Thread the finishing tail through your tapestry needle. Pass the needle up through the center ring from wrong side to right side. Thread the amber bugle bead vertically through the center of the butterfly, positioning it along the center line where all four wings meet. Pass the needle back through the center ring. Pull snug so the bead sits vertically at center. Secure with two or three knots on the wrong side. Now trim all tails.
Step 3Step 3: Shape Wire Antennae: Take one 4-inch piece of copper wire. Using round-nose pliers, fold the wire in half to find the center. At the center point, make a small loop approximately 3 mm in diameter. This loop attaches to the motif. Thread 2 seed beads onto each antenna wire end (4 beads total). Trim each wire end to approximately 1.5 inches from the center loop. Using pliers, curl each wire tip into a tiny closed loop to keep beads from sliding off.
Step 4Step 4: Attach Antennae: Insert the center loop of your shaped antennae through the top center of the butterfly, between stitches at the top of the center ring, from right side to wrong side. Gently close the loop snugly against the back of the motif.
Step 5Step 5: Attach Ear Wire: Open the loop at the bottom of the copper fish-hook ear wire using pliers (twist sideways, do not pull apart). Thread through the center loop of the antennae wire. Close securely with pliers.
Step 6Step 6: Blocking: This step is optional but makes a huge difference. Lightly mist the butterfly with water or apply diluted fabric stiffener. Pin flat onto a foam blocking mat, spreading each wing into its rounded shape. Allow to dry completely, about 1 to 2 hours.
Step 7Step 7: Make Your Second Earring: Repeat all steps for your matching earring.
Finishing
- Weave both starting and finishing tails through several stitches at the center ring on the wrong side, then knot before trimming.
- Pass the finishing tail through to the right side and thread a bead through the center line where all four wings meet.
- Stiffen the finished motif with fabric stiffener or spray starch before attaching the copper ear wires, so the wings hold their shape.
Why it works
The upper wing packs 12 stitches into the magic ring while the lower wing uses 9, which is what makes the upper wing the larger, pointed one.
Because the edging round works back along the outside of the same stitches without turning, the front stays the right side throughout, so no seam shows on the surface.
The lower wing continues straight from the same center ring with a chain 3, without a break, which is what makes this a continuous joined motif rather than pieces sewn together afterward.
What it becomes
- A pair to wear with a rust sweater or plain denim when you want a small handmade detail.
- A quick handmade gift for a friend who collects thread jewelry or small crochet pieces.
- Stock for a craft fair or small shop table, paired with matching thread bracelets or bookmarks.
FAQ
Can I use fingering-weight yarn instead of size 10 thread?
Yes, the pattern lists a B-1 hook for fingering weight instead of the steel hook. Just watch your tension so the motif still holds a crisp shape.
Is the fabric stiffener really necessary?
It's optional but strongly recommended in the pattern. Without it the wings can droop, since thread on its own has little structure.
Why does the pattern use two colors held together?
One version calls for two shades of Scheepjes Catona held together, which blends into that mottled autumn leaf effect. You could try a single variegated thread instead for a similar look.
How much thread do I actually need?
About 15 yards per earring, so 30 yards for the pair, per the materials list. Buy a little extra if you're new to picots, since tension adjustments use more thread.