Free Pattern
Step-by-Step
Crochet
AccessoriesLayered sunflower crochet headpiece with band cover
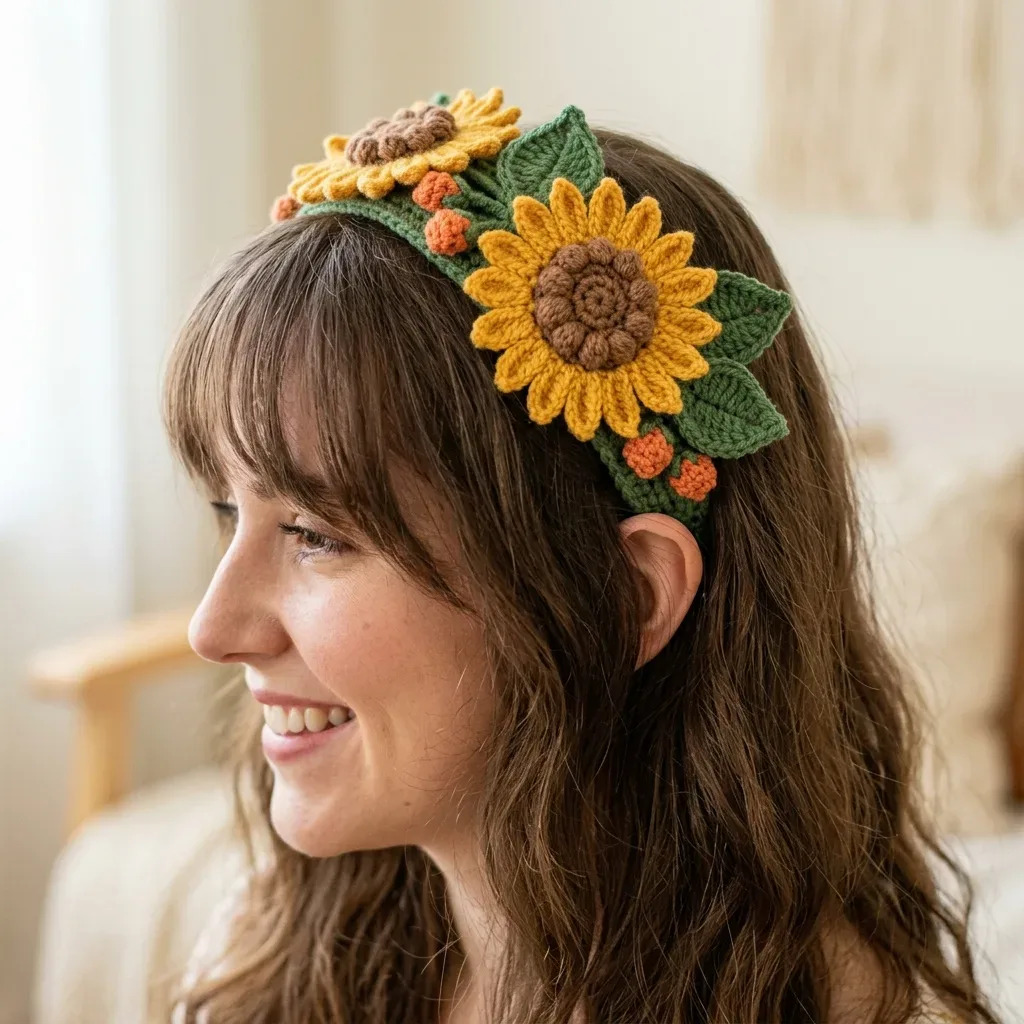
A crochet headpiece with layered sunflower petals, berries, and leaves worked around a plastic headband.
- Level
- Intermediate
- Time
- 5-8 hours
- Hook
- 3.5 mm
- Yarn
- DK
Pattern highlights
- Start with the band cover, working single crochet rows directly around the plastic headband until it is fully encased.
- Build each sunflower center disc from a magic ring, increasing steadily until the base lies flat.
- Repeat the center-and-petals process for the second large sunflower, then make the smaller one in a different color combination.
- Crochet the leaves separately, then block everything — flowers pinned open, leaves pinned flat with a pointed tip.
- Pin the finished sunflowers and leaves onto the covered band in your preferred arrangement before sewing them down.
About This Pattern
I keep this one in the floral-accessory section of my mental collection, next to the flower crowns. It is not a garland and not a brooch. It is a structured headpiece built around a store-bought headband, which is its own small category. Collectors of novelty motifs will recognize the sunflower center disc immediately. What makes this project worth a slot is the petal technique, not the flower shape itself.
The construction leans on front-loop and back-loop crochet. Both layers come from the same round, one base, two petal heights. The center discs start with a magic ring and grow through standard increase rounds, flattening as they go. The band cover is worked flat in rows, single crochet wrapped straight around the plastic headband. Back-loop-only rows add a ridged texture against the smooth right side. If you have never tried treble crochet, the petals double as a quiet lesson.
The result is a dimensional headpiece. Two large sunflowers, one small sunflower, and a scatter of leaves sit fixed to a covered band. The petals sit open and layered, not flat appliqués. It reads like a wearable botanical study, not a simple trim. Once blocked and sewn into place, it holds its shape without wire. The glue option stays optional, for extra hold if you want it.
Worth knowing
What I like here is the petal trick. Front loop makes the inner layer, back loop makes the outer, both from the same round. It is efficient, and it looks clever once you see it worked. The treble crochet petals on the large sunflower add real dimension. That is not a flat doily shape. Blocking does real work too. Pinning the petals open changes the whole character of the flower. The band cover satisfies in a different way. Tight single crochet wraps the plain plastic headband until it disappears. None of the individual pieces are large. You finish a leaf or a petal layer quickly. That keeps momentum going even through the fiddly parts.
Common mistakes
- Loose band cover stitches Keep the sc tight and even around the headband. Adjust the count in increments of two if gaps show.
- Petal layers in the wrong loop Work the inner layer into front loops and the outer into back loops of the same round. Mixing them up flattens the dimensional effect.
- Losing the round-three stitch count Mark the start of the round before splitting into petals. It is easy to lose count once both loop layers are in play.
- Rushing treble crochet tension Practice a few treble stitches before the petals if they are new to you. Uneven tension shows more here than in plain single crochet.
Intermediate
Progress Tracker
0 of 0 rounds
Tap a round to tick it off — your place is saved on this device.
The kit
Yarn (DK weight, category 3)
- Color A, Forest Green: approximately 120 yards or 110 meters
- Color B, Golden Yellow: approximately 80 yards or 73 meters
- Color C, Warm Brown: approximately 30 yards or 27 meters
- Color D, Burnt Orange: approximately 15 yards or 14 meters
Recommended Yarn Options
- Lion Brand Comfy Cotton Blend works beautifully here. The 50% cotton and 50% microfiber blend gives clean stitch definition with a slight sheen that photographs well.
- Paintbox Yarns Simply DK offers excellent color consistency and stitch definition at a budget-friendly price point.
- Paintbox Yarns Cotton DK provides a firmer hand that helps petals hold their shape without stiffening spray.
- Avoid fuzzy or textured yarns for this project. You need clear stitch definition so the petal and leaf shapes read properly.
Hook
- US size E-4 or 3.5 mm
Notions
- Yarn needle
- Scissors
- Stitch markers
- Small amount of fiberfill or yarn scraps for stuffing berries
- Straight pins for assembly
- Sewing thread and needle in green for reinforcing (optional but recommended)
Section 1: Band Cover
Using Color A (Forest Green) and your E-4 or 3.5 mm hook, hold the plastic headband in your non-dominant hand with the outer curve facing up.
Step by step: Using Color D (Burnt Orange) and your E-4 or 3.5 mm hook.
Round 1Setup Insert hook into the space beside the headband, yo with Color A, pull up a loop, ch 1 (does not count as a stitch). Work sc tightly around the headband from one end to the other, encasing the band. Work approximately 60 sc across the outer curve of the band, keeping stitches snug and evenly spaced. Check that the band is fully enclosed and does not show through. (60 sc)A note about Row 1: The exact stitch count will vary depending on your specific headband. The goal is a tight, even cover with no gaps. Adjust your stitch count in increments of 2 if needed.
Round 2Ch 1, turn. Working in BLO, sc across. (60 sc)(Sc2tog) rep 6 times. (6 sc) Stuff lightly with a small pinch of fiberfill or a yarn scrap.Rnd 4 (Berry Closing Round): Cut yarn leaving a 10-inch or 25 cm tail. Thread tail onto yarn needle. Pass needle through the front loop of each of the 6 remaining stitches. Pull tight to close. Knot securely. Leave remaining tail for sewing.
Step by step: Each berry is a small sphere approximately 0.5 inches or 1.25 cm in diameter.
Checkpoint: You should have between 10 and 14 berries, each firm and round, with no fiberfill showing.
Round 3Ch 1, turn. Sc across. (60 sc) Repeat Row 3 until the cover wraps over the top of the headband. You will work approximately 6 to 8 rows total depending on your band width. The fabric should wrap snugly without pulling or gapping.
After your final row, do not fasten off. Fold the crocheted fabric over the band and sl st the final row to the foundation row on the underside of the band to close the cover. You can use your yarn needle or hook to connect through both layers. Fasten off and weave in ends securely.
Checkpoint: Your headband should be completely encased in forest green fabric with no plastic showing. The cover should not slip when you handle it.
Section 2: Large Sunflower (Make 2)
Using Color C (Warm Brown) and your E-4 or 3.5 mm hook.
Center Disc:
Round 1Make a MR. Work 6 sc into the ring. Pull ring closed. (6 sc)
Round 2Work 2 sc in each st around. (12 sc)
Round 3(Sc in next st, 2 sc in next st) rep 6 times. (18 sc)
Round 4(Sc in next 2 sts, 2 sc in next st) rep 6 times. (24 sc)
Round 5(Sc in next 3 sts, 2 sc in next st) rep 6 times. (30 sc) Sl st to next st to even tension. Do not fasten off. The center disc should measure approximately 1.5 inches or 3.8 cm in diameter. Change to Color B (Golden Yellow).
Inner Petal Layer:
Round 6(Inner petals, worked in FLO of Rnd 5): Working into the front loops of Rnd 5 only, (sl st into next st, ch 2, 4 dc in same st, ch 2, sl st into same st) rep 10 times, working into every 3rd st and skipping 2 sts between petals. You will use all 30 sts of Rnd 5 as 10 petal bases with 2 skipped sts between each. (10 petals)Work the sl st and petal sequence into stitches 1, 4, 7, 10, 13, 16, 19, 22, 25, and 28. This distributes 10 petals evenly around the 30-stitch disc.After completing Rnd 6, sl st into the back loop (the unworked loops from Rnd 5) of the first stitch of Rnd 5 to reposition. Do not cut yarn.(10)
Outer Petal Layer:
Round 7(Outer petals, worked in BLO of Rnd 5): Working into the back loops of Rnd 5 only, (sl st into next st, ch 3, 2 tr into same st, ch 3, sl st into same st) rep 10 times into the same stitch positions used in Rnd 6. (10 long petals)
These longer petals will fan out behind the inner petals, creating that beautiful two-layer effect. Fasten off, leaving a 12-inch or 30 cm tail for sewing.
Checkpoint: Each large sunflower should measure approximately 4 inches or 10 cm in diameter with 10 inner petals and 10 outer petals visible from the front.
Section 3: Small Sunflower (Make 1)
Using Color C (Warm Brown) and your E-4 or 3.5 mm hook.
Center Disc:
Round 1Make a MR. Work 6 sc into the ring. Pull ring closed. (6 sc)
Round 2Work 2 sc in each st around. (12 sc)
Round 3(Sc in next st, 2 sc in next st) rep 6 times. (18 sc) Sl st to next st. Change to Color B (Golden Yellow).
Inner Petal Layer:
Round 4(Inner petals, worked in FLO of Rnd 3): Working into the front loops of Rnd 3 only, (sl st into next st, ch 2, 4 dc in same st, ch 2, sl st into same st) rep 6 times, working into every 3rd st (stitches 1, 4, 7, 10, 13, 16). (6 petals)(6)
Outer Petal Layer:
Round 5(Outer petals, worked in BLO of Rnd 3): Working into the back loops of Rnd 3 only, (sl st into next st, ch 3, 2 tr into same st, ch 3, sl st into same st) rep 6 times into the same stitch positions used in Rnd 4. (6 long petals)Fasten off, leaving a 12-inch or 30 cm tail for sewing.
Checkpoint: The small sunflower should measure approximately 2.5 inches or 6.5 cm in diameter.
Section 4: Leaves (Make 6 to 8)
Using Color A (Forest Green) and your E-4 or 3.5 mm hook.
Ch 14.
Round 1(RS): Starting in 2nd ch from hook, sc in next 5 sts, hdc in next st, dc in next st, hdc in next st, sc in next 4 sts, work 3 sc in the last ch (this is the tip of the leaf). Do not turn. Working back along the opposite side of the foundation chain, sc in next 4 sts, hdc in next st, dc in next st, hdc in next st, sc in next 5 sts. Sl st to first sc to join. (30 sts around the leaf perimeter, plus 3 sc at tip)
The leaf is worked in a single pass around both sides of the foundation chain, creating an oval with a pointed tip at one end.
Fasten off, leaving a 10-inch or 25 cm tail for sewing.
Lightly press each leaf flat with a cool iron or block with pins to flatten and shape the point.
Checkpoint: Each leaf should be a flat, pointed oval approximately 2.5 inches or 6.5 cm long and 1 inch or 2.5 cm wide.
Assembly
Step 1Blocking the flowers: Mist each sunflower motif lightly with water and pin the petals flat in an open arrangement on a foam blocking board. Allow to dry completely, about 4 to 6 hours. This opens the petals and sets their shape.
Step 2Blocking the leaves: Pin each leaf to your blocking board with the center spine flat and the tip pinned to a point. Mist and dry.
Step 3Optional stiffening: Mix one part white school glue with one part water. Using a stiff-bristled paintbrush, paint the solution onto the right side of the flowers and leaves. Reshape petals and leaves while wet. Pin and dry completely. This gives a firm, sculptural result that holds its shape during wear.
Step 4Do not block the band cover while it is on the headband. Moisture may warp some plastic headbands.
Finishing
- Weave in loose ends on the band cover, both sunflowers, and all the leaves before you start assembly.
- Block the sunflowers with petals pinned open. Block the leaves flat with the tip pinned to a point.
- Pin the sunflowers and leaves onto the band cover, then sew each piece down with matching thread.
Why it works
The center disc starts in a magic ring. It doubles through steady increases, then slows to the standard rate that keeps a circle flat.
The inner and outer petal layers share one round. The inner works into front loops, the outer into back loops of the same stitches.
The band cover is worked flat, in rows, not in the round. A rigid, open headband needs a flat wrap, not a closed tube.
What it becomes
- A statement accessory for a themed photo session, paired with loose waves or a simple braid.
- A display piece on a mannequin head or styling stand, alongside other floral motifs in a collection.
- A hair accessory for an outdoor garden gathering, worn with solid-color clothing so the sunflowers stand out.
FAQ
Can I use a headband that is not exactly 14 inches?
Yes. Adjust your single crochet count around the band in increments of two until it fits snugly, since headbands vary.
Why does the pattern call for treble crochet on the petals?
The taller stitch gives the outer petal layer more height and curl than single crochet would. It is also a gentle way to practice treble if you have not used it before.
Do I need to stiffen the sunflowers with glue?
No, blocking alone sets the shape through pinning and drying. The glue-and-water finish is optional, mainly for extra hold if the piece gets handled a lot.
Is this really an intermediate pattern, or closer to a beginner one?
The band cover and leaves are genuinely beginner-friendly. The layered sunflower petals, with their front-loop and back-loop split, are where the intermediate skill comes in.