Free Pattern
Step-by-Step
Crochet
AccessoriesCrochet sandals with nautical motifs and buckle straps
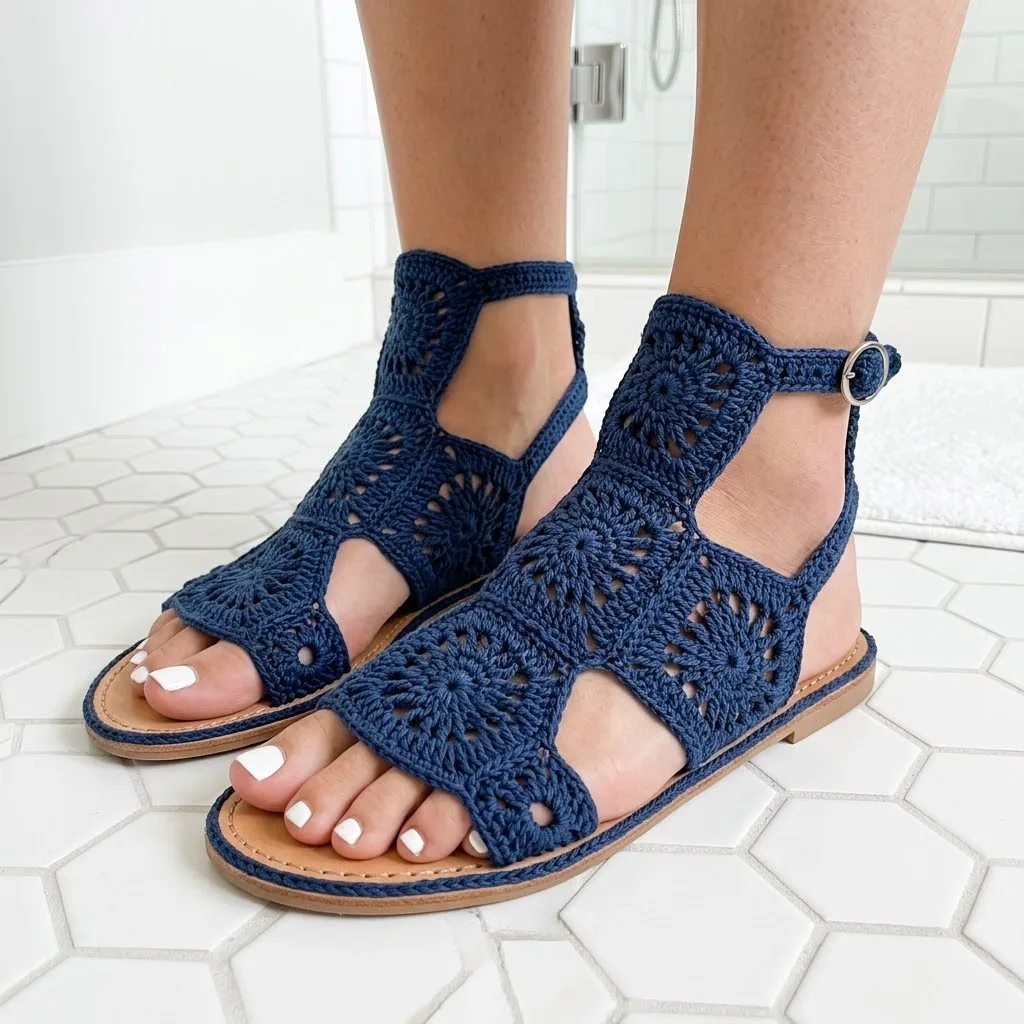
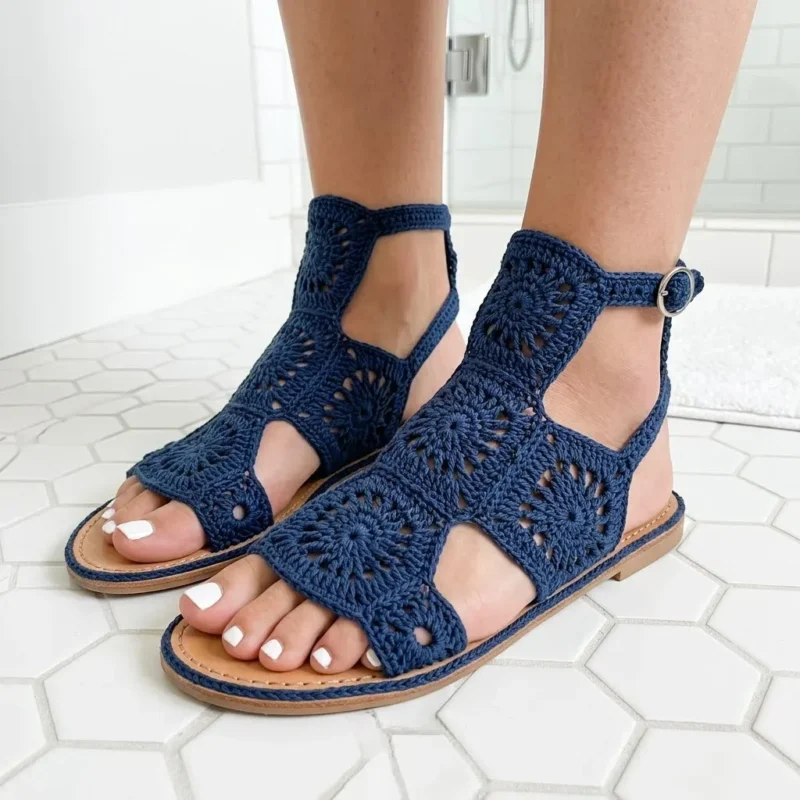
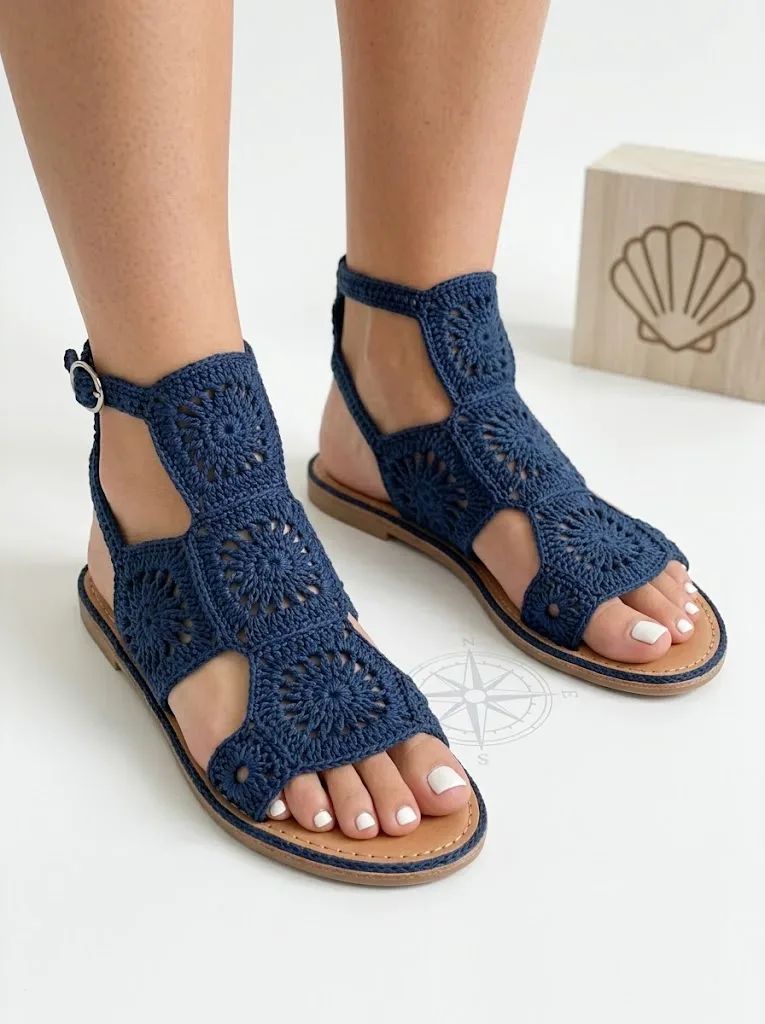
A crochet motif sandal built onto flip flop soles with a buckled ankle strap.
- Level
- Intermediate
- Time
- 4-6 hours
- Hook
- 3.5 mm
- Yarn
- DK
Pattern highlights
- Start each sandal's toe motif in a magic ring, then increase through double crochet rounds into a lacy circle.
- Work the ch-1 spaces and dc clusters that turn the plain circle into an openwork motif with loops.
- Join the toe motifs together, then pick up stitches to crochet the T-strap flat in single crochet rows.
- Build the ankle band in joined single crochet rounds, incorporating the top of the T-strap as you go.
- Shape a buttonhole into the back ankle extension so the buckle strap has somewhere to close.
- Glue the finished crochet pieces onto a purchased flip flop sole and thread the buckle through pre-punched holes.
About This Pattern
Footwear doesn't come up often in my notebook. Most entries are amigurumi or bags, not things you walk on. This sandal pattern earns its place differently. It treats crochet as structural, not decorative—motifs built to anchor onto an actual flip flop sole. I like projects that force the question of durability, and cotton yarn worked this way answers it. It sits in my collection as proof crochet can leave the shelf.
What comes off the hook is a navy cotton sandal. It has a round toe motif, a single-crochet T-strap, and a buckled ankle band. It photographs like it belongs near water, which fits the navy and coastal styling. The sole does the real work. The crochet just rides on top, held by glue and a few pre-punched holes. A wearable motif, which is rarer than it sounds.
Common mistakes
- Losing Round 3's ch-1 spaces Count stitches after Round 3 so you have 12 dc and 12 ch-1 spaces before starting Round 4.
- Gluing before the fit is confirmed Hold the strap and ankle band against your flip flop and foot before any glue goes down.
- Skipping the awl on tough rubber Pre-punch strap holes with an awl or thick needle; forcing a needle through rubber tears the strap.
- Working Part 2 the wrong length Adjust the row count for your own foot length; the pattern only gives a default for average sizing.
- Misaligning the buttonhole row Work Row 13 exactly as sc, ch 4, skip 4, sc, or the buckle won't thread through.
Intermediate
Progress Tracker
0 of 0 rounds
Tap a round to tick it off — your place is saved on this device.
The kit
- for Your Crochet Sandals
- Yarn
- Cotton yarn in DK weight (size 3) works best for this project. I recommend 100% mercerized cotton for its strength, slight sheen, and ability to hold up to foot traffic. You’ll need approximately:
- 150-200 yards for sizes 5-7
- 200-250 yards for sizes 8-10
Suggested yarns
- Drops Muskat, Scheepjes Catona, or Lion Brand 24/7 Cotton
- Cotton holds its shape better than acrylic for footwear, and it won’t get slippery or stretchy with wear. Trust me on this one.
Crochet hook
- 3.5mm (E/4) or size needed for gauge
Flip flop base
- Purchase inexpensive rubber flip flops in your size (leather-look soles work beautifully)
Small buckle
- One 15mm round buckle per sandal (2 total)
Tapestry needle
- For weaving ends
Stitch markers
- To mark starting rounds
- Fabric glue or E6000: For securing crochet to sole edges
- Scissors
- Optional But Helpful
- Awl or thick needle for pre-punching holes in flip flop straps
- Rubber thimble for pushing needle through tough materials
- Gauge
- One completed circular motif measures approximately 2.5 inches (6.5cm) in diameter.
- 4 double crochet stitches = 1 inch in pattern
Main Pattern
Round 1Create a magic ring. Ch 3 (counts as first dc throughout), work 11 dc into ring. Sl st to top of ch-3 to join. Pull ring closed. (12 dc)
Round 2Ch 3, dc in same st. 2 dc in each st around. Sl st to join. (24 dc)
Round 3Ch 4 (counts as dc plus ch-1), skip next st, *dc in next st, ch 1, skip 1 st.* Repeat from * around. Sl st to 3rd ch of beginning ch-4 to join. (12 dc, 12 ch-1 spaces)
Round 4Sl st into first ch-sp. Ch 3, 2 dc in same sp, ch 2. *3 dc in next ch-sp, ch 2.* Repeat from * around. Sl st to join. (12 clusters of 3 dc, 12 ch-2 spaces)
Round 5Sl st to center dc of first cluster. Ch 1, sc in same st. *Ch 5, skip ch-2 sp and next cluster, sc in center dc of following cluster.* Repeat from * around, ending with ch 5, sl st to first sc. (6 sc, 6 ch-5 loops)
Round 6Sl st into first ch-5 sp. Ch 3, 4 dc in same sp, ch 2, 5 dc in same sp. *Ch 1, (5 dc, ch 2, 5 dc) in next ch-5 sp.* Repeat from * around. Ch 1, sl st to join. (6 shell groups)(6)
This creates the lovely sunburst pattern visible in the sandals. The center is dense, and the edges have that beautiful petal effect.
Fasten off, leaving an 8-inch tail for joining.
Joining Motifs Lay out your motifs to plan placement. For a size 7-8 sandal, you’ll need: 2 motifs for the toe section (side by side)
2 motifs for the midfoot section (stacked behind toe motifs)
1-2 motifs for the ankle area
Join-as-you-go method: On the final round of subsequent motifs, replace the ch-2 at shell corners with: ch 1, sl st to corresponding ch-2 sp of previous motif, ch 1. This creates a flat, secure join.
Alternatively, whip stitch motifs together using your yarn tail after all motifs are complete.
T-Strap Section The vertical strap runs from the toe motifs up to the ankle.
Part 2
Round 1Join yarn to the center top of your toe motif assembly. Ch 1, work 8 sc evenly across the joining point. Turn. (8 sc)
Rounds 2–15Ch 1, sc in each st across. Turn. (8 sc) Adjust row count for your foot length. The strap should reach from toe motifs to just above your ankle bone.Fasten off.
Ankle Band
Part 3
Round 1Join yarn at side edge of top motif. Ch 1, work 30-40 sc evenly around the ankle opening, incorporating the top of the T-strap. Join with sl st to first sc. (30-40 sc)
Rounds 2–4Ch 1, sc in each st around. Join. (30-40 sc) For the buckle strap extension (one side only):
Round 5Working on back ankle section only, ch 1, sc in next 8 sts. Turn.
Rounds 6–12Ch 1, sc in each st across. Turn. (8 sc)
Round 13Buttonhole row Ch 1, sc in 2 sts, ch 4, skip 4 sts, sc in last 2 sts. (4 sc, ch-4 sp)
Round 14Ch 1, sc in 2 sts, 4 sc in ch-4 sp, sc in last 2 sts. (8 sc) Fasten off and weave in end.
Attaching to Flip Flop Sole This is where your sandals become real footwear.
Method 1: Crochet Edging
Work a round of sc around the entire flip flop sole edge, punching through the rubber with your hook every quarter inch or so. This creates an anchor row.
Then, using sl st or sc, attach your motif assembly to this edging, matching center toe motifs to center front of sole.
Method 2: Glue and Stitch
Apply fabric glue around the sole edge. Press crocheted upper firmly against glue. Let dry completely. Then add reinforcement stitches through the upper and around the sole edge where possible.
I prefer Method 1 for durability, but Method 2 works well if your flip flops have thick soles that resist a hook.
Finishing the Sole Edge
Work a final round of sc or sl st around the entire sole edge, encasing the raw flip flop edge in yarn. This gives that polished, professional look visible in the finished sandals.
Attach buckle to strap by folding the strap end through the buckle bar and stitching securely.
Tips for Success
Block your motifs before joining. Wet blocking cotton helps even out stitches and makes joining much easier.
Try on frequently during assembly. Feet are all different shapes. Adjust motif placement as needed.
Reinforce high-stress areas with extra stitches. The toe section and ankle strap attachment points see the most wear.
Consider adding a fabric liner to the sole for extra comfort. Trace your flip flop, cut from soft cotton fabric, and glue inside the sole cup.
Sizing Adjustments For smaller feet (5-6): Use fewer motifs or slightly smaller hook.
For larger feet (9-10): Add an extra motif to the midfoot section and lengthen the T-strap by 4-6 rows.
Width adjustments: The lace motifs have natural give, but for very wide feet, space motifs slightly further apart during joining.
Caring for Your Crochet Sandals
Hand wash in cool water with mild soap. Reshape and air dry away from direct heat or sunlight (which can fade that gorgeous navy).
For quick freshening, spot clean with a damp cloth and let dry completely before wearing again.
Store stuffed with tissue paper to help motifs keep their shape between wearings.
Make It Your Own This crochet sandal pattern is wonderfully adaptable. Try these variations: Color options: Cream for a beach wedding, rust for fall, or variegated cotton for a playful look
Embellishments: Add small wooden beads to the ch-5 loops in Round 5, or weave thin leather cord through the openwork
Sole alternatives: Espadrille rope soles, cork platforms, or even sturdy leather soles from a shoe repair shop
I’m so excited for you to try this step by step crochet tutorial and create your own gorgeous summer footwear. When you finish your sandals, I’d love to see them! Tag me on Instagram or share in our Facebook group so I can celebrate with you.
Save this crochet pattern to your Pinterest boards so you can find it when you’re ready to start. And please drop a comment below if you make these beauties. I read every single one and love hearing how your projects turn out!
From the collection
Finishing
- Weave in ends from each motif round before joining pieces, since the lace structure makes stray tails show.
- Attach the finished motif-and-strap assembly to the sole with fabric glue or E6000 along the edge.
- Thread the buckle through the punched holes, then test the fit before trimming any excess strap.
Why it works
The increases are front-loaded. Round 2 doubles the Round 1 stitch count. Rounds 3 and 4 convert plain dc into chain spaces and clusters, not more stitches.
Part 2 is worked in flat turned rows instead of joined rounds. That's what keeps the T-strap a straight strip, not a tube.
Part 3 rejoins into rounds for the ankle band. It then breaks into flat rows on the back section only, to build the buckle extension and buttonhole.
What it becomes
- Slip these on for a walk along a boardwalk or dock, where cotton won't mind a splash.
- Wear them with a simple sundress or linen pants for a coastal-casual look that doesn't try too hard.
- Keep a pair by the back door as slide-on sandals for quick trips to the mailbox or garden.
Original pattern: https://crochr.com/navy-nautical-crochet-sandals-in-coastal-bathroom-free-pattern/
FAQ
Do I need two buckles or just one?
Each sandal gets its own buckle, so you need one per sandal, two total for a pair. The materials list calls for a 15mm round buckle for each side.
Why does Part 2 call for adjusting the row count?
The toe strap length depends on your own foot, not a fixed number. It tells you to keep working rows until the strap reaches just above your ankle bone.
What glue should I use to attach the crochet to the sole?
The materials list names fabric glue or E6000 for securing the crochet to the sole edges. Either one is meant to hold cotton yarn against rubber without stiffening the strap too much.