
Free Pattern
Step-by-Step
Crochet
Baby & KidsAutumn Spice Gradient Baby Dress Crochet Pattern
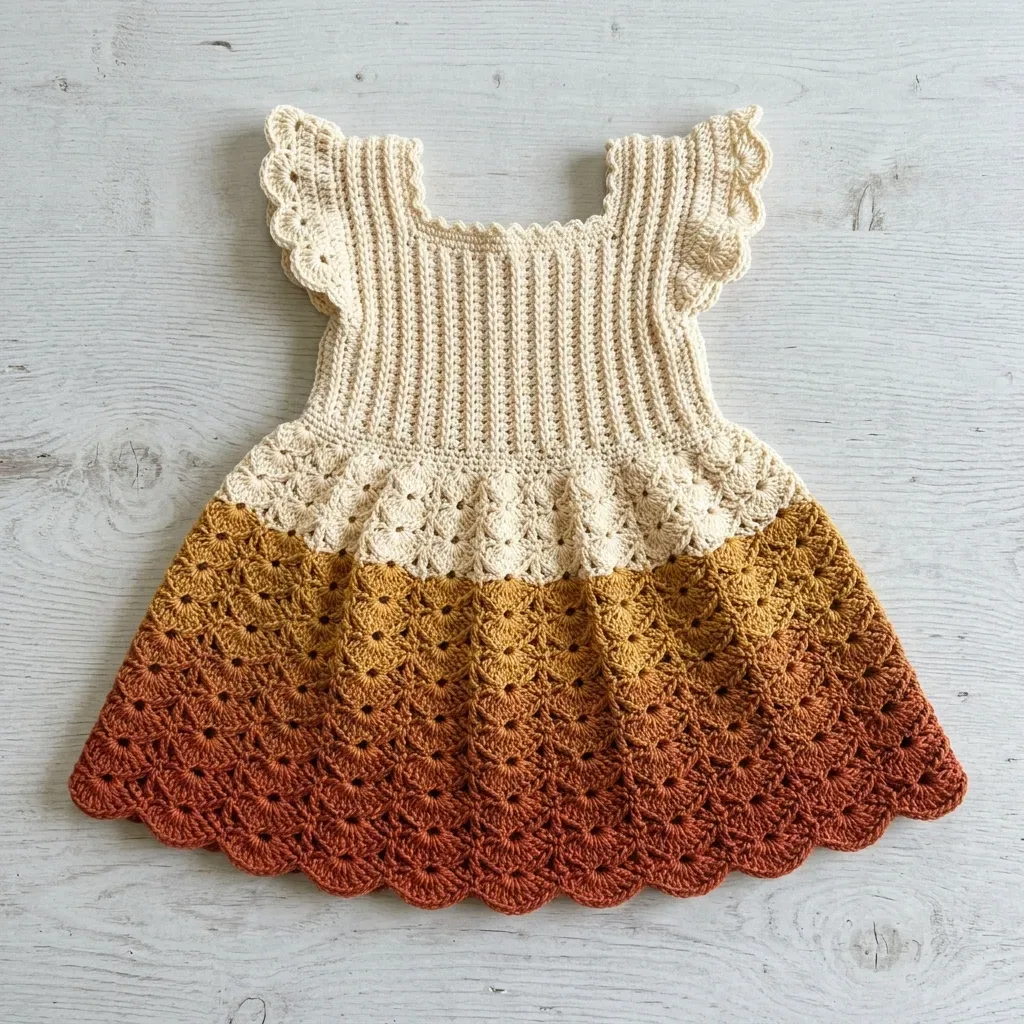
Crochet an autumn spice gradient baby dress with a ribbed bodice, fan shell skirt, and scalloped hem. Sizes 6-18 months, full written pattern.
Level IntermediateTime 8-14 HoursHook 3.5 mmYarn DK
Pattern highlights
- Crochet the Bodice Front Panel flat in back-loop-only single crochet rows until it reaches its finished ribbed height.
- Split the last few rows into two shoulder sections, fastening off with a long tail on the left side for seaming.
- Repeat the exact same construction for the Bodice Back Panel, matching the shoulder shaping row for row.
- Whipstitch the front and back shoulders together using the saved yarn tails, then join the side seams while leaving the top rows open for armholes.
- Join a new round at the bodice's bottom edge and work the Waist Ruffle rounds, increasing stitches to transition into the fuller skirt shape.
- Finish the bottom edge with a single round of scalloped hem border for a decorative, feminine trim.
- Work the Ruffle Sleeve Edging around each armhole opening to complete both sleeves and finish the dress.
About This Pattern
This gradient baby dress takes its cues from the richest colors of fall — cream, golden mustard, warm amber, and deep terracotta flow into one another from the bodice down through a swishy fan shell skirt. It's the kind of piece that makes you slow down and actually enjoy the process, with a snug back-loop-only ribbed bodice that gives way to a ruffled peplum and a full, twirly skirt. Perfect for crocheters who love color work but want something more approachable than intarsia or stranded colorwork.
You'll work back loop only single crochet ribbing for the bodice, simple whipstitch seaming at the shoulders and sides, dc-based increase rounds for the ruffle transition, and a fan shell stitch pattern through the skirt before finishing with a scalloped hem and ruffled armhole edging. It's rated advanced beginner to intermediate, so if you're comfortable with basic stitches and following a stitch count, you're ready. Set aside 8 to 14 hours total, easily split across a few cozy evenings.
The finished dress comes in two sizes — 6 to 12 months at an 18-inch chest and 14-inch length, or 12 to 18 months at a 20-inch chest and 15.5-inch length — with a fitted bodice that flows into a full, ruffly skirt. It has that heirloom-sweater feel while still being soft and stretchy enough for a squirmy baby, and it makes a genuinely showstopping baby shower or first-fall-photos gift.
Variations
The gradient concept in this dress is endlessly adaptable, so don't feel locked into the exact four colors. For a cooler palette, try dusty sage, ivory, slate blue, and plum instead of the warm cream-to-terracotta fade — same construction, completely different mood. If you want something for a spring baby, swap in blush, buttercream, and soft coral for a sherbet-inspired gradient. You could also go monochrome, using four tonal shades of the same color family (think palest blush through deep berry) for a more sophisticated, boutique look. For yarn substitutions, any DK weight (CYCA 3) yarn will work as long as you check gauge on the bodice ribbing — 14 stitches by 18 rows over 4 inches, lightly blocked. Cotton-blend DK yarns give the dress a crisper, more structured drape that's lovely for warmer climates, while a wool or wool-blend DK adds cozy loft for true autumn wear. If you're working with scrap yarn from your stash, this pattern is a fantastic way to use up leftover DK skeins in coordinating shades since the yardage per color is fairly modest. Size-wise, the pattern already includes both 6-12 month and 12-18 month options, but if you need something in between, you can add a few extra ribbing rows to the bodice before starting the shoulder shaping to lengthen the torso slightly. For a bolder ruffle effect, work an extra round of the Waist Ruffle transition in an accent color before moving into the skirt. And if you want to dress it up further, a coordinating headband or booties worked in the same fan shell stitch using leftover Color C or D yarn would make an adorable matching set.
I designed this dress because I wanted a baby project that felt like fall without leaning into anything literal — no leaves, no pumpkins, just that warm gradient moving from cream into mustard, amber, and terracotta. The back loop only ribbing on the bodice is so satisfying to work; it creates this subtle horizontal texture that looks intentional and structured, almost like a knit sweater, but it's all single crochet. Then that Waist Ruffle round hits and suddenly you're doubling your stitch count and the whole piece transforms from a flat little rectangle into something with movement and shape. The fan shell skirt is where this pattern really shines for me — once you get the rhythm down, it practically crochets itself, and watching the color changes stack up round after round is genuinely addictive. I also love that the shoulders and sides are simple whipstitch seams, no complicated finishing techniques, so even if colorwork transitions feel new to you, the construction stays friendly. By the time you add the scalloped hem and those little ruffled armhole edges, you have something that looks so much more complex than it actually was to make.
Common mistakes
- Working into both loops instead of back
- Double-check that you're inserting your hook under only the back loop of each stitch on every BLO row — this is what creates the ribbed texture and keeps the bodice stretchy. If your ribbing looks flat and smooth rather than textured, you've likely been working into both loops.
- Losing track of the stitch count
- Use stitch markers every 8-10 stitches as you work Rounds 1 and 2 of the Waist Ruffle so you can quickly verify your count matches 64 (72) after Round 1 and 96 (108) after Round 2 before moving on.
- Forgetting to leave the top rows open
- Before you start whipstitching, count down from the shoulder seam and mark where the top 4 rows end so you leave that section unseamed — this becomes your armhole opening for the Ruffle Sleeve Edging later.
- Cutting the Color A tail too short
- Leave a full 12-inch tail when fastening off the shoulder section; you'll need that length for whipstitch seaming, and a short tail means re-joining yarn mid-seam, which creates a visible join.
- Not adjusting the stitch count
- Read the size-specific instruction carefully — the 6 to 12 month size decreases with sc2tog worked 8 times evenly spaced, while the 12 to 18 month size works even with no decreases, since they're setting up different final counts for the fan shell pattern.
Intermediate
Progress Tracker
0 of 0 rounds
Tap a round to tick it off — your place is saved on this device.
Materials
Yarn (DK weight, CYCA 3)
- Color A (Cream): 120 yards for smaller size, 140 yards for larger
- Color B (Golden Mustard): 60 yards for smaller, 75 yards for larger
- Color C (Warm Amber): 70 yards for smaller, 85 yards for larger
- Color D (Deep Terracotta): 90 yards for smaller, 110 yards for larger
Recommended Yarns
- Paintbox Yarns Simply DK works beautifully for this project. Try Champagne White, Buttercup Yellow, Vintage Pink, and Burnt Red. Lion Brand Pound of Love is another excellent choice for baby items since it’s ultra-soft and machine washable. For a premium finish, Scheepjes Catona mercerized cotton gives the fan stitches crisp definition.
Hooks
- US size E-4 (3.5 mm) for the bodice
- US size F-5 (3.75 mm) for the skirt
Notions
- Yarn needle for weaving ends
- 4 to 6 stitch markers
- Scissors
- Rust-proof pins for blocking
Bodice Front Panel
Using Color A and E-4 hook, chain 33 (37 for larger size).
Bodice front panel should measure approximately 4.5 inches (5 inches for larger) tall after Row 20 (22). Do not fasten off.
Row 21 (23) forms the left shoulder section. Fasten off Color A on the left shoulder, leaving a 12-inch tail for seaming later.
Return to Row 20 (22); count 8 (9) stitches from each edge. The center 16 (18) stitches form the neckline opening. Skip those center stitches and rejoin Color A in the 25th (28th) stitch from the left edge to begin the right shoulder.
Fasten off the right shoulder with a 12-inch tail.
- Round 1(WS): Sc in 2nd ch from hook and in each ch across. Turn. [32 (36) sc]
- Round 2(RS): Ch 1, sc BLO in each st across. Turn. [32 (36) sc]
- Round 3through 20 (22 for larger size): Repeat Row 2. [32 (36) sc]
- Round 21 (Left)(23): Ch 1, sc BLO in first 8 (9) sts only. Turn. [8 (9) sc]
- Rnds 22-24 (Left)through 24 (24 through 26): Ch 1, sc BLO across. Turn. [8 (9) sc]
- Round 21 (Right)(23) Right Shoulder: Ch 1, sc BLO in first st and remaining 7 (8) sts. Turn. [8 (9) sc]
- Rnds 22-24 (Right)through 24 (24 through 26): Ch 1, sc BLO across. Turn. [8 (9) sc]
Waist Ruffle (Transition to Skirt)
With RS facing and F-5 hook, join Color A with a sl st to any stitch at the bottom edge of the bodice.
This ruffle creates the peplum effect and establishes your stitch count for the skirt.
These counts ensure your fan pattern divides evenly.
- Round 1Ch 3 (counts as first dc), work 1 dc in same st, work 2 dc in each st around. Sl st to top of beg ch-3. [64 (72) dc]
- Round 2Ch 3, dc in same st, dc in next st, (2 dc in next st, dc in next st) around. Sl st to top of beg ch-3. [96 (108) dc]
- Round 3Ch 1, sc in each st around, adjusting count as follows: 6 to 12 months - work sc2tog 8 times evenly spaced to reach [88 sc]; 12 to 18 months - work even [96 sc].(96)
Ruffle Sleeve Edging (Work on Both Armholes)
Make 2With RS facing and E-4 hook, join Color A to any edge stitch at the armhole. Work 3 dc into each stitch around the opening, then follow with 1 sc into each dc — the extra stitches create the ruffle effect naturally.
- Round 1Ch 3 (counts as dc), work 2 dc in same st, work 3 dc in each st around. Sl st to top of beg ch-3.
- Round 2Ch 1, sc in each dc around. Sl st to join. Fasten off.
Skirt
Skirt is worked in joined rounds using F-5 hook. All rounds begin with the appropriate chain and end with a slip stitch to join.
Color Sequence: Rounds 1-8 Color A, Rounds 9-14 Color B, Rounds 15-20 Color C, Rounds 21-27 Color D.
Skirt should measure approximately 8.5 (9.5) inches from waist to this point after Round 26.
- Round 1(RS, Color A): Ch 1, sc in same st as join, sk 3, (2 dc, ch 1, 2 dc, ch 1, 2 dc) in next st, sk 3, (sc in next st, sk 3, fan shell in next st, sk 3) rep around. Sl st to first sc. [11 (12) fans, 11 (12) sc]
- Round 2through 4: Continue in established fan shell pattern. Work fans into the center ch-sp of previous fans, work sc into sc between fans.
- Round 5(Increase Round): Work fan shells as established, but in each fan center ch-sp, work (2 dc, ch 1, 3 dc, ch 1, 2 dc). This adds 1 dc per fan. [11 (12) fans with 7 dc each]
- Round 6through 7: Work in established pattern with Color A.
- Round 8Work final round in Color A, changing to Color B on the last yarn over of the final sl st.
- Round 9through 12: Work in established pattern with Color B.
- Round 13(Increase Round): In each fan center ch-sp, work (2 dc, ch 1, 4 dc, ch 1, 2 dc). Each fan now has 8 dc.
- Round 14Work final round in Color B, change to Color C.
- Round 15through 18: Work in established pattern with Color C.
- Round 19(Increase Round): In each fan center ch-sp, work (2 dc, ch 1, 5 dc, ch 1, 2 dc). Each fan now has 9 dc.
- Round 20Work final round in Color C, change to Color D.
- Round 21through 25: Work in established pattern with Color D.
- Round 26(Final Increase Round): In each fan center ch-sp, work (2 dc, ch 1, 6 dc, ch 1, 2 dc). Each fan now has 10 dc.
Hem Scallop Border
Before the scallop border, work a foundation sc round: Ch 1, sc in each dc and ch-sp around. Adjust to 150 sc for smaller size (25 scallops) or 162 sc for larger size (27 scallops). Sl st to join.
Fasten off Color D.
- Round 27Ch 1, sc in first st, sk 2, 5 dc in next st, sk 2, (sc in next st, sk 2, 5 dc in next st, sk 2) rep around. Sl st to first sc. [25 (27) scallops]
Bodice Back Panel
Work exactly the same as the Bodice Front Panel, Rows 1 through 24 (26), including all shoulder shaping. The back neckline is identical to the front.
Assembly
- Step 1Shoulders: Hold front and back panels with wrong sides together (right sides facing out). Using your yarn needle and the Color A tail, whipstitch the right front shoulder to the right back shoulder across 8 (9) stitches. Repeat for the left shoulder.
- Step 2Sides: With wrong sides still together, align the side edges. Leave the top 4 rows open on each side for armhole openings. Whipstitch the side seams from the bottom edge through Row 20 (22).
- Step 3Checkpoint: Your joined bodice should measure approximately 5.5 (6) inches tall from waist to shoulder seam and approximately 18 (20) inches in circumference at the waist. The armhole openings should span about 2 inches vertically on each side.
Important notes
Block your bodice ribbing swatch before starting the full piece — BLO single crochet can appear tighter than expected, and lightly blocking will show you the true gauge of 14 stitches by 18 rows over 4 inches.
Work the Bodice Front Panel and Bodice Back Panel identically through all shoulder shaping rows; the back neckline uses the exact same construction as the front, so there's no need to modify anything.
Keep your Color A tails long (12 inches) at both shoulder fastening-off points since these tails do double duty for whipstitch seaming, saving you from weaving in and rejoining new yarn later.
Place stitch markers at the start of each round once you begin the Skirt's fan shell pattern, since it's easy to lose your place when the repeat spans multiple stitches across a long round.
Complete both Ruffle Sleeve Edging repeats (qty: 2) on each armhole opening after the side seams are joined, working with right side facing for a clean, consistent finish on both sides.
Skill Level: Advanced Beginner to Intermediate
Time Estimate: Approximately 8 to 14 hours depending on your experience level
Finished Sizes: 6 to 12 months - 18 inch chest, 14 inch length; 12 to 18 months - 20 inch chest, 15.5 inch length (adjustments noted in parentheses throughout)
Bodice gauge with E-4 hook in single crochet back loop only ribbing: 14 stitches x 18 rows = 4 inches, lightly blocked
Skirt gauge with F-5 hook in fan shell pattern: 1 fan shell repeat (9 stitches) = approximately 1.75 inches wide; 4 rounds of fan shell = approximately 1.25 inches tall
Gauge matters for garments! Make a swatch of at least 4 inches square in each stitch pattern before starting. Adjust your hook size up or down as needed.
FAQ
What size baby does this dress fit?
The pattern includes two sizes: 6 to 12 months with an 18-inch chest and 14-inch length, and 12 to 18 months with a 20-inch chest and 15.5-inch length. Choose based on your baby's current measurements or size up slightly if you want room to grow.
Can I use a different yarn weight instead of DK?
This pattern is specifically written for DK weight (CYCA 3) yarn and relies on the E-4 and F-5 hook sizes to hit the stated gauge. Substituting a heavier or lighter weight would change your finished measurements significantly, so it's best to stick with DK or swatch carefully and adjust hook size to match gauge.
How much yarn do I actually need for each color?
the smaller size you'll need about 120 yards of Cream, 60 yards of Golden Mustard, 70 yards of Warm Amber, and 90 yards of Deep Terracotta. The larger size needs slightly more of each: 140, 75, 85, and 110 yards respectively.
What does back loop only (BLO) actually do for this pattern?
Working BLO single crochet through the bodice rows creates a subtle ribbed, stretchy texture that helps the bodice hug baby's torso comfortably while still looking polished. It's the same technique used in a lot of sweater cuffs and hems, just applied to the whole bodice here.