Free Pattern
Step-by-Step
Crochet
Baby CrochetBaby Girl Crochet Scarf Pattern With a Jacket-Style Look
Crochet an adorable baby girl scarf with a jacket-style look using slip stitch ribbing, V-stitch, and a puff stitch border for a cozy handmade finish.
Level IntermediateTime 4-6 HoursHook 4.0 mmYarn 4-Ply
Pattern highlights
- Start the Front Panel and work the slip stitch ribbing across its rows to build a dense, textured base.
- Move to the Back Panel and complete its rows of V-stitch, alternating Row 2 and Row 3 for a total of 14 rows, for an open, contrasting texture.
- Work the ball lace border by chaining 6 and making the first puff into the 3rd chain from the hook.
- Chain three, then anchor each following puff into the top of the previous puff to build a connected chain of bobbles.
- Flip your work and lock each puff in place with a slip stitch into the third chain from the bottom.
- Chain three, skip one stitch or gap, and slip stitch into the next to attach, continuing all the way around the scarf's entire outer edge.
- Sew the edges of the front panel together with a small seam to form the complete jacket-style scarf shape.
- Weave in all ends, then attach buttons securely to finish the jacket-inspired look.
About This Pattern
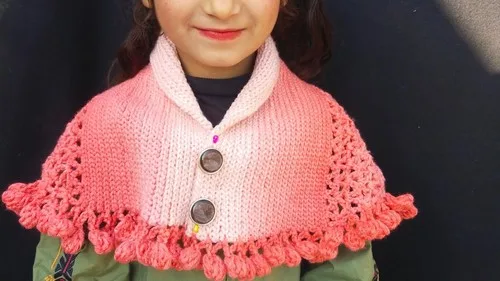
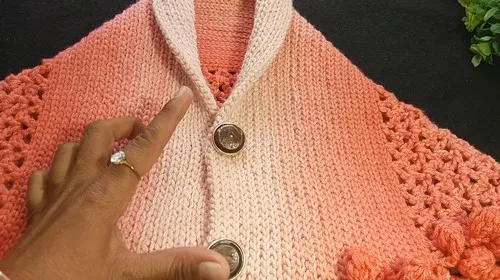
This Baby Girl Crochet Scarf is designed to look like a tiny jacket lapel wrapped snugly around a little neck, combining textured ribbing with a decorative V-stitch panel for a layered, tailored appearance. It's the kind of pattern that turns heads at family gatherings because it doesn't look like a typical scarf—it looks like a designer detail. Perfect for crocheters who want to make something for a baby girl that feels polished, boutique-quality, and totally huggable.
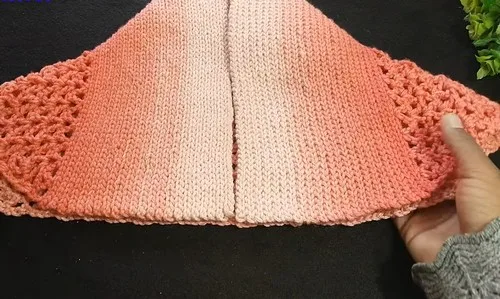
You'll work with two distinct panels: a Front Panel built from slip stitch ribbing for that classic knit-look texture, and a Back Panel featuring an open, airy V-stitch for contrast and drape. The real showstopper is the ball lace (puff stitch) border that finishes the entire edge, built from chains and incomplete double crochets pulled together into one loop. This is best suited for confident beginners to intermediate crocheters, and most makers finish it comfortably within a weekend, roughly 4 to 6 hours including the border.
The finished scarf has a structured, jacket-collar silhouette rather than a simple flat strip, with a soft wool hand and a scalloped, bobble-like edge running the full perimeter. Sized for ages 4 to 6 years, the scarf measures about 68 cm in length once finished. Buttons can be added for closure or purely as decoration, giving it a refined, ready-to-wear feel. It makes a beautiful baby shower gift, a first-birthday photo prop, or a keepsake piece that new parents will treasure long after their little one outgrows it.
Variations
This pattern is a dream for customizing to match any nursery or wardrobe. Try a classic blush pink Front Panel with an ivory Back Panel for a soft, girly contrast, or go bold with a dusty rose ribbing paired with a mustard V-stitch back for an autumn-inspired look. For a gender-neutral version, work both panels in a soft sage green or oatmeal, and swap the buttons for wooden toggle buttons instead of classic round ones. If you want a heavier, extra-cozy scarf for colder climates, size up to a 5.0mm hook and work with a light worsted weight yarn instead of 4-ply wool—just expect the finished piece to run slightly larger, so plan for a few extra puff stitch repeats around the border to keep the proportions balanced. Brands like Cascade 220 Superwash or Baby Soft both substitute beautifully for the 4-ply wool called for here, giving you similar drape with easy machine-washability, which is a huge win for baby items. For a seasonal twist, work the border puffs in alternating colors—say, cream and burgundy—to give it a festive, candy-cane-inspired edge without changing the base construction at all. You can also thread a length of coordinating ribbon through the top edge instead of using buttons, creating a soft tie-closure that's gentler for very young infants. If you're making this for an older toddler, consider adding a second row of puff stitch border stacked just inside the first for extra dimension and a chunkier, more textured finish. However you style it, this pattern is flexible enough to become a signature piece you make again and again in different palettes.
I adore how this scarf tricks the eye—it reads as a tiny jacket collar rather than a plain wrap, and that little bit of visual drama makes it so satisfying to gift. Working the slip stitch ribbing on the Front Panel gives you that dense, knit-like fabric that feels sturdy and warm against a baby's skin, while flipping to the V-stitch Back Panel is a fun change of pace since it works up so much faster and looser. But honestly, the ball lace border is the part I look forward to most. There's something almost meditative about the rhythm: chain, puff, chain three, flip, lock with a slip stitch, skip a gap, attach. By the time you've gone all the way around, you've got this gorgeous, bobbled edge that looks so much more advanced than it actually is. Add a couple of buttons at the end and suddenly you've made something that looks like it came from a boutique baby shop. It's a pattern that rewards patience with a genuinely impressive result, and that's exactly the kind of project I love sharing.
Common mistakes
- Pulling the puff stitch loops too tight
- Keep your loops relaxed and even as you build up the 4 incomplete dc stitches before pulling through, so the puff sits round and full instead of flat or puckered.
- Losing count of the 4 incomplete dc
- Pause after each yarn over and insert to physically count the loops on your hook before pulling through all of them together, ensuring every puff matches in size.
- Attaching the second puff
- Look for the small horizontal bar or ridge at the very top of the prior puff stitch and insert your hook there specifically, not into the surrounding chain.
- Skipping the slip stitch lock
- Always flip your work and locate the 3rd chain from the base of your last chain-3 before slip stitching in, which anchors the puff stitch shape correctly.
- Miscounting gaps or rows when skipping
- Use a stitch marker to mark every point where you attach with a slip stitch, so you can visually confirm you're skipping exactly one row or gap each time.
- Mixing up the Front Panel's slip stitch
- Block both panels flat before joining them so any tension differences even out, and check that your ribbing rows aren't pulled tighter than your V-stitch rows.
Intermediate
Progress Tracker
0 of 0 rounds
Tap a round to tick it off — your place is saved on this device.
Materials
- 4-ply wool yarn
- 4.0 mm crochet hook
- Buttons
- Scissors
- Tapestry needle
Front Panel (Slip Stitch Ribbing)
Begin with a slip knot Create a foundation chain in multiples of three measuring about 67–68 cm
- Row 1Skip the first chain, slip stitch in back loop of each chain across
- Row 2and onwards: Chain 1, turn, slip stitch in the back loop of each stitch across Continue until the panel measures 14 cm in width
Back Panel (V-Stitch)
Work along the long edge of the front panel
- Row 1Chain 3, skip 3 stitches, in the 4th stitch make a V-stitch (dc, ch 2, dc), skip 3, repeat across, end with 1 dc in last stitch
- Row 2Chain 3, dc in first stitch, skip first V-st, V-st in ch-2 space of each V-st across, end with 2 dc in top of turning chain
- Row 3Chain 3, skip first stitch, V-st in ch-2 space of each V-st, end with 1 dc in top of turning chainContinue alternating Row 2 and Row 3 for a total of 14 rows
Ball Lace Border
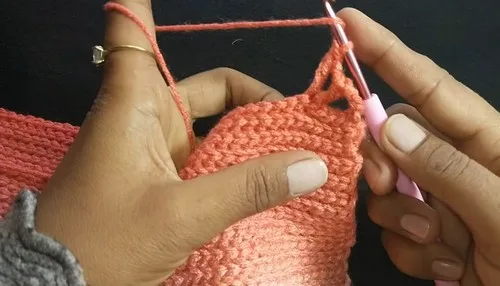
- BorderChain 6. First puff: Yarn over, insert in 3rd chain, make 4 incomplete dc, pull through all loops. Chain 3. Second puff: Yarn over, insert in top of previous puff, make 4 incomplete dc, pull through all loops. Flip, slip stitch into 3rd chain from the bottom to lock. Chain 3, skip one stitch or gap, slip stitch into the next to attach. Repeat the ball stitch border around the entire scarf edge, skipping one row or gap when attaching on sides.
Assembly
- Step 1Sew the edges of the front panel together with a small seam
- Step 2Attach buttons securely to complete the jacket style scarf
Important notes
💡 Use a 4.0mm hook consistently throughout both panels and the border to keep your gauge even between the ribbing and the V-stitch sections.
💡 Place a stitch marker at the start of each round on the Back Panel so you never lose track of where your V-stitch repeats begin.
💡 Choose a soft, machine-washable 4-ply wool since this scarf is for a baby, and always check the yarn label for safe washing instructions before gifting.
💡 When working the ball lace border, keep a small tapestry needle nearby to weave in the border's join tail immediately so it doesn't tangle with your working yarn.
💡 Sew buttons on securely with a double thread and tie off with a knot on the wrong side, since baby items need extra-secure fastenings for safety.
💡 Block the finished scarf gently by pinning it flat and lightly steaming, which helps the ball lace border pop and lie neatly around the edge.
💡 This scarf is sized for ages 4 to 6 years and measures about 68 cm in length once finished, so plan your yarn amount accordingly.
More photos
Original pattern: https://crocheteverything.com/baby-girl-crochet-scarf-pattern-with-jacket-style-look/
FAQ
Can I make this scarf without buttons?
Yes, the buttons are purely decorative in this pattern and can be left off entirely. Simply finish the ball lace border around the whole edge and the scarf will still look complete and polished.
What size baby is this scarf meant for?
This pattern is designed for children ages 4 to 6 years, with a finished length of about 68 cm. You can lengthen or shorten the panels slightly to fit a specific age, just keep the two panels proportional to each other.
Why does the Back Panel use V-stitch instead of matching the Front Panel's ribbing?
The V-stitch creates an open, lacy contrast that gives the scarf its layered, jacket-collar illusion rather than looking like a flat, uniform strip. It also works up faster, balancing out the denser slip stitch ribbing on the front.
My puff stitches look uneven, what went wrong?
Uneven puffs are almost always caused by inconsistent tension when pulling through the loops or miscounting the 4 incomplete dc stitches. Slow down, count your loops before pulling through, and keep your working yarn at a consistent, relaxed tension.
Can I use a different yarn weight than 4-ply wool?
Yes, you can substitute a light worsted weight yarn if you prefer, but you may need to size up to a 5.0mm hook for similar drape. Just be aware the finished scarf will come out slightly larger than the original 4-ply wool version.