Free Pattern
Step-by-Step
Crochet
AccessoriesBack loop half-double crochet fingerless gloves
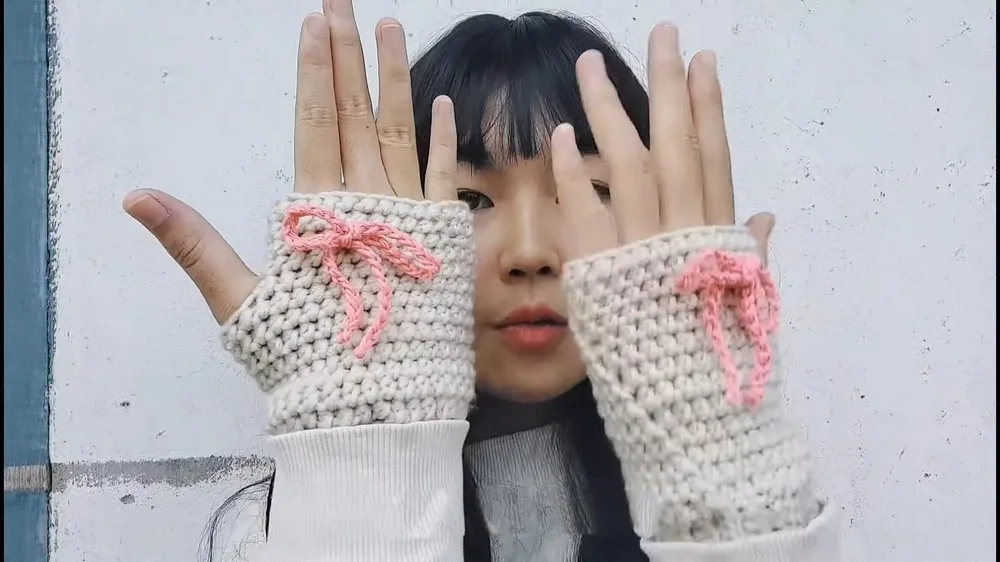
Fingerless gloves worked flat then joined, with a woven ribbon tie at the wrist.
- Level
- Intermediate
- Time
- 4-6 hours
- Hook
- 4 mm
- Yarn
- Worsted
Pattern highlights
- Chain a short ribbon length and work half-double crochet across it to make a wrist ribbon.
- Chain and turn to start the glove body, working back loop only half-double crochet across each row.
- Repeat that flat row until the strip wraps comfortably around your wrist.
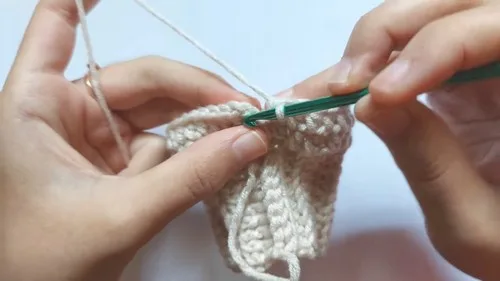
- Join the two edges into a tube with slip stitches to close the seam.
- Work half-double crochet in the round above the ribbon section for several rounds.
- Make a second glove and a second wrist ribbon to match the first.
- Weave a separately chained tie through the wrist section and knot the ends.
About This Pattern
Every notebook needs a wrist-warmer entry, and this one earns its place by keeping things plain. No cables, no lace, just half-double crochet asked to do quiet work. It sits next to the other small accessory makes in my collection, the kind I reach for when I want a finished object in an evening, not a project that argues back.
The technique here is back loop only half-double crochet, worked flat, row after row, until a strip is long enough to wrap a wrist. That strip becomes the body. A chain-twelve ribbon, worked in two rounds of hdc, rides alongside it and later gets threaded through for the tie. Two separate small pieces, one shared logic.
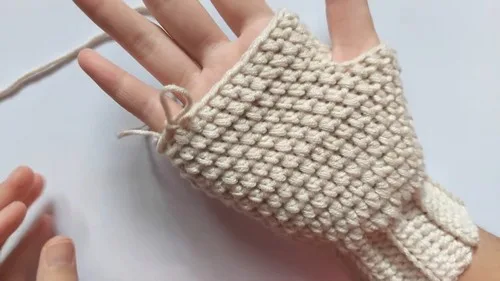
The finished object is a pair of gloves with texture from the BLO ridge and a drawn-through ribbon for adjustment. Cotton yarn keeps it light for wrist warmers rather than heavy winter mitts. It reads as a small, tidy make with a clever detail hiding in the seam.
Worth knowing
The satisfaction is in the ridge. Working every row in back loop only half-double crochet leaves a visible horizontal line on each row, so a plain stitch starts to look deliberate. Then there's the join: slip stitching two edges together into a tube is a small, almost sly move, turning a flat strip into a hand-shaped tube without any shaping math. The ribbon is the reward at the end, a woven-through detail that costs almost nothing in stitches but changes the whole look. Two identical wrist ribbons and two identical glove bodies also means once you've solved it once, the second glove is just repetition. Nothing here fights you. It's the kind of project that lets a stitch pattern be the whole point.
Common mistakes
- Missing the back loop Check that the hook goes under only the back loop each stitch. Working under both loops flattens the ridge that defines this piece.
- Skipping the turning chain Chain two at the start of every flat row before turning. Without it the row edge pulls tight and the strip narrows.
- Uneven wrist ribbon length Chain the same starting length for both wrist ribbons. Lay them side by side before working the hdc row to confirm they match.
- Twisted seam at the join Line up both edges carefully before slip stitching them together. A half-twist here shows up as a spiral in the finished tube.
- Losing count on rounds above the seam Mark the joining slip stitch at the start of each round with a scrap of yarn. It keeps the eight rounds above the ribbon section honest.
Intermediate
Progress Tracker
0 of 0 rounds
Tap a round to tick it off — your place is saved on this device.
The kit
- A ball of cotton yarn in beige and pink color (or any color of your choice)
- A 4mm crochet hook
- Scissors
- Yarning needle
Wrist Ribbon
Make 2Round 1Make a slip knot; chain 12 (for a longer ribbon, add more chains as desired).
Round 2Skip two chains, make a half-double crochet into the third chain; repeat half-double crochet in each remaining chain to complete the row.
Main Glove
Make 2Round 1Second Row Chain two and turn your work; make back loop only half-double crochet in each stitch across (insert hook into the back loop of the stitch only, then complete the half-double crochet as before).
Rounds 2–14Repeat chaining two, turning your work, and working back loop only half-double crochet in each stitch across every row until the ribbon part can wrap comfortably around your wrist. (15 rows total)
Round 15Match the two edges to form a tube and join them together with slip stitches, inserting the hook into both sides and making slip stitches across.
Round 16Chain 2, then make half-double crochet into every available space around the top of the wrist part; when you reach the start, make a slip stitch to join the round.
Rounds 17–24Chain two to start a new row, then make half-double crochet in each stitch around; repeat for eight total rows above the ribbon part.
Round 25Continue half-double crochet until you're just before where the thumb hole should be; chain three, skip about six stitches (adjust for size), and resume half-double crochet to create a loop for the thumb.
Round 26Continue crocheting around the thumb space, making sure to half-double crochet into each of the three chains when you reach the thumb space chain in the following round.
Rounds 27–39Continue for 13 rows above the thumb hole; after completing the desired length, chain one and cut the yarn, weaving in any loose ends with a yarning needle.
Assembly
Step 1Make a slip knot, then chain 60 (or desired length for the ribbon), cut the yarn, and make a knot at each end.
Step 2Use the crochet hook to weave the ribbon through the wrist part of the gloves, tying it for decorative and adjustment purposes.
Step 3Trim any yarn ends and ensure the ribbon is secured neatly through the wrist part of the gloves.
From the collection
Finishing
- Weave in yarn ends from both the glove body and the wrist ribbon pieces.
- Thread the separately made ribbon tie through the wrist section with the crochet hook.
- Knot the ribbon ends and trim any excess yarn close to the knot.
Why it works
The glove body is worked flat, row by row with a turning chain, so the back loop ridge lands consistently on every row before the seam closes it into a tube.
The slip stitch join across both edges is what turns the flat strip into the finger-opening shape, rather than any increase or decrease round.
What it becomes
- Everyday wear over a long-sleeve shirt, for typing or driving when fingers need freedom.
- A lightweight throw-on accessory paired with a cardigan on cool mornings.
- A quick handmade gift alongside a matching scarf or simple hat.
Original pattern: https://crocheteverything.com/easy-crochet-fingerless-gloves-pattern-for-wintry-weather/
FAQ
Why does the glove start as a flat strip instead of working in the round?
Working flat lets the back loop only stitch build a visible ridge on every row. That ridge would be harder to control if the whole glove were worked in continuous rounds from the start.
What is the wrist ribbon for exactly?
It is worked separately in two short rounds and set aside. The ribbon detail is a different chained piece that later gets woven through the wrist for tying and fit adjustment.
Can I use a different yarn color than the pattern suggests?
Yes, the pattern lists beige and pink as a starting point but says any color works. Cotton yarn at this weight is the main material constant, not the shade.
How do I know when to stop working the flat strip and join it?
The pattern says to keep working rows until the strip wraps comfortably around your wrist. That comfort check, not a fixed row count, is what tells you it's ready to seam.