
Free Pattern
Step-by-Step
Crochet
AmigurumiA beginner-friendly crochet owl purse worked in rounds and rows
An owl purse built from an oval base, cluster body, and a flat flap top.
- Level
- Intermediate
- Time
- 4-6 hours
- Yarn
- Worsted
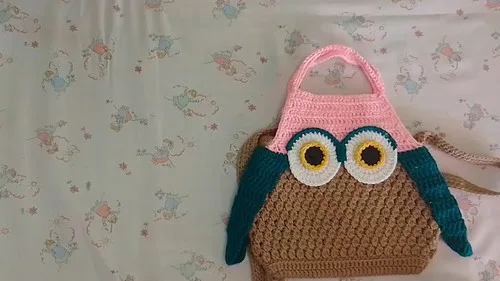
Pattern highlights
- Start with the oval base, building it up with increases at each rounded end.
- Work the top part in rounds first, then turn to flat decrease rows to shape the flap.
- Chain out the strap directly from the top part and attach it on the other side.
- Make two small circles separately for the eyes using the same basic shaping.
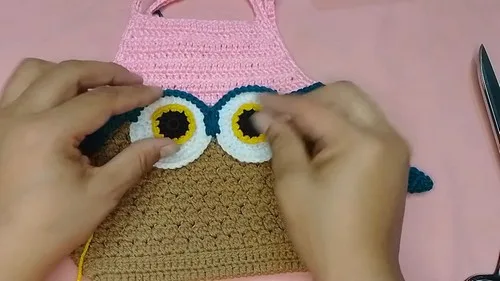
- Attach the eyes to the front center, one on the base and one on the flap.
- Join the strap sides with slip stitches and clean up the second side with sc.
About This Pattern
Every collector of patterns needs a few novelty bags, and this owl purse earns its shelf space. It is small, odd, and a little bit funny, which is exactly the point. I keep coming back to pieces like this when I want something with personality rather than pure practicality. It sits between amigurumi and accessory, which is a fun place to work from.
The techniques here do real work. An oval base with paired increases at each curved end gives the bottom its shape, then a cluster stitch body builds texture fast. The top part breaks from rounds into flat rows with decreases, which is where the flap narrows into shape. Two small circles become eyes, and a long chain becomes the strap.
What comes off the hook is a compact purse with a rounded bottom, a bumpy cluster-stitch body, and a flap that closes the front like a face. The eyes land one on the base and one on the flap, so the owl looks out at you properly. It is playful, pocket-sized, and clearly made by hand.
Worth knowing
This one is satisfying because the techniques actually earn their keep. The oval base teaches a clean increase pattern at both rounded ends, no guesswork needed. The cluster stitch in the body is the real payoff: incomplete dc stitches pulled through together, repeated around, building a texture you cannot get from plain sc or dc. Then the top part shifts gears, turning rows worked flat with decreases at each end, so you are shaping fabric instead of just building it in rounds. Add two magic-ring eyes and a simple chained strap, and you have touched most of the core amigurumi skills in one small project. It is a good piece for proving to yourself that clusters are not as fussy as they look.
Common mistakes
- Losing count on base increases Count the 5 dc made into the same stitch at each rounded end carefully. A missed increase flattens the oval instead of rounding it.
- Pulling cluster loops through separately Each cluster needs all the incomplete dc pulled through together in one motion. Doing it stitch by stitch leaves loose, uneven bumps.
- Skipping back loop only rounds Working into both loops on the back loop only rounds erases the ridge they are meant to create. Check the loop before each stitch.
- Uneven decreases on the top flap Decrease at both the start and end of every row to keep the flap symmetrical. One-sided decreasing pulls the flap off center.
- Forgetting the new color join Attach the new color with a slip knot before starting the top part, not partway through. A late color change leaves a visible jog.


Intermediate
Progress Tracker
0 of 0 rounds
Tap a round to tick it off — your place is saved on this device.
The kit
- Crochet hook
- Yarn in several colors (a main color for the base and body, a contrast color for the top part and wings, plus black and yellow for the eyes)
- Stitch markers
Base
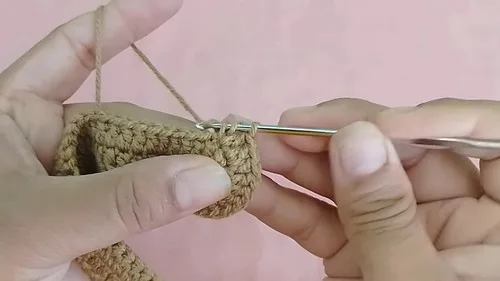
Round 1Chain 36; double crochet into the fourth chain from the hook (counts as first dc); make 5 dc into the same stitch; dc across until the last stitch; in the last stitch, make 5 dc; dc back across the other side; join with a slip stitch to the third chain.
Round 2Chain 3, dc in same stitch; at each of the 5 edge dc from the last round, place 2 dc each; dc across the straight side; at the opposite rounded end, 2 dc in each stitch; dc to the end, join with a slip stitch.
Round 3Chain 1, sc in each back loop around; join with a slip stitch to complete the round.
Body
Round 1Chain 3, make 2 incomplete dc in same stitch; pull through all loops to complete the cluster; chain 2, skip one stitch, attach to the next stitch with an incomplete dc; make 2 more incomplete dc in same stitch, pull through all loops; repeat this pattern around and join with a slip stitch.
Rounds 2–7Slip stitch into the next space and repeat the same cluster pattern as Round 1.
Rounds 8–10Repeat the same cluster pattern, using chain 1 between clusters instead of chain 2.
Top Part
Attach a new color with a slip knot before starting this part.
Round 1Chain 1, sc in each stitch around; join with a slip stitch.Mark the sides using stitch markers before Round 2.
Round 2Chain 3, dc in back loops only across the top edge; join the last two stitches together.
Rounds 3–11Chain 2 and turn; decrease at the start and end of each row; continue for 9 rows.
Round 12Chain 36 for the strap; attach to the other side of the top part; repeat on the other side.
Finishing
Round 1Make 2 sc at the end of each row; sc in the second stitch; crochet 2 stitches together for the next pairs (3rd & 4th, 5th & 6th); sc in the 7th stitch; skip the 8th stitch and attach to the opposite end with sc; sc down the opposite side; sc into each of the 36 chains; sc at the end stitches on the opposite side as well.
Wings
Attach a new color across 16 stitches (middle 4 stitches plus 6 stitches on each side) before starting this part.
Round 1Chain 2, dc across the loops.
Round 2Chain 3, turn, tr into the next stitch; tr across the row.
Rounds 3–10At each new row, decrease 1 stitch at the start; make 10 rows total (1 dc row, 9 tr rows).
Round 11End with a single row of sc.
Eyes
Make 2Round 1Create a magic ring; chain 2, make 11 dc into the ring; tighten and join with a slip stitch. (12 dc)
Round 2Chain 2, dc into same stitch, 2 dc into the next stitch; continue 2 dc in each stitch around.Make two circles total, working Rounds 1 and 2 the same way on each, before continuing with the outline colors below.
Round 3Outline the top of the eyes using a new color: 15 sc, skip 3 stitches on each circle, 15 sc again.
Round 4Create the black inner circle with 10 dc and outline in yellow using sc.
Strap
Round 1Knot, chain 4; pull yarn through loops to form the strap.
Assembly
Step 1Make two circles for the eyes, working the magic-ring rounds and the color outline rounds the same way on each, ready to attach to the purse later.
Step 2Attach strap sides to the purse with slip stitches; sc along the second side for a clean finish.
Step 3Paste the eyes onto the front center of the purse—one on the base and one on the top flap—for the signature owl look.
From the collection
Finishing
- Weave in any loose ends from the base, body, and top part before attaching pieces.
Why it works
The base gains its oval shape from 5 dc increases placed into the same stitch at each end, repeated over the first two rounds.
The body is worked in joined rounds rather than spiraled, since each round ends with a slip stitch before the next begins.
The strap is generated by chaining directly off the top part and attaching to the opposite side, so no separate strap piece is sewn on later.
What it becomes
- An everyday purse for a kid who wants something to carry small treasures, paired with a plain t-shirt outfit.
- A soft decoration for a shelf or playroom, sitting alongside other amigurumi animals.
- A little storage pouch for crochet notions like stitch markers and spare hooks, kept near the yarn basket.
Original pattern: https://crocheteverything.com/adorable-crochet-owl-purse-pattern-perfect-for-beginners/
FAQ
What yarn weight works best for this purse?
Worsted weight gives the cluster stitch enough body to hold its bumpy texture. Lighter yarn will work but softens the shape.
Can I make the strap longer or shorter?
Yes, the strap is just a chain attached to the top part, so you can adjust the chain length to taste. Just attach it the same way on the other side to keep it even.
How exactly do the eyes attach to the purse?
Make the two eye circles separately, then paste one onto the base and one onto the top flap at the front center. Lining them up at the center is what makes the owl face read correctly.