Free Pattern
Step-by-Step
Crochet
Bags & TotesBlush Pink Tassel Tote Free Crochet Pattern
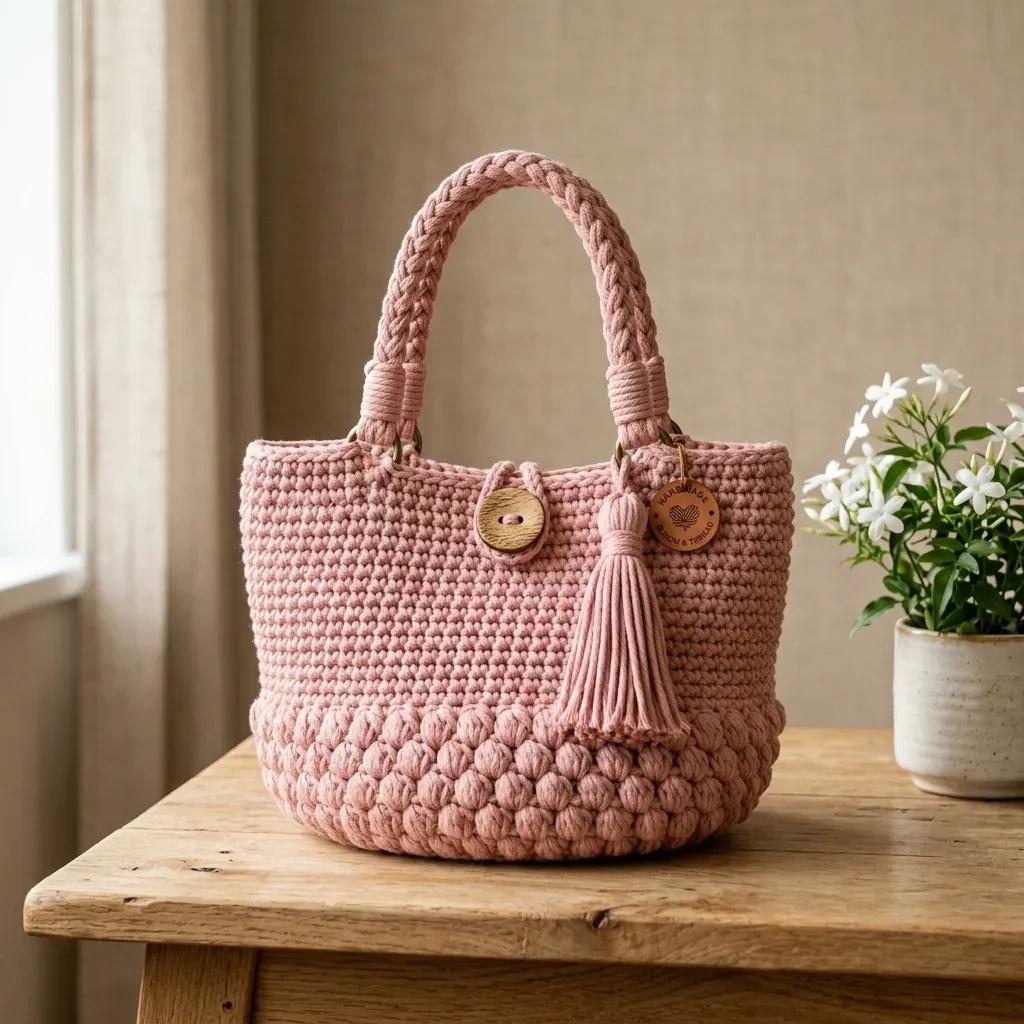
Crochet the Blush Pink Tassel Tote with a bobble band, braided cord handles, and a boho tassel. A free pattern for a sturdy, stylish everyday bag.
Level IntermediateTime 6-9 HoursHook 5 mmYarn Bulky
Pattern highlights
- Start by crocheting the oval base flat in the round, increasing evenly until it reaches its full width.
- Continue upward with the smooth single crochet body rows to form the tall, clean walls of the tote.
- Add the button loop at the top edge so the bag has a closure point on the finished front.
- Mark your side points and sew a D-ring securely to the inside top edge on each side.
- Braid two firm cord handles, then thread and wrap each end tightly around a D-ring to attach.
- Sew the wooden button to the front center so it lines up perfectly with the loop closure.
- Wrap and bind a cord tassel, then hang it from one D-ring for the final finishing touch.
About This Pattern
The Blush Pink Tassel Tote is a sturdy, texture-rich carryall built from an oval base, a staggered bobble band, and a smooth single crochet body finished with a button loop closure. What makes it special is the way it balances rustic and refined all in one bag — chunky cord construction gives it substance, while the soft blush pink color and wooden button keep it looking polished. It's perfect for anyone who wants a market tote that doubles as a genuine fashion accessory, not just a project bag hiding in the closet.
This pattern moves through an oval base worked in the round, a bobble band that adds dimensional pebble texture, and a body of clean single crochet rows, so you'll get practice with increases, bobble stitches, and simple shaping all in one project. It's rated intermediate mainly because of the bobble band and the handle assembly (braiding, wrapping D-rings, binding a tassel), not because any single stitch is tricky. Expect somewhere around 6 to 9 hours total, spread across a couple of relaxed evenings or one focused crafting day.
When it's done, you'll have a tote measuring about 11 inches wide by 8 inches tall (excluding handles), roomy enough for daily essentials but not bulky or awkward. The bobble-textured base paired with the smooth upper body gives it a lovely handmade-but-intentional look, and the braided cord handles with wrapped D-rings feel genuinely sturdy on the shoulder. With its neutral blush shade and boho tassel detail, this bag makes a wonderful gift for a friend, a treat-yourself project, or a signature piece you'll reach for all season.
Variations
I adore this bag because every part of it does something different for the finished look. The bobble band around the base is so satisfying to work — each staggered bobble pops out and catches the light, giving the bottom of the tote real dimension before it transitions into calm, clean single crochet rows up top. Then there's the handle assembly, which sounds fussy but is honestly one of my favorite parts: braiding six strands of cord into two firm braids, threading them through D-rings, and wrapping the ends tight feels like proper bag-making, not just crochet. The wooden button and loop closure add a tailored touch, and don't get me started on the tassel — wrapping cord around cardboard and binding it off is quick, almost meditative, and it's the detail everyone compliments first. This is a project where the payoff is immediate: you finish a bag that looks like it came from a boutique, not a hook. If you love mixing textures and want a make that feels substantial in your hands from the very first round, this tote will not disappoint.
Common mistakes
- Working the bobble stitches too loosely, so the pebble texture looks flat instead of raised.
- Keep consistent tension by pulling each loop up to the same height before closing the bobble, and don't be afraid to snug the closing stitch firmly so the bobble pops forward.
- Losing track of increases while building the oval base, leading to a lopsided or wavy shape.
- Place a stitch marker at the start of each round and another at the halfway point of the oval, then recount your stitches after every round before moving on.
- Attaching the D-rings without enough reinforcement, so the handles pull loose under weight.
- Pass your cord through each D-ring several times when sewing it in place, and weave the ends back through a few stitches rather than just knotting once.
- Braiding the handle strands too loosely, resulting in a soft, floppy handle that stretches over time.
- Pull each section taut as you braid and keep even tension throughout, checking that the finished braid measures close to the target 13 inches without excess give.
- Wrapping the braid ends around the D-ring unevenly, leaving gaps or a lumpy bound section.
- Fold back the full 1½ inches evenly, hold it snugly against the braid, and wrap your binding cord in tight, close coils before securing with a few small stitches.
- Rushing the tassel and ending up with uneven strand lengths or a loose binding wrap.
- Wrap the cord around the cardboard the full 18-20 times for a full tassel, trim all ends evenly after removing it from the cardboard, and wrap the binding cord tightly enough that it won't slide down.
Intermediate
Progress Tracker
0 of 0 rounds
Tap a round to tick it off — your place is saved on this device.
Materials
Yarn
- Approximately 350 to 430 yards (320 to 395 meters) of bulky weight cotton cord or recycled t-shirt yarn (Weight 5 to 6) in soft blush pink. A firm, round cord gives the crispest bobbles.
Recommended yarn options
- Hoooked RibbonXL recycled cotton cord, approximately 2 cones
- Bobbiny Premium Cord (5 mm) macramé cotton, approximately 1 to 2 spools
- Lion Brand Re-Up Bulky recycled cotton blend, 2 to 3 balls
Hook
- 6.0 mm (J-10) crochet hook, or size needed for gauge
Notions
- Tapestry needle
- Stitch marker
- Scissors
- One 1¼ inch (32 mm) wooden button
- Two 25 mm metal D-rings or O-rings (for handle anchors)
- Small piece of cardboard for the tassel
- Optional wooden charm
The Oval Base
Foundation: Ch 19. (19 ch)
- Round 1Starting in 2nd ch from hook, sc in next 17 ch, 3 sc in last ch; rotate to work the underside, sc in next 17 ch, 3 sc in last ch; join into spiral. (40 sc)
- Round 2Sc 17, [inc] 3 times, sc 17, [inc] 3 times. (46 sc)
- Round 3Sc 17, [sc 1, inc] 3 times, sc 17, [sc 1, inc] 3 times. (52 sc)
- Round 4Sc 17, [sc 2, inc] 3 times, sc 17, [sc 2, inc] 3 times. (58 sc)
- Round 5Sc evenly around, adding 2 evenly spaced inc. (60 sc)
- Round 6Working in BLO, sc in each st around. This sets the wall upright. (60 sc) Take a moment here to admire your work! The back loop only round creates a crisp edge where the base meets the walls. This is where your bag starts to take shape.
Bobble Band
- Round 7[Sc 1, MB in next st] around. (30 sc & 30 bobbles, 60 sts)
- Round 8Sc in each st around. (60 sc)Sl st loosely in each st around to firm the rim; sl st to join. Fasten off and weave in the end. (60 sl st)
- Round 9[MB in next st, sc 1] around (offsetting bobbles). (30 bobbles & 30 sc, 60 sts)
- Round 10Sc in each st around. (60 sc) Pro tip: Offsetting the bobbles in Round 9 creates that gorgeous staggered pebble texture you see in the photos. It makes such a difference!
Smooth Single Crochet Body
- Round 11through 24: Sc in each st around (14 rounds). (60 sc each round)(60)
- Round 25Sc in each st around; place a marker at each side, 30 sts apart, to mark handle centers. (60 sc)
If you want a taller tote, add or remove rounds here in pairs to keep the side markers balanced. Each added round raises the bag by about ⅓ inch (0.8 cm).
Button Loop
Join cord at the center front, ½ inch below the rim. Ch 9, sl st back into the same area to form a loop sized to your button; fasten off and secure the ends inside. (1 loop)
Test the loop with your button before weaving in the ends completely. You want it snug but not so tight that closing the bag becomes frustrating.
Assembly
- Step 1Almost done! Here is how to give your tote that professional finish:
- Step 2Weave in all ends on the inside, splitting the cord plies for a flat, invisible finish.
- Step 3Gently shape the base into an oval and stand the bag upright. A rolled towel inside helps it hold form overnight.
- Step 4Steam the walls lightly with an iron held above the fabric. Never press directly onto the cord, as this can flatten your stitches.
Important notes
💡 Use a firm, round cord rather than a flat or floppy one — it makes a real difference in how crisp your bobble band looks.
💡 Keep your 6.0 mm hook nearby specifically for gauge checks; cord thickness can vary slightly between brands and affect your final bag size.
💡 Mark your side points on the oval base early with a stitch marker so your D-ring placement stays symmetrical later on.
💡 Buy a little extra cord beyond the estimated 350-430 yards if you're adding a fuller tassel or longer handles — cord for binding and wrapping adds up fast.
💡 Before sewing the wooden button, close the loop and test the position a few times so the closure sits centered and doesn't pull the front off-kilter.
💡 Weave in all cord ends securely, especially around the D-rings, since this bag is meant to carry real everyday weight, not just look pretty.
Original pattern: https://bunnypatterns.com/blush-pink-tassel-tote-free-crochet-pattern/
FAQ
What weight cord works best for this tote?
A bulky weight 5 to 6 cotton cord or recycled t-shirt yarn works best, giving you around 350 to 430 yards total. A firm, round cord holds the bobble band texture more crisply than a soft or flat one.
How long do the finished handles end up?
Each braid finishes at about 13 inches before being threaded through the D-rings and wrapped, giving you a comfortable shoulder or hand-carry length. You can shorten them if you prefer a wristlet-style carry.
Can I substitute the metal D-rings with something else?
Yes, sturdy metal O-rings work just as well as D-rings for this pattern. Just make sure they're around 25 mm and strong enough to handle the reinforced cord passes without bending.
Is this pattern good for a beginner?
It's better suited to an advancing beginner or intermediate crocheter comfortable with basic bobble stitches and simple increases. The handle assembly and braiding are straightforward but do take some patience the first time through.
How much yarn do I really need to finish the whole bag?
Plan on the full 350 to 430 yard range to cover the base, bobble band, body, handles, and tassel comfortably. If you're adding a fuller tassel or extending the handles, pick up a little extra to be safe.