Free Pattern
Step-by-Step
Crochet
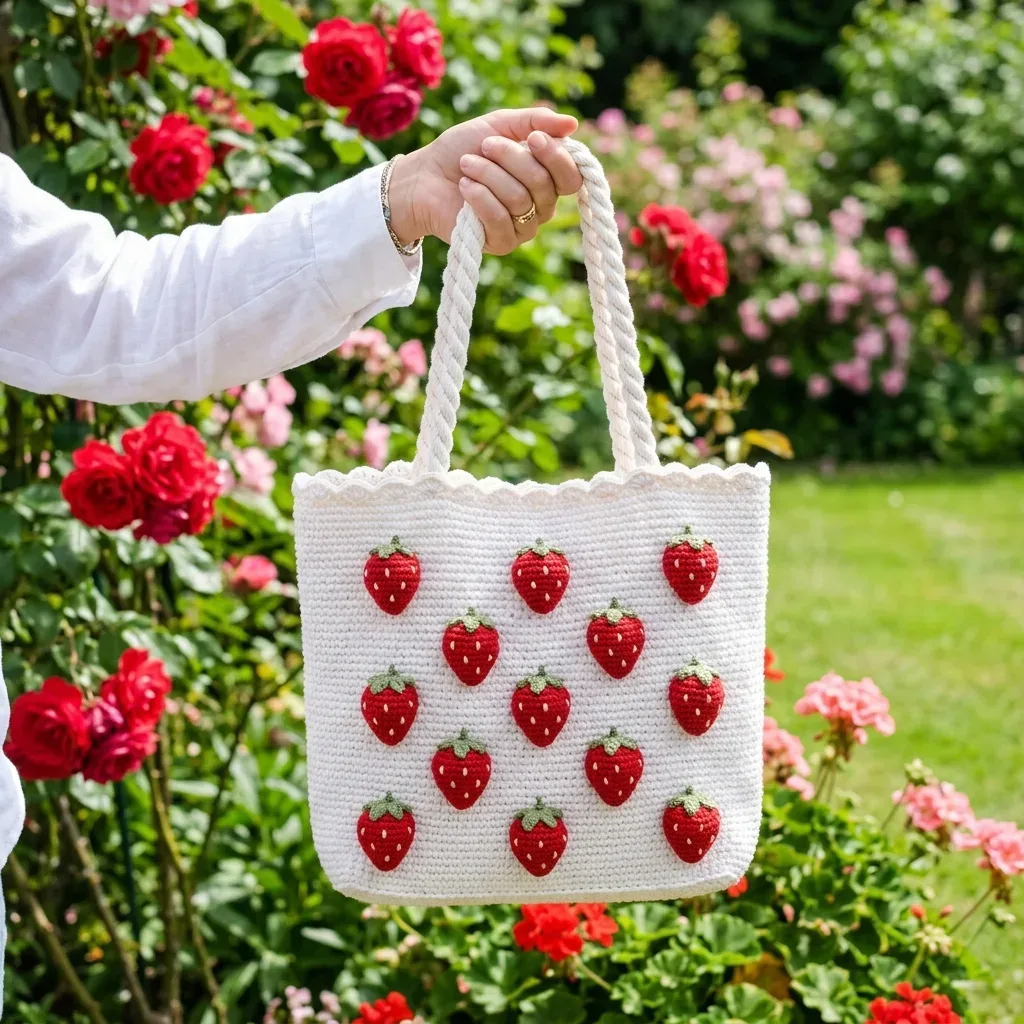
Bags & TotesStrawberry market tote with crocheted berries and rope handles
A spiral-worked crochet tote topped with 26 hand-stitched strawberries and rope handles.
- Level
- Confident Beginner
- Time
- 8-12 hours
- Hook
- 5.0 mm
- Yarn
- Worsted / Aran
Pattern highlights
- Crochet a firm rectangular base in single crochet to set the bag's footprint.
- Work the body upward from the base in one continuous spiral of single crochet rounds.
- Finish the top edge with a small shell-stitch scallop trim.
- Make the rope handles separately and set them aside.
- Crochet 26 small strawberries from the bottom point up, adding leaf tops and embroidered seeds.
- Sew the handles inside the bag with mirrored front-and-back placement.
- Pin and sew the strawberries onto both sides in a staggered layout.
About This Pattern
Every notebook needs a cheerful entry, and this one earns its page. It sits between the sturdy market bags and the whimsical amigurumi shelf, borrowing structure from one and charm from the other. I log it under 'bags with a sense of humor' — practical first, decorative second.
The techniques are plain: single crochet worked flat for the base, then a long spiral climb for the body, a shell-stitch scallop to finish the top. The 26 strawberries are their own small project, each one a tiny decreasing round with a leaf and embroidered seeds sewn on after.
What comes off the hook is a square-bottomed tote with real depth, rope handles with a 9-inch drop, and a scattering of berries across both sides. It reads more like a piece of produce-stand folk art than a standard market bag.
Worth knowing
I like a pattern that teaches two skills in one sitting. The spiral body is meditative — round after round of single crochet with no counting gymnastics, just steady growth up from a rectangular base. Then the mood shifts entirely for the strawberries: tiny amigurumi rounds, a smaller hook, a leaf top, hand-embroidered seeds. It's the contrast that makes this one satisfying, not just the finished object. Sewing 26 berries into a 3-2-3-2-3 layout is fussy in a good way, the kind of fussy that rewards patience with a bag that looks far more complicated than the stitches actually are. The scallop trim is the last small flourish, and it earns its place.
Common mistakes
- Losing the spiral join Mark the first stitch of the round with a stitch marker from Round 1 onward. Without it, the spiral drifts and the scallop trim starts unevenly.
- Overstuffing the strawberries Add stuffing a little at a time and check the shape as you go. Too much fiberfill distorts the point and makes sewing them flat difficult.
- Uneven berry layout Pin all berries in the staggered rows on one side before sewing a single one down. Adjusting pins is easier than unpicking stitches.
- Soft, floppy handles Work the cotton cord or piping into the handle as you crochet rather than after. It is much harder to thread through a finished rope.
Confident Beginner
Progress Tracker
0 of 0 rounds
Tap a round to tick it off — your place is saved on this device.
The kit
- Cream (main color): approximately 380 yards / 350 meters
Red
- approximately 35 yards / 32 meters
Leaf green
- approximately 18 yards / 17 meters
White
- small amount for embroidered seeds
Yarn suggestions that work beautifully for this project
- Lily Sugar’n Cream (worsted cotton)
- Paintbox Yarns Cotton Aran
- DROPS Paris (aran cotton)
- Cotton yarn is essential here. It gives the bag structure, holds up to regular use, and the dense fabric keeps the strawberry stuffing from peeking through.
- 5.0 mm (US H/8) crochet hook for the bag body and handles
- 3.5 mm (US E/4) crochet hook for the strawberries (the smaller hook creates a tighter fabric so stuffing does not show)
- Tapestry or yarn needle
- Stitch markers
- Small amount of fiberfill stuffing
Optional
- cotton cord or piping to firm up the handles
Step 1: The Base
The base is worked flat as a firm rectangle using your 5.0 mm hook and cream yarn .
Foundation: Chain 49.
Step by step: Make 26 leaf tops using your 3.5 mm hook and green yarn .
Round 1Single crochet in the 2nd chain from hook and in each chain across. Turn. (48 sc)[Single crochet, increase] repeat 3 times. (9 sc) Leaves: Chain 4, slip stitch in the 2nd chain from hook and in the next 2 chains, slip stitch in the next stitch of the round. Repeat from * around. (5 leaf points)Fasten off, leaving a tail for sewing. Center each leaf top over the open top of a strawberry and stitch it in place, letting the leaf points splay outward naturally.
Round 2through 17: Chain 1 (this does not count as a stitch), single crochet in each stitch across. Turn. (48 sc)Your finished base should measure about 12 inches by 4 inches (30 x 10 cm). Do not fasten off after Row 17. You will continue straight into the body. Chain 1 and rotate your work to crochet around the entire outer edge.
Pro tip: For a sturdier, free-standing tote, hold a strand of cotton thread together with your yarn for the base only. Alternatively, you can work the base in back loops only to reduce stretch.
Step 2: The Body and Scallop Trim
Now we will build up the walls of the bag by working around the rectangular base in a spiral.
Round 1Working around the base, work 48 single crochet across one long edge, 16 single crochet across the short edge, 48 single crochet across the other long edge, and 16 single crochet across the last short edge. Join with a slip stitch to the first single crochet, then continue working in a spiral. (128 sc)
Round 2through 53: Single crochet in each stitch around, working in a continuous spiral for 52 rounds. (128 sc)At the end of Round 53, your bag body should stand about 12 inches (30 cm) tall . Slip stitch in the next stitch to even out the spiral before starting the trim.
Step 4: The Strawberries
Make 26 berries (13 for the front and 13 for the back) using your 3.5 mm hook and red yarn . The strawberries are worked from the bottom point upward.
Round 1Work 6 single crochet in a magic ring. (6 sc)
Round 2[Single crochet, increase] repeat 3 times. (9 sc)
Round 3[Single crochet in next 2 stitches, increase] repeat 3 times. (12 sc)
Round 4Single crochet in each stitch around. (12 sc)
Round 5[Single crochet in next 3 stitches, increase] repeat 3 times. (15 sc)
Round 6and 7: Single crochet in each stitch around. (15 sc)
Round 8[Single crochet in next 3 stitches, decrease] repeat 3 times. Lightly stuff your strawberry at this point. (12 sc)
Round 9[Single crochet in next 2 stitches, decrease] repeat 3 times. (9 sc) Fasten off, leaving a long tail. Thread the tail through the final 9 stitches but do not pull fully closed. The slightly open top will sit neatly under the leaves. Each finished berry is about 1¼ inches (3 cm) tall .
Important tip: Add only a wisp of stuffing. Over-stuffed berries will pull at the bag fabric and show white stuffing between your red stitches.
Scallop Top Edge
Round 54Single crochet in next stitch, skip 1 stitch, work 5 double crochet in next stitch (this is your shell), skip 1 stitch. Repeat from * around. Slip stitch to first single crochet. (32 shells)(32)
The 128 stitches divide evenly into 32 four-stitch repeats, so your scallops will meet perfectly with no gap. Fasten off and weave in your ends.
Step 3: The Rope Handles
Make 2 firm cord handles using your 5.0 mm hook and cream yarn .
Round 1Foundation: Chain 70.
Round 2Pass 1: Single crochet in the 2nd chain from hook and in each chain across. (69 sc)
Round 3Pass 2: Without turning your work, continue along the opposite side of the foundation chain by working single crochet in each chain back to the start. This draws the work into a round cord shape. Slip stitch to join. (69 sc on this side, 138 sc total)(138)
Each handle measures about 17 inches (43 cm) . For extra firmness, lay a length of cotton cord or piping inside before closing the second pass. Leave a long tail for sewing.
Handle Placement: On the front of the bag, count in from each side and pin the handle ends about 3 inches (7.5 cm) apart , positioned just below the scallop edge. Mirror this placement on the back. Stitch each handle end firmly to the inside of the bag, sewing through several stitches so the handle can bear weight evenly. A 9-inch (23 cm) drop should remain when properly attached.
Seeds
Using white yarn and a tapestry needle, embroider 7 to 9 tiny straight stitches (or French knots if you prefer) scattered over each red strawberry. Knot off securely on the inside.
Berry Placement
Arrange your 13 strawberries on the front of the bag in five offset rows following this pattern: 3, 2, 3, 2, 3 . Each row sits in the gaps of the row above, creating that classic scattered strawberry look. Repeat the same arrangement on the back.
Pin all your berries first and step back to check your spacing before committing. Once you are happy with the layout, sew each strawberry down securely around its base using matching thread.
Assembly
Step 11. Weave in all remaining ends on the body and handles. Block the bag lightly to square up the corners if needed.
Step 22. Sew both rope handles to the inside of the bag, with front and back placement mirrored, maintaining a 9-inch drop.
Step 33. Make sure all 26 strawberries have their leaf tops attached and white seeds embroidered.
Step 44. Pin your berries in the 3-2-3-2-3 layout on both the front and back, then sew each one down around its base with matching thread.
Step 55. Give the whole tote a final light steam to settle the stitches and scallops.
Step 6Optional fabric liner: For a polished interior, cut two fabric panels to match the bag’s inner dimensions plus a seam allowance. Sew them into a pouch and hand-stitch the liner just below the scallop edge. This creates a tidy, stronger interior and prevents small items from poking through your stitches.
Finishing
- Weave in all ends on the body, handles, and each of the 26 strawberries before assembly.
- Stuff each strawberry lightly so the shape holds without straining the fabric.
- Block the bag gently to square the corners, then sew handles and berries into place.
Why it works
The base is worked flat first, which gives the bag a defined rectangular footprint before any height is added.
The strawberries increase steadily over the first rounds, then hold a flat stitch count, which is what shapes the rounded shoulder below each berry's point.
What it becomes
- A grocery or farmers market run, where the firm base holds produce upright.
- A beach bag, roomy enough for a towel alongside the usual essentials.
- A project tote for carrying current crochet work, yarn and hook included.
Original pattern: https://bunnypatterns.com/strawberry-summer-tote-free-crochet-pattern/
FAQ
Can I make the tote without any strawberries?
Yes, the body and scallop trim stand on their own as a plain tote. The berries are a separate, optional embellishment sewn on at the end.
Why does the pattern use two hook sizes?
The larger 5.0 mm hook builds a sturdy, open fabric for the bag itself. The smaller 3.5 mm hook tightens the strawberry fabric so the fiberfill stuffing stays hidden.
What yarn works best for this bag?
Cotton is essential, not optional, for this one. It gives the structure needed to hold a shape and stands up to regular handling.
How do I keep the base rectangle from curling?
Work the base firmly and keep tension consistent across all rows. A light blocking after the fact also helps square up the corners.