Free Pattern
Step-by-Step
Crochet
Bags & TotesDusty rose granny square tote crochet pattern
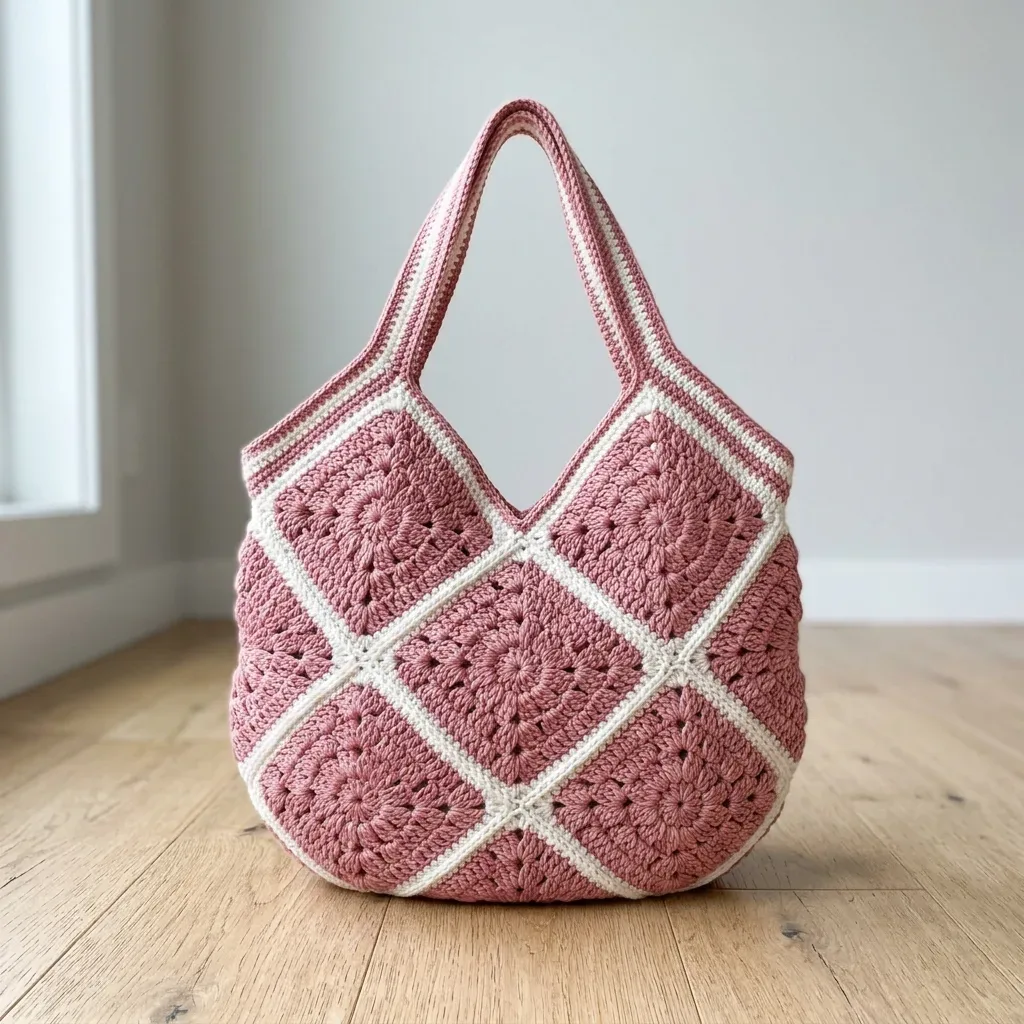
An intermediate crochet tote made from eighteen sunburst granny squares joined on point.
- Level
- Intermediate
- Time
- 10-14 hours
- Hook
- 5.0 mm
- Yarn
- Worsted
Pattern highlights
- Make eighteen sunburst granny squares, building the motif outward from a magic ring center.
- Add the cream border rounds so each square reads as a window-framed diamond.
- Join the squares on point, letting the diamond grid give the panel movement.
- Work the two strap bands flat in stripes, alternating Color A and Color B.
- Whip stitch the panels together along both sides and across the bottom to form the body.
- Work two single crochet rounds along the top opening to clean up and reinforce the edge.
- Fold and seam the strap bands, then attach them to finish the tote.
About This Pattern
Every notebook needs a workhorse bag pattern, and this is mine. It sits next to my market totes and project bags, the kind of make I return to when I want something sturdy rather than fussy. Eighteen granny squares is a commitment, but it is the good kind — repetitive enough to be meditative, varied enough to stay interesting.
The technique here is classic granny square construction with a twist: joining the motifs on point so the sunburst centers tilt into a diamond grid. That rotation does a lot of visual work for very little extra effort. The panels are worked flat, then seamed with a whip stitch that handles both structure and finish in one pass.
What comes out the other end is a roomy tote with a curved base and a cream-striped strap. It is not a precious piece. It is meant to carry a water bottle, a paperback, and whatever yarn you are currently obsessed with.
The finished size is generous at approximately 13.5 × 14 inches (34 × 35.5 cm) with a strap drop of about 9 inches (23 cm) — roomy enough for a trip to the market, a day at the beach, or carrying your current work in progress to a friend's house.
Gauge: 16 dc × 8 rows = 4 inches (10 cm); one finished square should measure about 4.5 inches (11.5 cm) square after light blocking. The gauge is fairly forgiving with this pattern — if you are slightly off, your bag will just be a bit larger or smaller, but if you want to match the finished dimensions exactly, adjust your hook size until your square hits that 4.5 inch measurement.
Worth knowing
I like a pattern that teaches you something by square number five, and this one does. The sunburst center, worked into a magic ring and closed tight, rewards a little patience early on — get that ring snug and the whole motif reads clean. Turning the corners with a ch-2 space is standard granny territory, but doing it eighteen times builds real fluency. Then there is the on-point join, which takes a familiar shape and makes it look deliberately different. The striped strap, worked flat and folded into a tube, is a nice change of pace after all that circular motif-making. By the time you whip stitch the side seams, you have practiced three distinct skills in one project.
Common mistakes
- Loose magic ring center Pull the ring closed tightly before joining round one. A loose center leaves a visible gap at the heart of the sunburst.
- Corners drifting out of square Work the (2 dc, ch 2, 2 dc) corner into the same stitch every round, not spread across two stitches. Misplaced corners throw off the whole grid once squares are joined on point.
- Skipping the gauge swatch Test one square before starting all eighteen. The pattern is forgiving on size, but an off-gauge square multiplied eighteen times changes the finished dimensions a lot.
- Seaming through the wrong loops Whip stitch with wrong sides together along both side edges and the bottom, leaving the top open. Catching the wrong loops puffs the seam instead of letting it round into a base.
- Uneven strap stripes Change color every two rows in the order given, and keep tension consistent across all ninety stitches per row. A dropped stripe count makes the two straps look mismatched side by side.
Intermediate
Progress Tracker
0 of 0 rounds
Tap a round to tick it off — your place is saved on this device.
The kit
Yarn
- Color A (Dusty Rose): approximately 450 yards / 410 meters
- Color B (Cream): approximately 300 yards / 275 meters
- You want a smooth worsted weight (aran / #4) cotton or cotton blend yarn. The cotton gives the squares crisp stitch definition and helps the bag hold a gentle structured slouch rather than stretching out over time.
Recommended Yarns
- Lion Brand 24/7 Cotton in shades Rose and Ecru. This mercerized cotton has excellent stitch definition.
- Paintbox Yarns Cotton Aran in Rosy Pink and Champagne White. Affordable with a matte finish and wide color palette.
- Hobbii Rainbow Cotton 8/8 in a blush rose and natural cream. Soft with a relaxed drape.
Hook
- 5.0 mm (US H/8) crochet hook
Optional
- 4.5 mm hook for tighter joins if you prefer
Notions
- Tapestry needle
- Stitch markers
- Scissors
Optional
- fabric lining and magnetic snap for added structure and security
Main Pattern
Pattern Notes The beginning ch 3 counts as the first dc throughout the pattern. Squares are worked in joined rounds with the right side always facing you. Join each round with a slip stitch to the top of the beginning chain unless the pattern tells you otherwise. Weave in your ends as you go — with eighteen squares, leaving all those ends for the finish will feel overwhelming.
This is the heart of your bag. Make 18 squares total. Rounds 1 through 3 use Color A (Dusty Rose). The final border round in Color B (Cream) creates that beautiful cream lattice when the squares are joined.
Round 1Color A: Into a magic ring: ch 3, work 15 dc into the ring. Pull the ring closed tightly. Sl st to the top of the beginning ch 3 to join. (16 dc)Pull that center ring snug for a neat sunburst eye with no gap.
Round 2Color A: Ch 3, dc in the same st, then work 2 dc in each st around. Sl st to the top of the beginning ch 3 to join. (32 dc)
Round 3Color A: Ch 3, dc in the next 3 sts. Work (2 dc, ch 2, 2 dc) in the next st for the corner, dc in the next 7 sts. Repeat from * around, ending the final side with dc in the last 3 sts. Sl st to join.
You will have four corners with 11 dc along each side. (44 dc, 4 corner spaces)
Round 4Color B Join Color B in any corner ch 2 space. Ch 3, then work (dc, ch 2, 2 dc) in the same space. Dc in each dc across to the next corner, work (2 dc, ch 2, 2 dc) in the corner space. Repeat from * around. Sl st to join.Fasten off, leaving a long tail for seaming later. (60 dc total, 15 dc per side)
Blocking Tip: Block all 18 squares to the same 4.5 inch (11.5 cm) measurement before joining. Uniform squares make those lattice lines run perfectly straight and give your finished bag a polished look.
The Striped Handles
Make 2 handles. Each handle is worked lengthwise so the dusty rose and cream stripes run the full length of the strap.
Foundation Foundation – Color A: With Color A, ch 91.
Row 1Sc in the 2nd ch from hook and in each ch across. Turn. (90 sc)
Rows 2–10Rows 2 through 10 – Stripes: Ch 1, sc in each st across. Turn. Change color every 2 rows in this order: Color A, Color B, Color A, Color B, Color A.
After 10 rows, your band will be approximately 1.5 inches (4 cm) wide. (90 sc each row)
Shaping the Strap
Fasten off, leaving a long tail. Fold the band in half lengthwise and whip stitch the long edge closed to form a rounded, sturdy strap. (2 straps total)
Attaching the Handles
Center one strap across the front rim and one across the back. Position the ends about 4 inches (10 cm) apart.
Stitch each end securely to the inside of the rim. Reinforce with several passes since the handles carry all the weight.
For a longer crossbody drop: Add chains to the foundation. Every 4 chains adds approximately 1 inch (2.5 cm) of length.
Assembly
Joining the SquaresArrange your completed squares into two panels of nine squares each. Each panel forms a 3 × 3 grid. One panel becomes the front of your tote, the other becomes the back. Keep every square facing the same direction so the sunburst centers line up consistently.
Join MethodUsing Color B and your tapestry needle, hold two squares with right sides together. Whip stitch through the back loops only, matching stitch for stitch along one edge. (15 sts joined per edge) Work in this order: 1. Join squares into three rows of three. 2. Then join the three rows together to complete each panel.
Alternative JoinIf you prefer a more decorative look, you can slip stitch or single crochet the squares together with Color B. This creates a raised lattice ridge on the right side of your work. Once both panels are complete, press the seams flat from the wrong side. Each finished panel measures roughly 13.5 inches (34 cm) square.
Seam the PanelsPlace the two panels with wrong sides together. Using Color B, whip stitch up one side, across the bottom, and up the other side. Leave the top open. The soft cotton naturally rounds into a gentle curved base as you work. (3 edges seamed)
Work the Top EdgeJoin Color B at one of the side seams. Work 1 sc in each dc around the entire top opening, working evenly across both panel tops. Sl st to join. (96 sc)
Reinforce the RimWork 1 more round of sc around the opening. This creates a firm, tidy rim that supports the handles and helps the bag keep its shape. Sl st to join. Do not fasten off if you are attaching handles next. (96 sc)
Optional LiningFor extra structure, sew a fabric lining inside the bag before attaching the handles. This keeps your contents tidy and prevents small items from poking through the openwork squares. A magnetic snap at the center of the rim adds security if you like a closed top.
Finishing
- Weave in every tail on the wrong side, splitting each one through stitches of matching color so it disappears.
- Block the panels by steaming or wet blocking, shaping the base round and squaring up the diamond grid.
- Fold each strap band in half lengthwise, whip stitch the long edge closed, then attach both straps to the top edge.
Why it works
Each square increases from 16 dc at the center to 32 dc on round two, doubling evenly to keep the sunburst circular before the corners square it off.
The corner ch-2 spaces introduced on round three are what let the motif transition from round to square, setting up clean joins later.
The strap band is worked flat in rows rather than in the round because it needs to fold lengthwise into a tube, not sit flat like the squares.
What it becomes
- A market tote roomy enough for produce, bread, and a stray bouquet.
- A beach bag that pairs well with a towel and a paperback tucked inside.
- A project bag for carrying a current crochet work in progress to a friend's house.
Original pattern: https://crochr.com/dusty-rose-granny-square-tote-free-crochet-pattern/
FAQ
Can I use a different cotton yarn than the ones listed?
Yes, any smooth worsted weight cotton or cotton blend will work. Just swatch first, since the pattern's finished size depends on hitting the 4.5 inch square gauge.
Why join the squares on point instead of straight?
Joining on point rotates the sunburst centers into a diamond grid, which gives the panel more visual movement. It is a styling choice, not a structural one, so it does not change the construction otherwise.
Do I need the fabric lining and magnetic snap?
They are listed as optional materials for added structure and security. The tote holds its shape from the cotton yarn alone, but a lining adds extra body if you want it.
How much yarn do I actually need for both colors?
Plan on about 450 yards of Color A and 300 yards of Color B. That covers all eighteen squares, the seaming, the top edge, and both strap bands.