Free Pattern
Step-by-Step
Crochet
Bags & TotesSage green mushroom cottage backpack crochet pattern
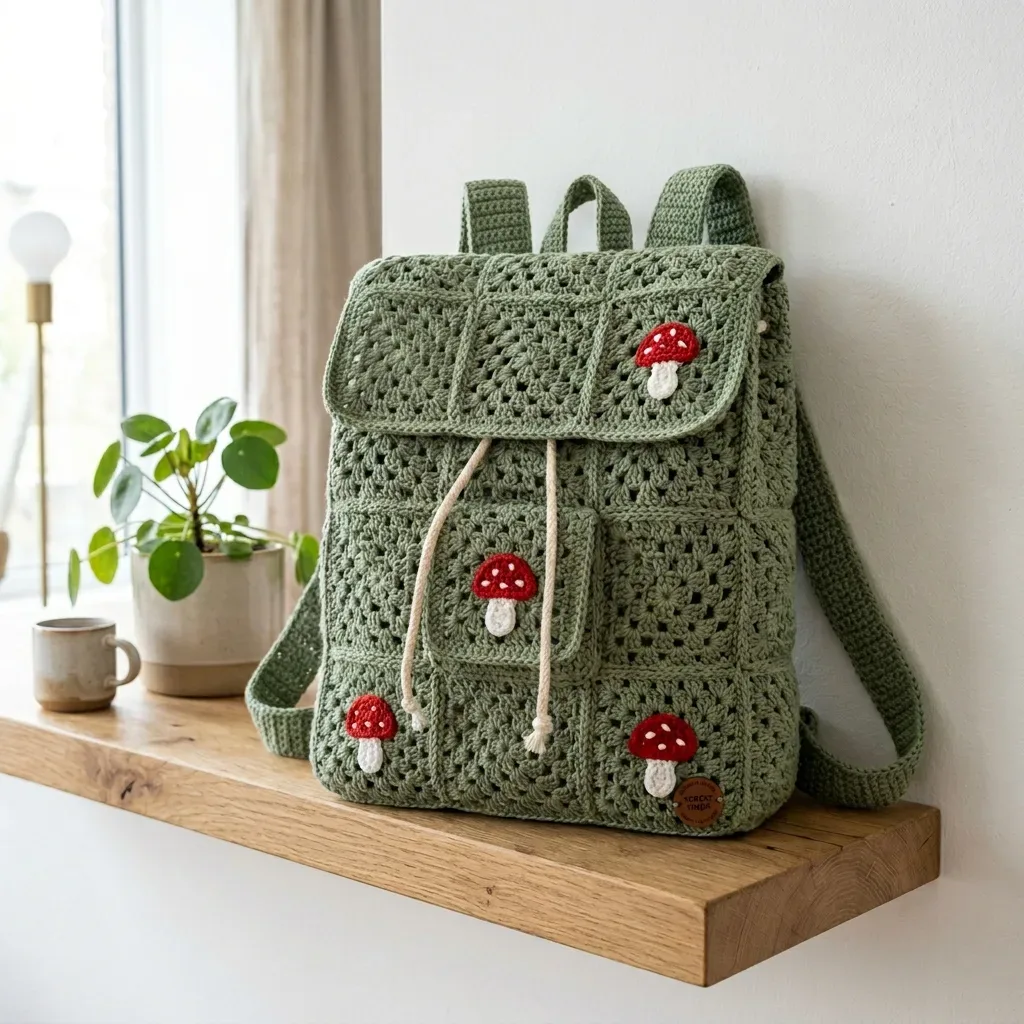
A granny square backpack with a gusset, flap, pocket, and crocheted mushroom appliques.
- Level
- Intermediate
- Time
- 10-15 hours
- Hook
- 4.0 mm
- Yarn
- Worsted
Pattern highlights
- Start by making and blocking 22 sage granny squares, setting aside extras for the flap and pocket.
- Join the squares into front and back panels, then whipstitch the long gusset strip around the sides and bottom.
- Work the top band and its eyelet round so the drawstring has somewhere to thread through later.
- Add the fold-over flap, front pocket, and mushroom appliques worked at the smaller hook size.
- Attach the shoulder straps with their sliders and D-rings, then thread the drawstring cord.
- Weave in ends, block the whole bag gently, and shape it over towels until dry.
About This Pattern
I keep a shelf for bags that started as flat squares. This one lands there, a sage green backpack built from 22 granny squares instead of one solid panel. I like projects that prove motifs aren't only for blankets. Cottagecore gets tossed around loosely, but here it means mushroom appliques, a drawstring top, and soft cotton that holds its shape. It's a motif project wearing a structural disguise.
The construction stacks a few techniques I enjoy separately. Granny squares build the front, back, flap, and pocket, each blocked to the same size before joining. A long gusset strip works flat in single crochet until it's seamed around the sides and bottom. A top band adds eyelet rounds for the drawstring. Two hook sizes keep the mushroom appliques finer than the body. Whipstitching joins everything with RS facing out, which keeps seams visible but tidy.
What comes off the hook is a structured little backpack, about 9.5 inches wide and 11.5 inches tall. The gusset gives it real depth, so it holds shape even half empty. A fold-over flap and front pocket add function beyond the pretty appliques. Adjustable straps with sliders and D-rings make it wearable, not just decorative. It reads as a cottage ornament until you actually pack it.
Worth knowing
The satisfying part is watching 22 identical granny squares turn into something with actual function. Each square joins into panels, flap, or pocket front. The repetition turns meditative by square ten or so. The gusset strip is the quiet workhorse. It's 114 rows of plain single crochet. Whipstitched in, it gives the bag its box shape. Eyelet rounds on the top band are a small satisfying trick, just chain-1 spaces waiting for a drawstring. Then come the mushroom caps and stems. They're worked at a finer gauge, so they read as tiny appliques, not bulky patches. Finishing a motif bag that actually holds its shape feels like a small engineering win.
Common mistakes
- Joining squares before blocking Block each granny square to size first. Unblocked squares vary in size and the panels won't align evenly.
- Stretching squares during gusset seaming Pin gently and ease the gusset to fit. Stretching the motifs during whipstitching distorts the corners.
- Mismatched hook sizes on appliques Use the smaller 3.5 mm hook for mushroom caps and stems. The body's 4.0 mm hook makes appliques too loose and bulky.
- Losing eyelet alignment in band Keep the eyelet round's skip-and-chain pattern consistent all the way around. An uneven count makes the drawstring sit crooked.
- Working the gusset without turning Turn at the end of every gusset row, just like any flat single crochet strip. Forgetting to turn twists the strip and ruins the seam line.
Intermediate
Progress Tracker
0 of 0 rounds
Tap a round to tick it off — your place is saved on this device.
The kit
Yarn
- Worsted weight cotton yarn in sage green: 620 to 720 yards (567 to 658 meters)
- Red cotton yarn for mushroom caps: 30 yards (27 meters)
- Cream cotton yarn for stems and spots: 35 yards (32 meters)
- Beige cotton cord or yarn: 2 yards (1.8 meters), or you can crochet your own cord
Hooks
- 4.0 mm (US G-6) hook for motifs and body
- 3.5 mm (US E-4) hook for appliques
Hardware
- 2 strap sliders, 1 inch / 25 mm
Optional
- 2 D-rings
Tools
- Yarn needle
- Stitch markers
- Blocking pins
- Tape measure
- Scissors
Yarn suggestions
- Choose a smooth, firm worsted cotton or cotton blend. Good options include Lion Brand 24/7 Cotton, Paintbox Cotton Aran, or Lily Sugar n Cream Solids. If you substitute yarn, match the gauge and choose a fiber that holds structure. Soft acrylic may need a fabric lining for stability.
Main Pattern
Round 1Magic ring, ch 3, 2 dc in ring, ch 2, [3 dc in ring, ch 2] 3 times, join to top of ch-3. (12 dc, 4 ch-2 corners)
Round 2Sl st to corner sp, ch 3, 2 dc, ch 2, 3 dc in same sp, ch 1; in next corner sp work 3 dc, ch 2, 3 dc, ch 1; rep from around, join. (24 dc, 4 ch-2 corners, 4 ch-1 sps)
Round 3Sl st to corner, work corner as above, ch 1; 3 dc in next ch-1 sp, ch 1, corner in next corner sp, ch 1; rep from around, ending before first corner, join. (36 dc, 8 side ch-1 sps, 4 corners)
Round 4Work each corner as above and work 3 dc in each side ch-1 sp with ch 1 between clusters. (48 dc, 12 side ch-1 sps, 4 corners)
Round 5Repeat Round 4 once more. (60 dc, 16 side ch-1 sps, 4 corners) Edging round: Ch 1, sc in each dc and ch-1 sp, placing 3 sc in each corner sp; join. Each side has 22 edge sts including corner sc. Fasten off.
Gusset Strip
With sage and 4.0 mm hook, ch 21.
Round 1Sc in 2nd ch from hook and each ch across, turn. (20 sc)
Round 2114 Ch 1, sc in each st across, turn. (20 sc) Fasten off, leaving a long seaming tail.
Checkpoint: Gusset should measure about 4.75 inches / 12 cm wide and 28.5 inches / 72.5 cm long. It wraps one side, the bottom, and the other side of the bag.
Top Band and Eyelets
Round 1Join sage at center back top. Work 38 sc across back top, 20 sc across side gusset top, 38 sc across front top, 20 sc across other side gusset top; join. (116 sc)
Rounds 2–3Ch 1, sc in each st around; join. (116 sc)
Round 4Eyelets Ch 3, skip 1, dc in next st, ch 1, skip 1, dc in next st; rep from around, ch 1, join to top of ch-3. (58 dc, 58 ch-1 sps)
Rounds 5–7Ch 1, sc in each dc and ch-1 sp around; join. (116 sc) Fasten off. Checkpoint: From bottom to top band, bag height should be about 11.5 inches / 29 cm.
Adjustable Shoulder Straps (Make 2)
With sage and 4.0 mm hook, ch 8.
Round 1Sc in 2nd ch from hook and each ch across, turn. (7 sc)
Round 2126 Ch 1, sc in each st across, turn. (7 sc) Strap should measure about 31.5 inches / 80 cm unstretched. Fasten off.Thread each strap through a 1 inch / 25 mm slider. Sew one end securely to the upper back panel and the other end to the lower back corner or D-ring. Repeat for second strap. Box-stitch the sewn ends by hand with several passes of yarn.
Mushroom Cap (Make 5)
With red and 3.5 mm hook, ch 9.
Round 1Sc in 2nd ch from hook and each ch across, turn. (8 sc)
Round 2Ch 1, inc, sc 6, inc, turn. (10 sc)
Round 3Ch 1, sc in each st across, turn. (10 sc)
Round 4Ch 1, dec, sc 6, dec. (8 sc) Do not turn. Curved edge: Ch 1, work 10 sc evenly around the rounded top edge and 8 sc across the lower edge; join. (18 sc) Fasten off.
The finished cap measures approximately 1.4 inches / 3.5 cm wide by 1.8 inches / 4.5 cm tall.
Assembly
Step 1Finishing Steps: Weave in all ends. Steam block lightly from the wrong side, avoiding hardware. Shape the body with towels inside until dry. Attach optional small faux leather style label or leave plain.
Step 2Care Instructions: Hand wash cold. Press water out gently in a towel. Reshape and dry flat. Do not bleach. Do not iron appliques or hardware.
Finishing
- Weave in every yarn tail from the squares, gusset, band, straps, and appliques before blocking.
- Steam block the assembled bag lightly from the wrong side, keeping heat away from hardware.
- Shape the bag with towels inside while it dries, then thread the drawstring and attach the straps.
Why it works
Each granny square round adds a 3-dc cluster at every corner, raising the stitch count each time.
The gusset is worked flat in single crochet rows, since it must seam onto two separate panel edges.
The eyelet round skips a stitch at set intervals, leaving evenly spaced gaps for the drawstring.
What it becomes
- Wear it as a lightweight day bag for a market trip, paired with jeans or a simple cotton dress.
- Use the front pocket for keys and a phone, and the drawstring top for a notebook or light layers.
- Give it as a finished bag to a crochet-loving friend who collects granny square projects.
FAQ
Can I substitute a different yarn for the sage cotton body?
Yes, match the gauge and pick a smooth, firm cotton or cotton blend. Soft acrylic may need a fabric lining since it won't hold the bag's structure as well.
Why does the gusset take so many rows?
The gusset strip wraps the sides and bottom of the bag in one long piece, so it needs its full row count to cover that distance. It's worked flat in single crochet, which keeps the fabric dense and sturdy.
Do I need both hook sizes?
Yes. The 4.0 mm hook handles the granny squares, gusset, and bands, while the smaller 3.5 mm hook keeps the mushroom appliques neat and in proportion.
How do I know my granny squares are the right size?
Block a test square first and measure it against the stated finished size. If it runs big or small, change hook size before making all 22.