Free Pattern
Step-by-Step
Crochet
Bags & TotesSage garden granny square tote crochet pattern
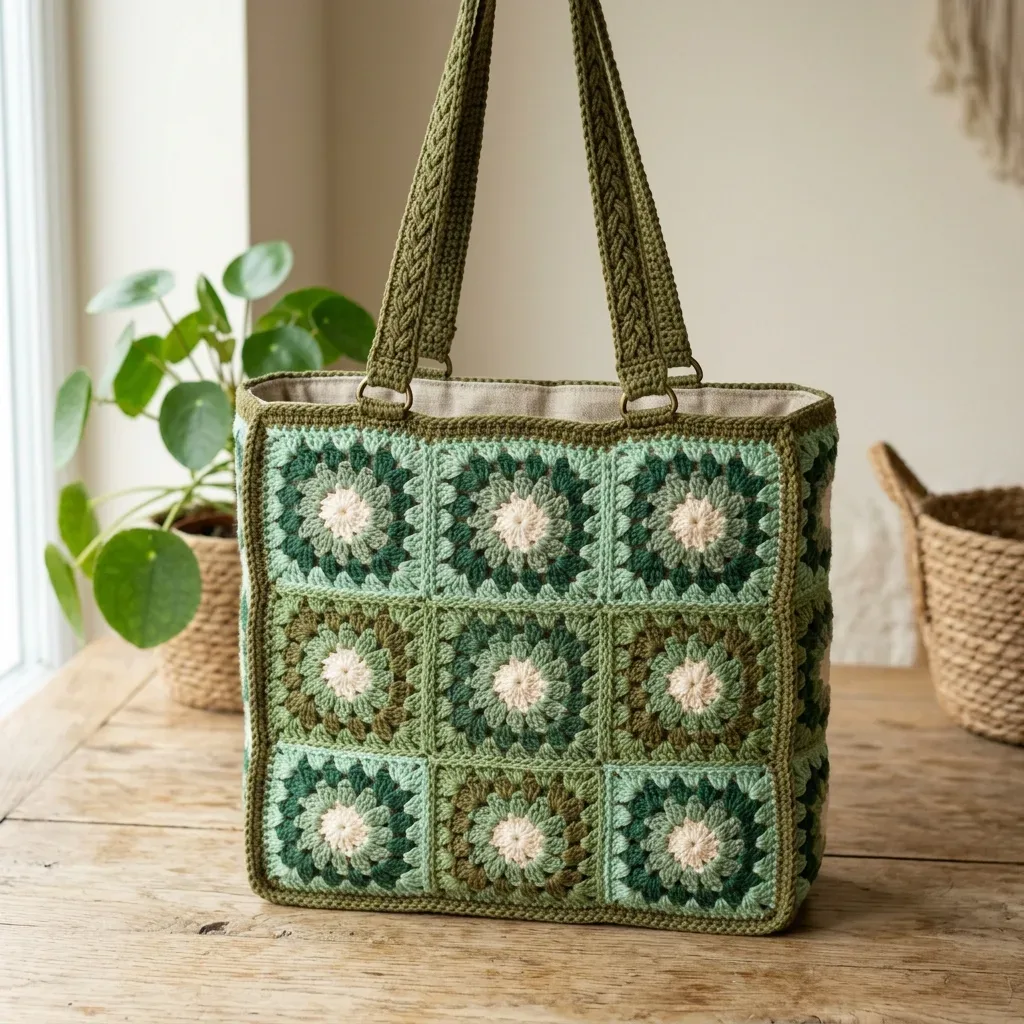
A lined granny square tote in sage tones, joined with a visible ridge seam.
- Level
- Intermediate
- Time
- 14-20 hours
- Hook
- 4.0 mm
- Yarn
- Worsted/DK
Pattern highlights
- Make a test granny square first to confirm your gauge before cutting into eighteen squares of yarn.
- Work eighteen granny squares through their rounds, then wet block each one flat before joining.
- Join the squares into two panels of nine using the flat slip stitch method along shared edges.
- Crochet the bottom piece flat in rows to give the bag its depth and footprint.
- Attach the bottom panel to the joined square panels to form the bag body.
- Wet block the full assembled bag over a box to set its final shape.
- Work the top edge border, then add the lining and braided straps with D-rings.
About This Pattern
I keep a shelf for bags that outgrew their granny square roots. This tote belongs there. Eighteen squares, five colors, and a construction plan that treats the join as decoration rather than a chore to hide. It is the kind of project a collector reaches for when plain blankets feel too easy.
The technique worth noting is the flat slip stitch join. Instead of burying the seam, it leaves a ridge on the right side, and the pattern builds the whole layout around that ridge showing. Add a separately crocheted bottom panel and braided straps threaded through brass D-rings, and you have real structural engineering, not just squares stacked together.
What comes off the hook is a stiff-sided, lined tote, about 14 inches wide and 13 inches tall with 3 inches of depth. It reads as a finished accessory, not a craft fair sample. The strap drop sits around 10 inches, enough to carry over a shoulder without fuss.
Worth knowing
The satisfaction here is structural. You are not just making granny squares, you are making them behave like architecture. The flat slip stitch join turns a seam into a visible ridge, so every join is a line you plan for, not one you apologize for. The separate bottom panel, worked flat in Color E, gives the bag its stance instead of letting it slump. Braided straps anchored to brass D-rings make the whole thing feel like hardware you'd find on a store-bought bag. Blocking the squares individually, then blocking the assembled body again over a box, is the kind of double-check that rewards patience. It is a project that teaches you to trust the math of granny squares at a larger scale.
Common mistakes
- Skipping the test square Make one granny square and check it against the gauge before committing all five colors to eighteen squares. A hook adjustment now saves hours later.
- Hiding the slip stitch join Work the flat slip stitch join on the right side on purpose, since the ridge is meant to show. Burying it flattens the design the pattern is built around.
- Rushing the first block Block every square to the same square measurement before joining. Uneven squares will throw off how the panels line up.
- Skipping the second blocking Wet block the fully assembled bag body over a box before adding the lining. This sets the bag's shape while it is still easy to adjust.
Intermediate
Progress Tracker
0 of 0 rounds
Tap a round to tick it off — your place is saved on this device.
The kit
- You’ll need worsted weight or DK weight yarn in five colors. The pattern calls for:
- Color A (Cream): 55 yards
- Color B (Mint/Light Sage): 120 yards
- Color C (Medium Sage): 110 yards
- Color D (Forest Green): 110 yards
- Color E (Olive Green): 320 yards
Yarn suggestions
- Lion Brand 24/7 Cotton works beautifully for this project. The mercerized cotton creates a sturdy, structured fabric. Paintbox Yarns Simply DK is an affordable acrylic option that’s machine washable. WeCrochet Dishie gives excellent stitch definition if you prefer a 100% cotton worsted.
Substitution note
- Any DK to light worsted weight yarn works well. Choose a smooth, plied yarn without fuzz or halo so your granny square architecture reads cleanly. Avoid fluffy or bouclé textures.
Crochet hook
- US Size G-6 (4.0 mm) for squares and border
Optional
- US Size F-5 (3.75 mm) for tighter strap tension
- Tapestry needle for weaving ends
- Scissors
- 2 antique brass D-rings, 1 inch wide
- Stitch markers
- Blocking mats and pins
- 14 inches by 13 inches woven fabric (linen or canvas weight), cut 2 pieces for lining panels
- Sewing needle and thread to match lining fabric
- Sewing pins
Part 2
Round 1Color A Chain 3 (counts as first dc here and throughout). Work 2 dc into ring. Chain 2. [3 dc into ring, ch 2] 3 times. Join with sl st to top of beginning ch 3. Fasten off Color A.(4 clusters of 3 dc, 4 ch-2 corner spaces)
Round 2Color B Join Color B with sl st in any ch-2 corner sp. Ch 3, work 2 dc in same corner sp. Ch 2. Work 3 dc in same corner sp. [Ch 1. Work 3 dc in next ch-2 corner sp. Ch 2. Work 3 dc in same corner sp.] 3 times. Ch 1. Join with sl st to top of beginning ch 3. Fasten off Color B.(8 clusters of 3 dc, 4 ch-2 corner spaces, 4 ch-1 side spaces)
Round 3Color D Join Color D with sl st in any ch-2 corner sp. Ch 3, work 2 dc in same corner sp. Ch 2. Work 3 dc in same corner sp. [Ch 1. Work 3 dc in next ch-1 side sp. Ch 1. Work 3 dc in next ch-2 corner sp. Ch 2. Work 3 dc in same corner sp.] 3 times. Ch 1. Work 3 dc in next ch-1 side sp. Ch 1. Join with sl st to top of beginning ch 3. Fasten off Color D.(12 clusters of 3 dc, 4 ch-2 corner spaces, 8 ch-1 side spaces)
Round 4Color C Join Color C with sl st in any ch-2 corner sp. Ch 3, work 2 dc in same corner sp. Ch 2. Work 3 dc in same corner sp. [Ch 1. (Work 3 dc in next ch-1 sp. Ch 1.) twice. Work 3 dc in next ch-2 corner sp. Ch 2. Work 3 dc in same corner sp.] 3 times. Ch 1. (Work 3 dc in next ch-1 sp. Ch 1.) twice. Join with sl st to top of beginning ch 3. Fasten off Color C.(16 clusters of 3 dc, 4 ch-2 corner spaces, 12 ch-1 side spaces)
Round 5Color E Join Color E with sl st in any ch-2 corner sp. Ch 3, work 2 dc in same corner sp. Ch 2. Work 3 dc in same corner sp. [Ch 1. (Work 3 dc in next ch-1 sp. Ch 1.) 3 times. Work 3 dc in next ch-2 corner sp. Ch 2. Work 3 dc in same corner sp.] 3 times. Ch 1. (Work 3 dc in next ch-1 sp. Ch 1.) 3 times. Join with sl st to top of beginning ch 3. Fasten off Color E.(20 clusters of 3 dc, 4 ch-2 corner spaces, 16 ch-1 side spaces)
Your square should measure approximately 4.25 inches by 4.25 inches after blocking.
Creating the Bag Bottom
The bottom is worked flat in Color E.
Foundation: Ch 64.
Round 1Sc in 2nd ch from hook and in each ch across. Ch 1, turn. (63 sc)
Round 2through 14: Sc in each st across. Ch 1, turn. (63 sc each row)(63)
Round 15Sc in each st across. Fasten off, leaving a 24-inch sewing tail. (63 sc) The bottom piece should measure approximately 14 inches wide by 3 inches tall.Checkpoint: Hold the bottom piece against the panel bottom edge to confirm the width matches before seaming.
Top Edge Border
Join Color E to any st at the top edge of the bag opening.
Round 1Sc evenly around the full top opening, working 1 sc into each st and adjusting as needed at the corner join points so the edge lies flat. Join with sl st. (approximately 142 sc)
Round 2and 3: Ch 1. Sc in each sc around. Join with sl st. Fasten off after Round 3. (142 sc)
Braided Strap Method
For each strap, work 3 single crochet cords in Color E.
Cord (make 3 per strap, 6 total): Ch 121.
Round 1Sc in 2nd ch from hook and in each ch across. Fasten off. (120 sc) Hold 3 cords parallel. Tie or sl st the ends together at one short end. Braid the three cords snugly for the full length. Tie or sl st the other ends together.Work a row of sc along each long edge of the braid in Color E to neaten: join yarn, sc approximately 120 sts along the edge, fasten off. Repeat on other long edge.Thread one end of the strap through a D-ring. Fold 1 inch of the strap end back over itself and whipstitch securely through all layers.
Simplified Strap Method (Alternative)
Ch 121.
Round 1Sc in 2nd ch from hook and in each ch across. Ch 1, turn. (120 sc)
Round 2through 6: Sc in each st across. Ch 1, turn. (120 sc each row)(120)
Round 7Sc in each st across. Fasten off. (120 sc) Fold strap in half lengthwise (wrong sides together). Sl st the two long edges together. Attach D-ring as above.
Color sequence
Round 1: Color A (Cream)
Round 2: Color B (Mint)
Round 3: Color D (Forest Green)
Round 4: Color C (Medium Sage)
Round 5Color E (Olive Green) Make a magic ring. If you prefer, chain 4 and join with a slip stitch to form a ring instead.
How to Crochet the Granny Square: Variation B
Make 8 squares in this colorway.
Color sequence: Round 1: Color A (Cream)
Round 2: Color C (Medium Sage)
Round 3: Color E (Olive Green)
Round 4: Color D (Forest Green)
Round 5a: Color B (Mint)
Round 5b: Color E (Olive outline) Work Rounds 1 through 4 exactly as Variation A, substituting colors as listed above. Round 5 is worked in two steps for Variation B.
Round 5a (Color B): Join Color B with sl st in any ch-2 corner sp. Ch 3, work 2 dc in same corner sp. Ch 2. Work 3 dc in same corner sp. [Ch 1. (Work 3 dc in next ch-1 sp. Ch 1.) 3 times. Work 3 dc in next ch-2 corner sp. Ch 2. Work 3 dc in same corner sp.] 3 times. Ch 1. (Work 3 dc in next ch-1 sp. Ch 1.) 3 times. Join with sl st to top of beginning ch 3. Do NOT fasten off.
Round 5b (Color E): Without turning, join Color E in any ch-2 corner sp. Sc evenly around the entire perimeter of the square, working 3 sc in each ch-2 corner sp and 1 sc in each dc and 1 sc in each ch-1 sp around. Join with sl st to first sc. Fasten off Color E.
This creates the olive outline on the outer edge that unifies all squares when assembled.
(Approximately 68 sc total around perimeter)
Assembly
Step 1Individual squares: Wet block each square before assembly to 4.25 inches by 4.25 inches.
Step 2Assembled bag: After joining all squares but before attaching the lining, wet block the assembled bag body. Submerge in cool water, press out excess moisture in a towel, then shape the bag over a book or box measuring approximately 14 by 13 by 3 inches. Allow to dry fully (12 to 24 hours for cotton yarn) before proceeding to lining attachment.
Step 3Final touches: Weave in all remaining yarn ends securely on the wrong side using a tapestry needle. Work ends into the back of dc clusters rather than across open chain spaces. Trim all tails close but leave approximately 0.25 inch beyond the securing knot.
Finishing
- Weave in every yarn end from the granny squares and border rounds before any blocking.
- Wet block the assembled bag body over a box shaped to the finished dimensions and let it dry fully.
- Sew in the fabric lining panels and attach the braided straps to the brass D-rings last.
Why it works
The flat slip stitch join leaves a ridge on the right side, so square placement is planned with that seam facing out.
The bag bottom is worked flat in rows rather than in rounds, which lets it sit as a rectangular panel between the two square panels.
The top edge border is worked in rounds after joining, so it unifies the opening after all seams are already in place.
What it becomes
- An everyday market tote that pairs well with a canvas jacket and simple jeans.
- A structured work bag for carrying a notebook and a laptop sleeve.
- A statement piece for a crochet show-and-tell, next to smaller granny square samples.
Original pattern: https://crochr.com/sage-garden-granny-square-tote-free-crochet-pattern/
FAQ
Can I use a different yarn weight than worsted or DK?
The pattern calls for worsted or DK weight for the squares and bottom. Changing weight will change your finished dimensions, so re-check gauge with a test square first.
Why does the join leave a visible ridge?
The flat slip stitch join is worked on the right side, which naturally raises a ridge along the seam. The pattern treats this ridge as a design feature rather than something to hide.
Do I need the brass D-rings specifically?
The materials list calls for two antique brass D-rings at 1 inch wide for the strap attachment. Any D-ring of a similar size should work if brass isn't available.
Is there a simpler strap option?
Yes, the pattern includes a Simplified Strap Method as an alternative to the Braided Strap Method. It's a good substitute if you want to save time on strap construction.