Free Pattern
Step-by-Step
Crochet
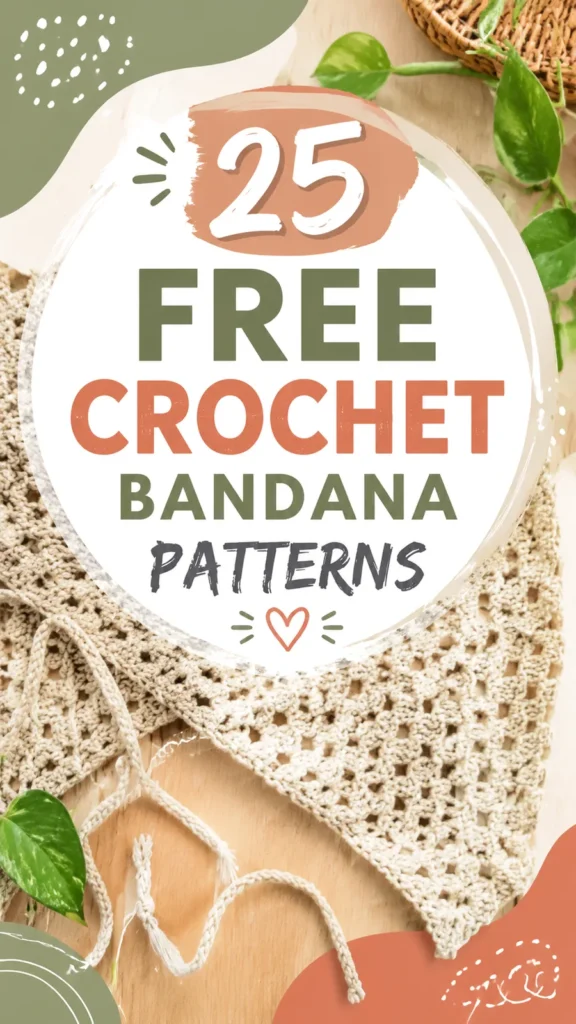
AccessoriesA boho crochet bandana with lacy shell stitch fans
A triangular crochet bandana worked flat in rows, shaped by shells and chain spaces.
- Level
- Easy to Intermediate
- Time
- 3-5 hours
- Hook
- 3.5 mm
- Yarn
- Sport
Pattern highlights
- Start at the top point with a small foundation chain and work the first shell group.
- Turn at the end of every row and work double crochet stitches across to build width.
- Keep increasing at the center point each row so the fabric widens into a triangle.
- Add chain spaces and shell clusters as the rows progress to open up the lace texture.
- Mirror the shell and chain pattern on both sides as the triangle grows wider.
- Finish the bottom edge with a lace-inspired border for a decorative hem.
- Block the damp piece pinned into a triangle shape before wearing it.
About This Pattern
A triangular bandana like this one sits in a particular corner of my collection, somewhere between scarf and hair wrap. It is not trying to be a winter accessory. Instead, it leans into open lace and a light drape, the kind of piece that feels more like decoration than coverage. I keep it filed with warm-weather makes, next to lace shawls and lightweight cowls I reach for when the weight of a project matters as much as the stitch count.
The construction is simple once you see it: start at the top point, work flat in rows, and increase at the center every time you turn. A shell, five double crochets into one space, carries the fan shapes that give the fabric its openwork look. Chain-1 gaps flank the shells by row four, mirrored on both sides, so the increase stays centered while the lace spreads outward toward the base.
Finished, it comes out to roughly 20 inches wide by 10 inches deep, a size meant to sit at the neck or over the head without bulk. The long side edges taper to points, and the lace border along the bottom edge gives the hem a finished, decorative line rather than a plain turn. In a sport-weight cotton blend, it drapes rather than stands, which is exactly what a bandana wants.
The suggested shade is a creamy neutral, close to natural handmade fibers, but the lace pattern reads just as well in earthy tones, soft pastels, bright festival colors, or gradient yarns. Cotton blends, bamboo blends, and soft acrylic yarns all work well since they give the shells enough structure while keeping the fabric comfortable against skin.
Worth knowing
What I like here is the shell stitch doing all the visual work with barely any fuss. Five double crochets into a single chain space, repeated down both sides, and suddenly you have a fan-lace triangle without lace-weight yarn or a chart. The center increase is satisfying to track too, since every row turns on that same ch-2 point, so the shape grows predictably even as the shells multiply. By row four the chain-1 gaps start mirroring on either side, and getting that symmetry right, stitch for stitch, feels like a small puzzle solved. It is a quick enough make that the lace border at the end still feels like a reward, not a chore.
Common mistakes
- Uneven triangle shape Check that the center increase is worked consistently every row.
- Tight fabric Try a larger hook size or loosen your tension.
- Curled edges Blocking usually helps lace crochet settle into shape.
- Incorrect shell placement Count stitches after each row to maintain the repeating pattern.
- Skipping measurements Always measure your work while crocheting, since small differences in yarn thickness and personal tension can change the final size of lightweight accessories.
Easy to Intermediate
Progress Tracker
0 of 0 rounds
Tap a round to tick it off — your place is saved on this device.
The kit
- 180 yards (165 meters) sport-weight cotton or cotton-blend yarn
- 3.5 mm crochet hook (US E-4)
- Scissors
- Tapestry needle for weaving ends
- Optional stitch markers
Main Pattern
Construction Notes: The bandana is worked from the top center point downward. Turning chains do not count as stitches unless noted. Turn after every row.
Row 1Ch 4. Work 2 dc into the first chain made. Ch 2, work 3 dc into the same chain. (6 dc)
Row 2Ch 3, turn. Dc in each dc across until center ch-2 space. Work 2 dc, ch 2, 2 dc in center space. Dc across remaining stitches. (10 dc)
Row 3Ch 3, turn. Dc in each stitch to center space. Work shell in center space. Dc in each stitch across. (14 dc)
Row 4Ch 3, turn. Dc across to center shell. Ch 1, sk 2 dc, shell in next stitch, ch 1, sk 2 dc. Continue pattern to center. Work shell in center point. Mirror the stitch pattern on the other side. (18 dc plus shells)(18)
Row 5Ch 3, turn. Dc in each stitch and chain space across. Work shell in center point. (22 dc)
Project Details
Skill Level Easy to Intermediate Beginner Finished Size Approximately 20 inches wide x 10 inches deep (51 cm x 25 cm)
Yarn Suggested sport-weight cotton blend yarn, approximately 180 yards (165 meters)
Hook Recommended 3.5 mm crochet hook (US E-4)
Gauge Approximately 18 double crochet stitches x 10 rows = 4 inches x 4 inches (10 cm x 10 cm)
Terminology US crochet terms
Special Stitch
Shell: Work 5 dc into the indicated stitch or chain space. This creates a fan-shaped decorative section.
Repeat Section
Repeat Rows 4 and 5 twelve more times, increasing one shell section at each side edge every repeat.
After each repeat, the triangle grows wider by approximately 1 inch (2.5 cm).
The final repeat should end with approximately 46 stitches across each side section and a defined center point.
Lace Border
Ch 1, turn. Sc evenly along the first side edge, placing approximately 2 sc in each row end.
At the bottom point, work 3 sc in the corner.
Sc evenly along the second side edge.
For the tie ends, chain 35, turn, and sl st back along the chain.
Repeat the tie on the opposite side.
Join with sl st to the starting point and fasten off.
Assembly
Step 1Blocking is an important finishing step for this crochet bandana because it helps define the lace texture and smooth the edges. Pin the damp piece into a triangle shape and allow it to dry completely before wearing.
Step 2For long-lasting softness, hand washing or gentle machine washing inside a protective bag is recommended depending on the yarn fiber. Avoid high heat, which can affect the shape of delicate crochet fabric.
Finishing
- Cut yarn, leaving a small tail, and weave in all ends securely with a tapestry needle through the back of the stitches.
- Gently block the bandana by shaping the triangle and allowing the lace spaces to open.
Why it works
The center ch-2 space from row one becomes the fixed increase point for every following row.
Working flat in rows, rather than joined rounds, keeps the triangle open instead of tubular.
Row four adds chain-1 gaps flanking each shell, mirrored on both sides to keep the point centered.
This bandana suits spring, summer, and transitional weather best, since the open lace stays light rather than warm.
Lace crochet depends heavily on consistent tension. Keep your stitches relaxed rather than tight, which helps the shells open naturally and gives the fabric its softer drape.
What it becomes
- A light head covering for sun protection on a walk or at an outdoor market.
- A neck scarf layered over a plain t-shirt for texture without added warmth.
- A decorative wrap tied over a sunhat or draped around a bag strap.
Original pattern: https://duniarecipe.com/boho-hippie-crochet-bandana-pattern-ideas-for-free-spirited-style/
FAQ
Can I make the bandana bigger?
Yes, keep repeating the shell and chain-space pattern before starting the lace border. The source notes say to continue adding repeat sections until the depth you want.
What yarn works best for this pattern?
A sport-weight cotton or cotton blend holds the shell shape while staying soft against skin. Bamboo blends work too if you want something even lighter for summer.
Is this a good first lace project?
It is listed as easy to intermediate, which fits, since the main challenge is tracking the center increase and mirroring shells. Once you get past the first few rows, the repeat is easy to read.
How do I keep the edges even?
Watch the turning chain and the stitch count at each end of the row so both sides grow at the same rate. Blocking afterward also helps straighten any edges that drift.