Free Pattern
Step-by-Step
Crochet
CardigansButterfly Wing Cardigan With Cherry Blossom Appliques
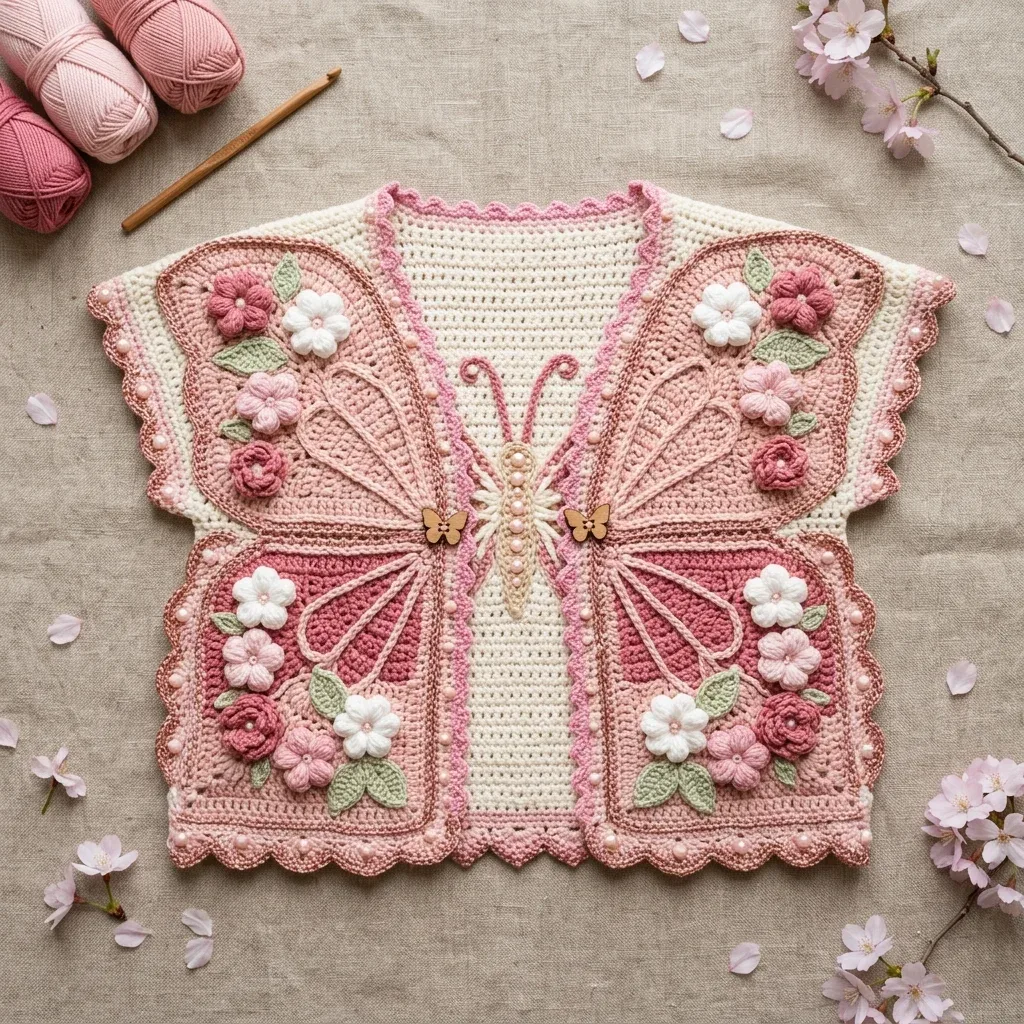
An advanced cardigan with butterfly wing panels, overlay veining, beading, and floral appliques.
- Level
- Advanced
- Time
- 10+ hours across multiple sessions
- Hook
- 3.5 mm
- Yarn
- DK
Pattern highlights
- I start with the back panel, the simplest section, worked flat in single crochet as a warm-up.
- Next come the right and left upper wing panels, shaped at the outer edge as sc2tog decreases build the tip.
- The lower wing panels follow, worked flat before every piece gets seamed at the shoulders and sides.
- Overlay crochet adds the wing vein detail once the panels are joined, defining each quadrant's shape.
- The butterfly body applique runs down the center front, bridging the four wing panels visually.
- Roses, cherry blossoms, and leaves get stitched onto each wing quadrant after the main assembly.
- Borders, beading, and the button closures finish the piece, starting with the hem and ending at the neckline.
About This Pattern
Every collector has a shelf for the pieces that refuse to be quick. This cardigan belongs there. I keep a folder of garments built from separate panels joined after the fact, and this one is the most ambitious entry yet. Four wing quadrants, a plain back, and a center-front butterfly body all have to agree on gauge before they agree on shape. It is the kind of project that earns a spot in the notebook, not the queue.
The wing veins come from overlay crochet worked over the finished panel, a technique that asks for patience more than skill. Three-dimensional roses and cherry blossoms are built separately in Colors C, D, and F, then sewn on after seaming. A scalloped shell border finishes the hem, front edges, and sleeve openings, and pearl beads get threaded along that border by hand. Surface slip stitch ties the butterfly body to the front opening. None of these steps are hard alone. Stacked together, across four panels, they add up.
What comes off the hook is a cropped bolero-style cardigan, worn open rather than closed. The back is a clean single crochet rectangle, almost severe next to the busy wing fronts. Wooden butterfly buttons and pearl beading catch the eye along the center front. At roughly 36 in / 91 cm chest circumference worn open, it reads as a statement piece, not an everyday layer.
Worth knowing
The satisfaction here is in the overlay wing veins. Working them over an already-finished panel means I can see the butterfly shape emerge stitch by stitch, not guess at it from a chart. Building six roses and twelve cherry blossoms separately, then placing them by eye on the wing quadrants, lets me decide where the motif feels balanced rather than following a fixed diagram. The scalloped shell border ties hem, front edge, and sleeve openings into one finished language. Threading 80 to 100 pearl beads along that border afterward is slow, meditative work. By the time I attach the wooden butterfly buttons, the cardigan has stopped being four panels and started being one object with a center seam running straight down its spine.
Common mistakes
- Skipping the gauge swatch This pattern states gauge is mandatory; a mismatched gauge throws off both fit and how the motif lines up across panels.
- Decreasing on the wrong wing edge Keep track of which side is the outer wing-tip edge before working sc2tog, since the inner center-front edge must stay straight.
- Rushing the overlay vein work Overlay crochet distorts easily if worked too tight; check that the panel still lies flat as you go.
- Placing floral appliques before seaming Attach roses, cherry blossoms, and leaves only after the panels are joined, so placement reads correctly across the whole front.
- Threading beads with the wrong tool Use the beading needle and coordinating thread, not yarn directly, since pearl bead holes are sized for thread, not DK yarn.
Advanced
Progress Tracker
0 of 0 rounds
Tap a round to tick it off — your place is saved on this device.
The kit
- Color A (Cream/off-white): approximately 600 yards / 550 m
- Color B (Medium dusty rose/mauve pink): approximately 400 yards / 365 m
- Color C (Light blush pink): approximately 200 yards / 183 m
- Color D (Deep rose/dark pink): approximately 150 yards / 137 m
- Color E (Sage green): approximately 80 yards / 73 m
- Color F (White): approximately 80 yards / 73 m
- Lion Brand Yarn Feels Like Butta in Blush, Dusty Pink, and White works beautifully. This smooth DK-weight acrylic has excellent stitch definition and soft hand, ideal for the wing vein overlay work.
- Paintbox Yarns Simply DK offers an affordable, wide-palette option with excellent color matching across the cream, blush, rose, and sage shades needed. Consistent twist and smooth texture make the scallop borders crisp.
- Drops Safran (DK cotton-blend) gives a more structured, heirloom quality finish similar to the photographed garment. This cotton-blend gives the panels slight body so the wing motifs hold their shape without blocking stiffener.
Substitution note
- Any smooth DK weight yarn that achieves the stated gauge may be used. Avoid fluffy, bouclé, or highly textured yarns as the wing vein overlay and scallop borders will be obscured.
- US size E-4 / 3.5 mm crochet hook (primary)
- US size D-3 / 3.25 mm crochet hook (for floral appliques and finer details)
- Stitch markers, at least 10
- Yarn needle for seaming and weaving ends
- Approximately 80 to 100 white or cream pearl beads , 6 mm to 8 mm diameter with large enough holes for yarn or thread
- Beading needle and coordinating thread for bead attachment
- Sewing needle and thread to match Color B for button attachment
- Blocking mats and pins
- Rust-proof T-pins
- Spray bottle with water or steamer
Section 1: Back Panel
The back panel is worked from the bottom hem upward in single crochet with Color A. This is the simplest section, so it is a great warm-up before tackling the more complex wing panels.
Foundation: With Color A and hook E-4, chain 77.
Round 1(RS): sc in 2nd ch from hook and in each ch across. Turn. (76 sc)
Rounds 2–10ch 1, sc in each st across. Turn. (76 sc) Continue working sc in each st across every row without shaping until piece measures 7 in / 18 cm from foundation chain. This is the armhole split point. At gauge, this should be approximately 42 rows.Checkpoint: After completing the first 7 in / 18 cm, the piece should be 76 sc wide and approximately 42 rows tall. Set a stitch marker at each edge of Row 42 to mark the beginning of the armhole shaping.
Right Upper Wing Panel
Foundation: With Color C and hook E-4, chain 46.
Round 1(RS): sc in 2nd ch from hook and in each ch across. Turn. (45 sc)
Rounds 2–5ch 1, sc in each st across. Turn. (45 sc) Begin Shaping: The outer (wing-tip) edge is on the RIGHT side of your work as you face it. The inner (center front) edge is on the LEFT.
Round 6ch 1, sc in each st to last 2 sts, sc2tog at outer (right) edge. Turn. (44 sc)
Rounds 7–8ch 1, sc in each st across. Turn. (44 sc)
Round 9ch 1, 2 sc in first st (outer edge inc), sc in each st to end. Turn. (45 sc)
Round 10ch 1, sc in each st across. Turn. (45 sc)
Round 11ch 1, 2 sc in first st, sc in each st across. Turn. (46 sc)
Round 12ch 1, sc in each st across. Turn. (46 sc)
Round 13ch 1, 2 sc in first st, sc in each st to last 2 sts, sc2tog at inner (left/neckline) edge. Turn. (46 sc)
Round 14ch 1, sc2tog at inner edge, sc in each st to end. Turn. (45 sc)
Round 15ch 1, 2 sc in first st, sc in each st to last 2 sts, sc2tog. Turn. (45 sc)
Round 16ch 1, sc2tog, sc in each st to end. Turn. (44 sc)
Rounds 17–18ch 1, sc in each st across. Turn. (44 sc)
Round 19ch 1, sc2tog at outer edge, sc in each st across. Turn. (43 sc)
Round 20ch 1, sc in each st across. Turn. (43 sc)
Round 21ch 1, sc2tog at outer edge, sc in each st to last 2 sts, sc2tog at inner edge. Turn. (41 sc)
Rounds 22–23ch 1, sc in each st across. Turn. (41 sc)
Right Lower Wing Panel
Foundation: With Color B and hook E-4, chain 47.
Rounds 1–4sc in 2nd ch from hook (Row 1), then ch 1, sc in each st across. Turn. (46 sc)
Hem Border
With RS facing, join Color B at the right side seam at the hem edge.
Round 1ch 1, sc evenly around entire hem edge. Target 162 sc. Join with sl st. (162 sc)
Round 2ch 1, sc in each st around. Join with sl st. (162 sc)
Round 3Shell border ch 1, sc in first st, sk 2 sts, 5 dc in next st (shell made), sk 2 sts, sc in next st; rep around, ending with sl st to first sc. (27 shells)Fasten off.(27)
Front Edge and Neckline Border
With RS facing, join Color B at lower right front edge.
Round 1sc evenly up the right front edge, around the neckline, and down the left front edge. Target 206 sc. Turn.
Round 2ch 1, sc in each st. Turn. (206 sc)
Round 3Shell border ch 1, sc in first st, sk 2 sts, 5 dc in next st, sk 2 sts, sc in next st, rep across. Fasten off.
Sleeve Opening Border
With RS facing, join Color B at the bottom of the right armhole opening.
Round 1sc evenly around entire armhole opening. Target 68 sc. (68 sc)
Round 2ch 1, sc in each st around. Join. (68 sc)
Round 3Shell border ch 1, sc in first st, (sk 2, 5 dc in next, sk 2, sc in next) around. Join.Fasten off. Repeat for left armhole.
Section 7: Butterfly Body Applique
With Color B and hook E-4, chain 5.
Round 1sc in 2nd ch from hook and in each remaining ch. Turn. (4 sc)
Round 2ch 1, 2 sc in first st, sc in next 2 sts, 2 sc in last st. Turn. (6 sc)
Rounds 3–7ch 1, sc in each st across. Turn. (6 sc)
Round 8ch 1, 2 sc in first st, sc in next 4 sts, 2 sc in last st. Turn. (8 sc)
Rounds 9–10ch 1, sc in each st across. Turn. (8 sc)
Round 11ch 1, sc2tog, sc in next 4 sts, sc2tog. Turn. (6 sc)
Rounds 12–13ch 1, sc in each st across. Turn. (6 sc)
Round 14ch 1, sc2tog, sc in next 2 sts, sc2tog. Turn. (4 sc)
Round 15ch 1, sc in each st across. Turn. (4 sc)
Round 16ch 1, sc2tog, sc2tog. Turn. (2 sc)
Round 17ch 1, sc2tog. Fasten off. (1 sc) Thread 5 to 8 pearl beads onto Color B or coordinating thread and sew in a vertical line along the center of the butterfly body piece.
Pin the butterfly body strip vertically along the center front opening. The widest point should sit at the junction between upper and lower wings. Hand-sew in place.
Attach the two wooden butterfly buttons through both the butterfly body strip and the front edge at the wing junction points.
Three-Dimensional Rose (make 6 total)
With Color D and hook D-3, chain 36.
Round 1dc in 4th chain from hook, dc in next 2 chains, (ch 2, sk 2 ch, dc in next 3 ch) 7 times, dc in last 3 ch. Turn.
Round 2ch 1, turn to work along bottom edge of foundation chain. In each ch-2 sp, work (sc, hdc, 3 dc, hdc, sc). Fasten off leaving a 12-in tail.Roll the strip from one end, coiling as you go, and use the tail to stitch through the base to secure layers.
Cherry Blossom (make 12 total: 6 in Color F, 6 in Color C)
With hook D-3, magic ring.
Round 1ch 1, work 5 sc into ring, sl st to first sc to join. (5 sc)
Round 2(ch 3, 2 dc in same st, ch 3, sl st in same st, sl st in next st) 5 times. (5 petals)Fasten off. Pull magic ring closed.(5)
Small Leaf (make 10 total)
With Color E and hook D-3, chain 10.
Round 1sl st in 2nd ch from hook, sc in next ch, hdc in next ch, dc in next 3 ch, hdc in next ch, sc in next ch, sl st in last ch. Now work back along the opposite side of the foundation chain: sl st in next, sc in next, hdc in next, dc in 3 next, hdc in next, sc in next, sl st in last. Fasten off.
Arrange and sew all appliques onto the wing panels as shown in the reference images, clustering roses with cherry blossoms and leaves in each wing quadrant.
Begin Color D Center Square Section
The center square occupies stitches 9 through 38 (30 sts), from Row 5 through Row 26.
Round 5ch 1, sc in first 8 sts in Color B, join Color D and sc in next 30 sts in Color D, rejoin Color B and sc in last 8 sts. Turn. (46 sc: 8 B + 30 D + 8 B)
Rounds 6–26Continue this color arrangement, maintaining 8 sc in Color B at each side and 30 sc in Color D in the center. (46 sc per row)(46)
Rounds 27–30ch 1, sc in each st across in Color B only. Turn. (46 sc) Fasten off. The lower wing panel is 46 sc wide and 30 rows tall.
Armhole Edge Shaping (Upper Wing)
Round 24ch 1, sc2tog, sc in each st across. Turn. (40 sc)
Round 25ch 1, sc in each st to last 2 sts, sc2tog. Turn. (39 sc)
Round 26ch 1, sc2tog, sc in each st across. Turn. (38 sc)
Rounds 27–28ch 1, sc in each st across. Turn. (38 sc) Place stitch markers at both edges to note the shoulder join line.
Shoulder Tab (Right Upper Wing)
Round 29ch 1, sc in first 22 sts only. Turn, leaving rem 16 sts unworked. (22 sc)
Rounds 30–31ch 1, sc in each st across. Turn/Fasten off. (22 sc)
Armhole Shaping (Back)
Round 43(RS): ch 1, sc2tog, sc in each st to last 2 sts, sc2tog. Turn. (74 sc)
Round 44ch 1, sc2tog, sc in each st to last 2 sts, sc2tog. Turn. (72 sc)
Round 45ch 1, sc2tog, sc in each st to last 2 sts, sc2tog. Turn. (70 sc)
Rounds 46–50ch 1, sc in each st across. Turn. (70 sc) Continue working even on 70 sc until armhole measures 7 in / 18 cm from armhole split markers. This brings the back to full length, approximately 14 in / 35.5 cm total height.
Shoulder Shaping (Back)
Work will now split for right and left shoulder sections to create the neck opening.
Right Back Shoulder: Row (neck split): ch 1, sc in first 22 sts. Turn, leaving remaining sts unworked. (22 sc)
Work 2 more rows even on these 22 sts. Fasten off.
Left Back Shoulder:
Rejoin Color A in stitch 49 (counting from right edge), leaving sts 23 through 48 (26 sts) as the back neck opening.
Row (neck split): ch 1, sc in each of next 22 sts. Turn. (22 sc)
Work 2 more rows even on these 22 sts. Fasten off.
Checkpoint: The finished back panel should measure 15 in / 38 cm wide at the hem, taper to 14 in / 35.5 cm across the armhole section, and have two shoulder tabs each 22 sts / approximately 4.4 in / 11 cm wide.
Section 2: Upper Wing Panels
Each upper wing panel serves as both the front upper bodice section and the butterfly upper wing. The upper wing is wider at the outer edge (sleeve edge) and tapers toward the center front edge.
Left Upper Wing Panel
Work as Right Upper Wing Panel but mirror all shaping. The outer edge is now on the LEFT as you face your work. The inner (neckline) edge is on the RIGHT.
Checkpoint: Each upper wing panel should be approximately 9 in / 23 cm tall and taper from 45 sts at the bottom to a 22-st shoulder tab at the top.
Section 3: Lower Wing Panels
The lower wings are the squarish quadrants at the bottom front of the cardigan. Each features a Color D rose-toned square set within a Color B border.
Left Lower Wing Panel
Work as Right Lower Wing Panel. The lower wings are near-identical rectangles.
Checkpoint: Each lower wing panel should be 46 sc wide and 30 rows tall, approximately 9.2 in / 23 cm wide and 5 in / 12.7 cm tall.
Section 4: Wing Vein Overlay
After all four wing panels are complete but before assembly, add the wing vein lines using surface slip stitch.
Right Upper Wing Vein Lines: Thread Color B onto hook. Starting from the approximate center of the upper wing panel where the butterfly body will run, work surface slip stitch in a curved arc toward the outer upper corner. Work 4 to 5 such arcs radiating from the center, spaced approximately 5 rows apart.
Repeat on the Right Lower Wing, starting from the inner-lower edge and arcing downward and outward. Add a second pass using Color D for veins within the rose-colored center square.
Mirror all vein lines for Left Upper Wing and Left Lower Wing.
Section 6: Borders
All border rounds are worked with Color B unless otherwise stated.
Assembly
Step 1Thread approximately 80 to 100 pearl beads along the front edges and hem border using a beading needle and coordinating thread. Space beads evenly along the scalloped shell border, placing one bead at the tip of each shell or between shells as desired.
Step 2For the butterfly body antennae, make a twisted cord or chain approximately 6 in / 15 cm. Fold in half and stitch the fold to the top center of the neckline. Curve the two free ends outward and upward to simulate antennae. Attach small picot loops or beads to the tips.
Step 3Block the finished cardigan gently using steam or spray blocking. Pin out the wing shapes to emphasize the butterfly silhouette and allow to dry completely before wearing.
Finishing
- Weave in all ends from the panels, appliques, and borders before blocking anything into place.
- Block the back and wing panels flat, using the spray bottle or steamer to set the scallop shape.
- Stitch on the roses, cherry blossoms, and leaves, then thread pearl beads along the hem and front edge and attach the wooden buttons.
Why it works
The right upper wing panel decreases only at its outer edge, leaving the inner center-front edge straight so the wing tapers to a point away from the opening.
The back panel is worked flat in plain single crochet from hem to armhole marker, with no shaping until the split point, keeping the reverse deliberately plain against the busy fronts.
The wing vein overlay is worked as a separate section after the panels are seamed, so the vein lines can cross panel boundaries without interrupting the base fabric.
What it becomes
- Wear it open over a plain fitted top or dress, letting the wing panels frame the front.
- Layer it over a solid-color sweater for a cropped evening topper.
- Use it as a statement piece for a crochet show-and-tell or guild meeting, since the overlay and appliques reward close inspection.
Original pattern: https://crochetwithmia.com/pink-cherry-blossom-butterfly-cardigan-crochet-pattern/
FAQ
Can I make this cardigan if I have never done overlay crochet?
The pattern itself is rated advanced and assumes some comfort with overlay or tapestry crochet already. I'd practice the wing vein technique on a swatch before starting the real panels.
Why is the back panel so much simpler than the front?
The back is worked in plain single crochet with no shaping until the armhole split, keeping the reverse clean. All the complexity sits in the four wing quadrants and the center-front butterfly body.
Do I need both hook sizes listed?
Yes. The E-4 / 3.5 mm hook handles the main panels and borders, while the D-3 / 3.25 mm hook is for the smaller floral appliques.
What yarn weight does this pattern need?
Any smooth DK weight yarn that meets the stated gauge works, from acrylic to a cotton-blend like Drops Safran. Avoid fluffy or bouclé yarns since they will obscure the wing vein overlay and scallop borders.