Free Pattern
Step-by-Step
Crochet
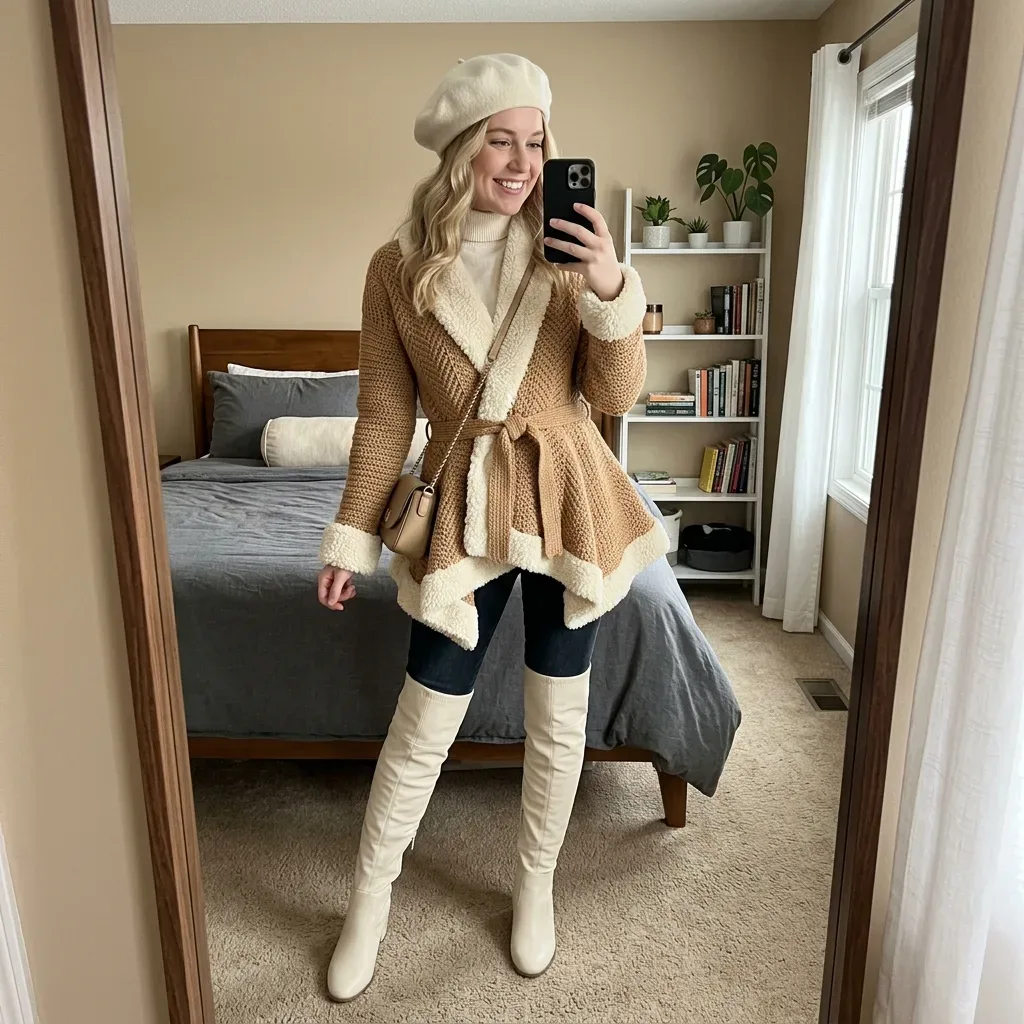
CardigansCamel tan cardigan with woven stitch and shearling trim
A woven-stitch cardigan with cream shearling trim, shaped from waist to a pointed handkerchief hem.
- Level
- Intermediate
- Time
- 35-50 hours
- Hook
- 6.5 mm
- Yarn
- Bulky (Weight 5)
Pattern highlights
- Work the back panel and both front panels flat, keeping the woven stitch rhythm consistent across every row.
- Shape the waist on the back and right front using paired decrease rows worked into the same stitch pattern.
- Flare the hip on the back and right front so the panels widen again before the hem begins.
- Shape the handkerchief hem on all three body panels, letting the edge break into points instead of a straight line.
- Work both sleeves flat from the cap down to the cuff, shaping the cap first.
- Block all five panels before seaming so gauge evens out across the large surfaces.
- Seam shoulders, sides, and sleeves, then set in sleeves and add the shearling trim and tie belt.
About This Pattern
This cardigan lands in the 'statement piece' corner of my collection, not the quick-weekend pile. It asks for five flat panels, careful gauge, and patience through waist shaping and a handkerchief hem. I keep it filed next to the pieces I reach for when a plain sweater feels too safe. It is not a first garment, but it rewards someone who has already seamed a cardigan and wants to push into real shaping.
The body runs on a two-row repeat: a back-loop hdc row, then a front-loop slip stitch row. That slip stitch row is what gives the fabric its woven look, so tension has to stay loose or it curls. Waist decreases and hip increases happen inside that same rhythm, row after row, all the way down to the pointed hem.
What comes off the hook is a camel tan cardigan with a fitted waist, a flared skirt, and shearling-textured trim at the collar, cuffs, and hem. The tie belt does the shaping work visually. Two colors, one woven stitch, and a hem that points instead of hangs straight - that's the whole trick of it.
Worth knowing
What I like about this one is the woven stitch itself - alternating back-loop hdc with front-loop slip stitch until the fabric reads like it was loomed, not hooked. Watching that horizontal line appear row after row is oddly satisfying, even deep into the back panel. The waist shaping and hip flare use the same hdc2tog decreases and increases built right into the pattern, so shaping never interrupts the texture. Then the handkerchief hem breaks the straight edge into points, which is the part that took me longest to get right. Add the cream boucle trim at collar and cuffs, and a cardigan that could have looked plain suddenly reads as shearling-lined. That contrast is the whole reason to make it.
Common mistakes
- Losing track of the loop Working hdc-blo when the row calls for sl st-flo blurs the woven line. Check which row type you're on before the first stitch.
- Tight slip stitches curling the fabric Slip stitches are naturally short, and tight tension makes Row B curl. Keep tension deliberately loose on every front-loop slip stitch row.
- Counting stitches mid-row Slip stitch rows are hard to count accurately. Always count stitches at the top of an hdc row instead.
- Skipping blocking before seaming Five large panels seam unevenly without blocking first. Pin each piece to measurement and let it dry completely before joining.
Intermediate
Progress Tracker
0 of 0 rounds
Tap a round to tick it off — your place is saved on this device.
The kit
- Main Color (MC): Camel tan, bulky weight (weight 5) yarn with a slight wool or acrylic blend for stitch definition. You will need approximately 1,400 to 1,600 yards / 1,280 to 1,463 meters .
- Contrast Color (CC): Cream or off-white boucle, loop, or sherpa-texture yarn in bulky weight (weight 5). You will need approximately 400 to 500 yards / 365 to 457 meters .
- Option 1: Lion Brand Wool-Ease Thick and Quick in "Caramel" (MC) and Lion Brand Pound of Love in "Antique White" (CC). Note that Pound of Love is worsted weight, so you may need to hold it doubled for the trim.
- Option 2: Paintbox Yarns Simply Chunky in "Caramel Brown" (MC) and Paintbox Yarns Simply DK held tripled in "Cream" (CC).
- Option 3: Cascade Yarns Magnum in "Camel" (MC) and Cascade Yarns Cloud in "Cream" (CC). Cloud has a subtle halo that mimics shearling beautifully and is the closest match to my original vision.
Substitution tip
- For MC, choose any bulky weight yarn with good stitch definition and low halo. Hairy or fluffy MC yarns will obscure the woven texture. For CC, choose a yarn with boucle, loop pile, sherpa texture, or strong halo so the trim reads as shearling.
Hook for MC
- US Size K-10.5 / 6.5 mm
Hook for CC
- US Size J-10 / 6.0 mm (the tighter hook controls boucle bulk)
- Yarn needle for seaming
- Stitch markers (at least 8)
- Measuring tape
- Scissors
- 4 removable stitch markers for collar pickup
Sleeves (Make 2 Identical)
The sleeve is worked flat from the top (sleeve cap) downward to the cuff.
Foundation Chain: 51. (50 working stitches at widest cap point.)
Foundation Row (RS): Hdc in 2nd ch from hook and in each ch across. Ch 1, turn. (50 hdc)
Cap Shaping (Rows 1 through 10):
(RS): 2 hdc-blo in first st, hdc-blo to last st, 2 hdc-blo in last st. Ch 1, turn. (38 sts)
Round 1(RS): Hdc2tog, hdc-blo to last 2 sts, hdc2tog. Ch 1, turn. (48 sts)
Round 2(WS): Sl st-flo across. Ch 1, turn. (48 sts)
Round 3(RS): Hdc2tog, hdc-blo to last 2 sts, hdc2tog. Ch 1, turn. (46 sts)
Round 4(WS): Sl st-flo across. Ch 1, turn. (46 sts)
Round 5(RS): Hdc2tog, hdc-blo to last 2 sts, hdc2tog. Ch 1, turn. (44 sts)
Round 6(WS): Sl st-flo across. Ch 1, turn. (44 sts)Step by step: Rows 53 through 54 (1 WTS pair): Work even. (44 sts each row).
Round 7(RS): Hdc2tog, hdc-blo to last 2 sts, hdc2tog. Ch 1, turn. (42 sts)
Round 8(WS): Sl st-flo across. Ch 1, turn. (42 sts)(RS): 2 hdc-blo in first st, hdc-blo to last st, 2 hdc-blo in last st. Ch 1, turn. (44 sts)
Round 9(RS): Hdc-blo across. Ch 1, turn. (42 sts)
Round 10(WS): Sl st-flo across. Ch 1, turn. (42 sts) Continue working the sleeve body in WTS, tapering gradually toward the wrist. Work even until sleeve measures approximately 22 in / 56 cm from foundation, then work final rows even at approximately 35 stitches for the cuff opening.
Waist Shaping for Back (Rows 31 through 44)
Round 31RS, Row A type Ch 1, turn. Hdc2tog over first 2 sts, hdc-blo in each st across to last 2 sts, hdc2tog over last 2 sts. Ch 1, turn. (72 sts)
Round 32WS, Row B type Sl st-flo in each st across. Ch 1, turn. (72 sts)(RS): 2 hdc-blo in first st, hdc-blo to last st, 2 hdc-blo in last st. Ch 1, turn. (42 sts)
Round 33(RS): Hdc2tog, hdc-blo across to last 2 sts, hdc2tog. Ch 1, turn. (70 sts)
Round 34(WS): Sl st-flo across. Ch 1, turn. (70 sts)(RS): 2 hdc-blo in first st, hdc-blo to last st, 2 hdc-blo in last st. Ch 1, turn. (40 sts)
Round 35(RS): Hdc2tog, hdc-blo across to last 2 sts, hdc2tog. Ch 1, turn. (68 sts)
Round 36(WS): Sl st-flo across. Ch 1, turn. (68 sts)
Round 37(RS): Hdc-blo in each st across. Ch 1, turn. (68 sts)
Round 38(WS): Sl st-flo across. Ch 1, turn. (68 sts)Rows 39 through 44 (3 additional WTS pairs): Work even. (68 sts each row) Checkpoint: After Row 44, your piece should measure approximately 14 in / 35.5 cm from the foundation row.
Waist Shaping for Right Front (Rows 31 through 44)
Round 31(RS): Hdc2tog, hdc-blo to last 2 sts, hdc2tog. Ch 1, turn. (40 sts)
Round 32(WS): Sl st-flo across. Ch 1, turn. (40 sts)
Round 33(RS): Hdc2tog, hdc-blo to last 2 sts, hdc2tog. Ch 1, turn. (38 sts)
Round 34(WS): Sl st-flo across. Ch 1, turn. (38 sts)
Round 35(RS): Hdc2tog, hdc-blo to last 2 sts, hdc2tog. Ch 1, turn. (36 sts)
Round 36(WS): Sl st-flo across. Ch 1, turn. (36 sts)Rows 37 through 44 (4 WTS pairs): Work even in WTS. (36 sts each row)
Waist to Hip Flare (Rows 45 through 54)
Round 45(RS): Ch 1, turn. 2 hdc-blo in first st, hdc-blo in each st across to last st, 2 hdc-blo in last st. Ch 1, turn. (70 sts)
Round 46(WS): Sl st-flo across. Ch 1, turn. (70 sts)
Round 47(RS): 2 hdc-blo in first st, hdc-blo across to last st, 2 hdc-blo in last st. Ch 1, turn. (72 sts)
Round 48(WS): Sl st-flo across. Ch 1, turn. (72 sts)
Round 49(RS): 2 hdc-blo in first st, hdc-blo across to last st, 2 hdc-blo in last st. Ch 1, turn. (74 sts)
Round 50(WS): Sl st-flo across. Ch 1, turn. (74 sts)
Round 51(RS): 2 hdc-blo in first st, hdc-blo across to last st, 2 hdc-blo in last st. Ch 1, turn. (76 sts)
Round 52(WS): Sl st-flo across. Ch 1, turn. (76 sts)
Round 53(RS): Work even hdc-blo across. Ch 1, turn. (76 sts)
Round 54(WS): Sl st-flo across. Ch 1, turn. (76 sts) Checkpoint: After Row 54, the piece should measure approximately 18 in / 45.7 cm from the foundation row.
Handkerchief Hem Shaping for Back (Rows 55 through 72)
The back hem continues straight on the sides while the center back drops into a V point. Place a marker at stitch 38 (center of the 76-stitch row).
Round 55(RS): Hdc-blo across to 2 sts before center marker, hdc2tog, sm, hdc2tog, hdc-blo to end. Ch 1, turn. (74 sts)
Round 56(WS): Sl st-flo across. Ch 1, turn. (74 sts)
Round 57(RS): Hdc-blo to 2 sts before marker, hdc2tog, sm, hdc2tog, hdc-blo to end. Ch 1, turn. (72 sts)
Round 58(WS): Sl st-flo across. Ch 1, turn. (72 sts) Continue this pattern through Row 72:Row 59: (70 sts) | Row 60: (70 sts)Row 61: (68 sts) | Row 62: (68 sts)Row 63: (66 sts) | Row 64: (66 sts)Row 65: (64 sts) | Row 66: (64 sts)Row 67: (62 sts) | Row 68: (62 sts)Row 69: (60 sts) | Row 70: (60 sts)
Round 71(58 sts) | Row 72: Sl st-flo across. Fasten off. (58 sts) Back panel total from foundation to side edge: approximately 18 in / 45.7 cm.
Back panel total from foundation to center back point: approximately 26 in / 66 cm.
Handkerchief Hem for Right Front (Rows 55 through 72)
The point falls at the outer side seam edge. Decreases are worked at the center front edge only.
Round 55(RS): Hdc-blo across to last 2 sts, hdc2tog at center front edge. Ch 1, turn. (43 sts)
Round 56(WS): Sl st-flo across. Ch 1, turn. (43 sts) Continue this pattern, decreasing at the center front edge every RS row:Row 57: (42 sts) | Row 58: (42 sts)Row 59: (41 sts) | Row 60: (41 sts)Row 61: (40 sts) | Row 62: (40 sts)Row 63: (39 sts) | Row 64: (39 sts)Row 65: (38 sts) | Row 66: (38 sts)Row 67: (37 sts) | Row 68: (37 sts)Row 69: (36 sts) | Row 70: (36 sts)
Round 71(35 sts) | Row 72: Sl st-flo across. Fasten off. (35 sts)
Handkerchief Hem for Left Front (Rows 55 through 72)
Round 55(RS): Hdc2tog at center front edge (first 2 sts), hdc-blo to end. Ch 1, turn. (43 sts)
Round 56(WS): Sl st-flo across. Ch 1, turn. (43 sts) Continue this pattern, decreasing at the beginning of RS rows through Row 72, ending with (35 sts) . Fasten off.
Back Panel
The back panel is worked from the top (neckline/shoulder) downward to the hem. This top-down approach allows you to try on the piece and adjust length before adding the decorative hem shaping.
Foundation:
Chain 75. (This gives 74 working stitches plus 1 turning chain replacement. Do not skip any chains.)
Foundation Row (RS): Hdc in the 2nd chain from hook and in each chain across. Ch 1, turn. (74 hdc)
This foundation row establishes the full shoulder width.
Back Body, Working Downward:
Work in WTS (alternating Row A and Row B) for the following rows. Maintain 74 stitches on every row until shaping begins.
Rows 1 through 30 (15 WTS pairs): Work even in WTS. No increases or decreases. (74 sts each row)
Checkpoint: After Row 30, your piece should measure approximately 9 to 9.5 in / 23 to 24 cm from the foundation row. This represents the area from shoulder to just below underarm.
Right Front Panel
The right front panel (as worn) sits on your right side when wearing the garment. It is worked top-down matching the back panel construction.
Foundation: Chain 43. (Gives 42 working stitches.)
Foundation Row (RS): Hdc in 2nd chain from hook and in each chain across. Ch 1, turn. (42 hdc)
Rows 1 through 30 (15 WTS pairs): Work even in WTS. (42 sts each row)
Left Front Panel
Work as Right Front Panel with shaping mirrored. On RS rows, the center front opening is at your left. All decreases in the handkerchief hem section are worked at the first 2 stitches of RS rows instead of the last 2 stitches.
Foundation Chain: 43. (42 working stitches)
Foundation Row (RS): Hdc in 2nd ch from hook and in each ch across. Ch 1, turn. (42 hdc)
Rows 1 through 30: Work even WTS. (42 sts) Work waist shaping Rows 31 through 44 exactly as the right front panel.
Work hip flare Rows 45 through 54 exactly as the right front panel.
Assembly
Step 1Blocking: Wet-block or steam-block all five panels before seaming. Pin to measurements and allow to dry completely. This step makes seaming significantly easier and gives you a more polished finished garment.
Step 2Seaming Order: 1. Shoulder seams: Using slip stitch seam method, join back panel to front panels at shoulders 2. Side seams: Join front panels to back panel from underarm to the start of hem shaping 3. Sleeve seams: Fold each sleeve and seam from underarm to cuff 4. Set in sleeves: Attach sleeves to armhole openings, matching cap shaping to shoulder seam
Step 3Shawl Collar: After seaming, pick up stitches along the right front edge, across the back neck, and down the left front edge. Work in WTS for approximately 3 to 4 inches of collar depth. The collar naturally folds over when worn.
Step 4Shearling Trim Attachment: Work shearling trim strips in CC for the collar outer edge, both cuffs, and the entire hem. Measure each edge before chaining to ensure proper fit. Whip stitch or slip stitch the trim in place with the boucle side facing outward.
Step 5Belt: Chain approximately 200 in MC. Work 2 rows of sc. Fasten off and weave in ends. The belt threads through the waist area and ties at the front.
Finishing
- Wet-block or steam-block all five panels first and let them dry fully before any seaming begins.
- Slip-stitch seam the shoulders, then the sides, then set in each sleeve using the same seam method.
- Attach the shearling-texture trim at collar, cuffs, and hem, then add the tie belt at the waist.
Why it works
Waist decreases fall as hdc2tog pairs at both ends of the row, so the back and right front narrow symmetrically.
The back panel carries eight rows of waist shaping against six for the right front, giving the back a wider starting width.
Every panel is worked flat, not in the round, because the woven stitch depends on distinct right-side and wrong-side rows.
What it becomes
- A layering piece over a plain tee or turtleneck for a camel-and-cream contrast.
- An outerwear-weight cardigan for cool office days, worn open over dark denim.
- A statement topper for a museum or gallery outing, paired with simple leggings and boots.
Original pattern: https://crochetwithmia.com/camel-tan-shearling-edge-crochet-cardigan-free-pattern/
FAQ
Can I use a fluffy or hairy yarn for the main color?
No - the pattern calls for low-halo MC yarn so the woven texture stays visible. Save any fuzzy yarn for the contrast trim instead.
Why does the pattern use two different hook sizes?
The K-10.5 hook works the main camel-tan body at the intended gauge. The smaller J-10 hook tames boucle or sherpa-texture yarn so the trim doesn't bulk up too much.
What if my slip stitch rows look tight and curl?
That's a tension issue, not a stitch issue - slip stitches are already short. Loosen your tension specifically on Row B and the curling should ease.
Is this a good first crocheted garment?
I wouldn't start here. It assumes comfort with seaming multiple panels and holding gauge across large pieces, so a simpler cardigan first is worth it.