
Free Pattern
Step-by-Step
Crochet
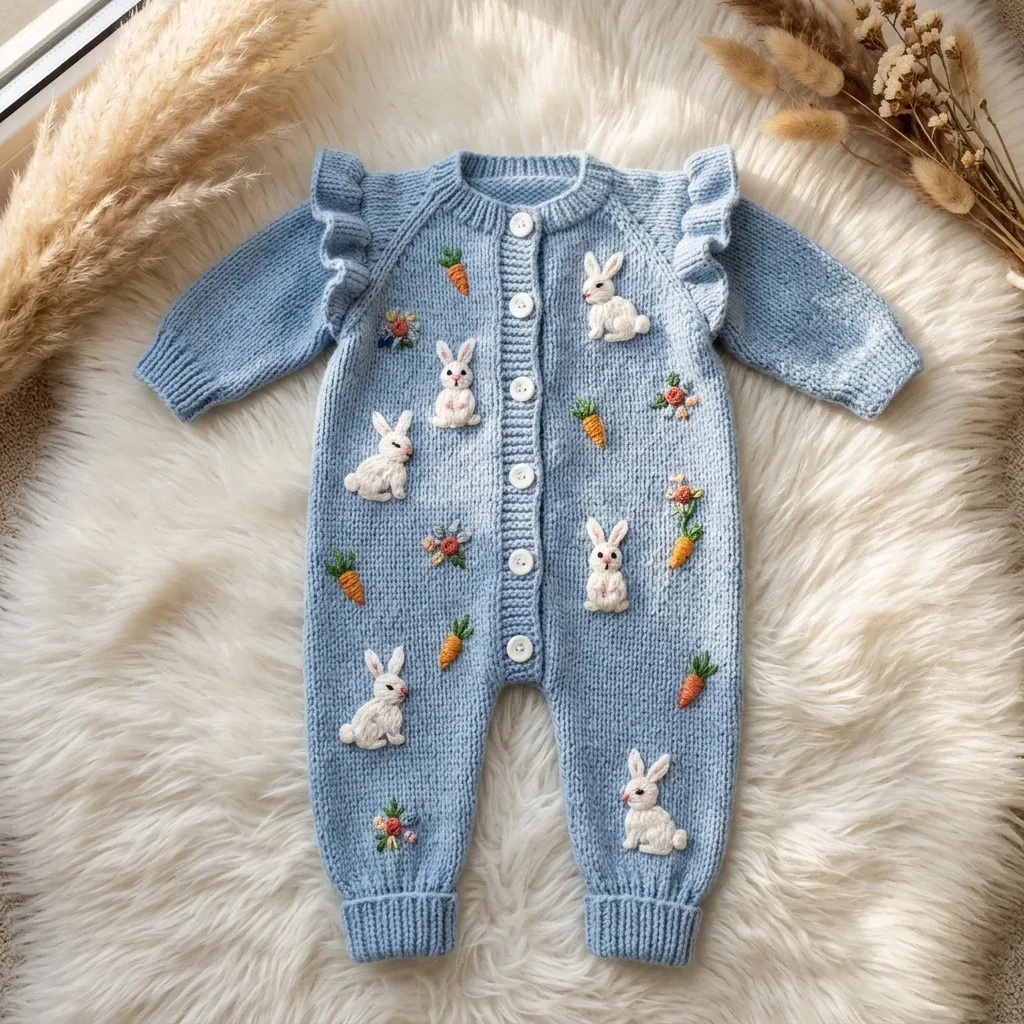
Baby & KidsButtoned baby romper with bunny appliques and ribbed trim
A buttoned baby romper worked flat with ribbed trim and dimensional bunny appliques.
- Level
- Intermediate
- Time
- 18-25 hours
- Hook
- 5.0 mm
- Yarn
- Worsted
Pattern highlights
- Work the back and front panels flat, shaping them from the shoulder down toward the crotch.
- Shape the legs and sleeves with dedicated decrease and increase sections before seaming them to the body.
- Add armhole and crotch shaping separately, then join the panels together with a tapestry needle.
- Work the button placket as its own strip and sew it along the front opening edge.
- Pick up stitches for the ribbed collar and cuffs, working sc in blo for a stretchy rib.
- Build the bunny appliques and shoulder ruffle separately, then sew or embroider on the finishing details.
About This Pattern
This romper lands in the baby-garment section of my notebook, next to the pieces built for practicality first. It's not a quick weekend make. Between the flat panels, the ribbing, and the bunny appliques, this is a project for someone who wants a wardrobe piece, not a gift finished in an afternoon. I filed it under intermediate because the shaping and seaming ask for real attention, even though no single technique here is hard on its own.
The construction leans on flat panels worked back and forth, then seamed and picked up along the edges for the collar and cuffs. Sc in blo gives the ribbing its stretch, worked perpendicular to the body and sewn on rather than grown from the fabric itself. The ruffle rounds work three dc into each stitch, which gathers the shoulder edge into soft frills. The bunnies are separate amigurumi-style pieces, small enough to finish in one sitting each.
What comes off the hook is a powder blue romper with a full button placket running from neckline to crotch, so diaper changes stay simple. Ribbed collar and cuffs add a knit-like edge without actual knitting. Dimensional bunny appliques and carrot embroidery turn a plain garment into something a little precious, without tipping into fussy. It reads as a keepsake piece, built for photos as much as for wear.
Worth knowing
The satisfying part is watching flat panels become a fitted romper through shaping alone. The leg and sleeve sections carry decrease and increase rounds that pull straight fabric into curves at the crotch and armhole. Sc in blo ribbing is the other quiet pleasure: a stitch that behaves nothing like the rest of the fabric, stretchy and rib-like, worked separately and seamed on at the collar and cuffs. Then there's the button placket, worked as its own strip and sewn to the front opening, which keeps the main panels simple while the closure does its own thing. The bunny appliques are the reward at the end, small amigurumi builds that don't demand a new skill, just patience and a tapestry needle for the surface embroidery on the carrots.
Common mistakes
- Skipping the turning chain in ribbing Sc in blo rows need that turning chain to keep the rib stretchy and even. Skip it and the collar or cuffs pull tight and lose their give.
- Working the ruffle too sparsely Three dc into every stitch or space is what makes the shoulder ruffle gather properly. Fewer stitches leave it flat instead of frilled.
- Missing the corner extra dc on ruffles Curved or angled ruffle edges need an extra dc at corner points. Without it, the ruffle puckers instead of lying flat.
- Overstuffing the bunny appliques These are flat-ish appliques, not full amigurumi toys. Too much fiberfill makes them bulge and sit awkwardly against the fabric.
- Rushing the button placket length The placket is worked as a long strip to match the front opening. Measure as you go instead of guessing the row count.
Intermediate
Progress Tracker
0 of 0 rounds
Tap a round to tick it off — your place is saved on this device.
The kit
- Main Color (MC): Powder blue, approximately 450 to 500 yards (411 to 457 meters)
- Accent Color 1 (A1): White, approximately 50 yards (46 meters) for bunny appliques
Yarn suggestions
- Lion Brand Pound of Love in Pastel Blue works beautifully. This 100 percent acrylic machine washable yarn is ideal for baby garments and offers excellent stitch definition. Paintbox Yarns Simply DK held double or Cascade 220 Superwash in a pale blue colorway are also wonderful options.
- Avoid fluffy or textured yarns that will obscure the stitch definition and make the appliques harder to attach.
- US Size H-8 / 5.0 mm hook for main body
- US Size G-6 / 4.0 mm hook for ribbing, collar, and appliques
- Tapestry needle for seaming and embroidery
- Stitch markers (at least 6)
- Seven 3/8 inch (10 mm) white buttons
- Sharp embroidery needle and matching floss or thin yarn for surface details
- Scissors
- Small amount of fiberfill for stuffing bunnies (optional)
Back Panel
The back panel is worked flat from the shoulder edge downward to the crotch.
Foundation: With MC and H-8 hook, ch 33.
Step by step: Foundation: With MC and H-8 hook, ch 17.
Step by step: Ch 1, sc across to last st, inc in last st. Turn. (17 sc).
Step by step: Ch 1, sc across to last 2 sts, sc2tog. Turn. (19 sc).
Round 1(RS): Sc in 2nd ch from hook and in each ch across. Turn. (32 sc)
Round 2Ch 1, sc in each st across. Turn. (32 sc)
Round 3through 10: Rep Row 2 eight times. Turn after each row. (32 sc) Checkpoint: After Row 10, the back panel should measure approximately 2.25 inches (5.7 cm) in height and 8 inches (20.3 cm) wide.
Front Panel Left Half (Button Side)
Foundation: With MC and H-8 hook, ch 17.
Round 1(RS): Sc in 2nd ch from hook and in each ch across. Turn. (16 sc)
Round 2Ch 1, sc across. Turn. (16 sc)
Round 3through 10: Rep Row 2. (16 sc)
Button Placket
The placket is worked as a long narrow strip sewn to the center front opening edges.
With MC and G-6 hook, ch 7.
Round 1Sc in 2nd ch from hook and in each ch across. Turn. (6 sc) Work sc in blo across every row (rib stitch) for the length of the front opening, approximately 12 inches (30.5 cm).
Neckline Ribbed Collar
With MC and G-6 hook, ch 8.
Round 1Sc in 2nd ch from hook and in each ch across. Turn. (7 sc) Work sc in blo across every row (rib stitch) until the collar strip measures 16 inches (40.5 cm).Fasten off leaving a long tail. Seam the short ends of the collar together with mattress stitch to form a ring. Sew collar to neckline edge of assembled romper body, easing evenly around.
Cuff
With MC and G-6 hook, ch 8.
Round 1Sc in 2nd ch from hook and in each ch across. Turn. (7 sc) Work in rib stitch (sc in blo every row) for 7 inches (17.8 cm). Fasten off. Seam short ends together with mattress stitch to form a ring. Set aside.
Sleeve Body
With MC and H-8 hook, ch 29.
Round 1(RS): Sc in 2nd ch from hook and in each ch across. Turn. (28 sc)
Round 2Ch 1, sc across. Turn. (28 sc)
Round 3through 6: Rep Row 2. (28 sc)
Legs (Make 2)
After the body panels are assembled and the crotch seam is closed, pick up stitches around each leg opening.
With RS facing, MC and H-8 hook, join yarn at the inside leg seam point. Work sc evenly around the leg opening to yield 40 stitches total. Place marker at beginning of round, join with sl st to work in the round.
Round 1Sc in each st around. (40 sc)
Round 2through 4: Sc in each st around. (40 sc)
Ankle Cuff
With G-6 hook, ch 8.
Round 1Sc in 2nd ch from hook and in each ch across. Turn. (7 sc) Work in rib stitch for 6.25 inches (15.9 cm). Seam short ends together to form a ring. Sew cuff to lower edge of leg, easing evenly around with rib running perpendicular to leg edge.Repeat for second leg.
Bunny Body
Magic ring, ch 1.
Round 16 sc in magic ring. (6 sc)
Round 2Inc in each st around. (12 sc)
Round 3(Sc in next st, inc in next st) 6 times. (18 sc)
Round 4through 6: Sc around. (18 sc)
Round 7(Sc in next st, sc2tog) 6 times. (12 sc) Stuff lightly with a tiny amount of fiberfill or scraps of white yarn.
Round 8Sc2tog around. (6 sc) Fasten off leaving a long tail. Close the opening by threading the tail through the remaining 6 sts and pulling tight. Weave in end.
Bunny Head
Magic ring, ch 1.
Round 16 sc in magic ring. (6 sc)
Round 2Inc in each st around. (12 sc)
Round 3(Sc in next st, inc) 6 times. (18 sc)
Round 4through 5: Sc around. (18 sc)
Round 6(Sc in next st, sc2tog) 6 times. (12 sc) Stuff lightly.
Round 7Sc2tog around. (6 sc) Fasten off, close, and weave in. Sew head to top of body.
Bunny Ears (Make 2 per bunny)
Ch 5.
Round 1Sc in 2nd ch from hook, sc in next 2 chs, 3 sc in last ch (for rounded tip), then work back down the other side of the foundation chain: sc in next 3 sts. Sl st to close. (9 sc plus sl st)Fasten off. With A5 (pink), embroider a tiny vertical stitch in the center of each ear for inner ear detail.Sew ears to top of head.(9)
With black embroidery floss or very thin dark yarn, embroider 2 tiny French knot eyes and a tiny nose dot on each bunny face.
Arrange and pin 6 to 8 finished bunnies across the front panel. Use this reference layout: 2 across the upper chest, 2 at mid body, and 2 to 3 scattered on the legs. Sew each bunny firmly to the romper using A1 yarn threaded on a tapestry needle.
Leg Decrease Section
Round 5Sc in first 18 sts, sc2tog, sc in next 18 sts, sc2tog. (38 sc)
Round 6through 9: Sc around. (38 sc)
Round 10Sc in first 17 sts, sc2tog, sc in next 17 sts, sc2tog. (36 sc)
Round 11through 14: Sc around. (36 sc)
Round 15Sc in first 16 sts, sc2tog, sc in next 16 sts, sc2tog. (34 sc)
Round 16through 19: Sc around. (34 sc)
Round 20Sc in first 15 sts, sc2tog, sc in next 15 sts, sc2tog. (32 sc)
Round 21through 28: Sc around. (32 sc) Checkpoint: After Rnd 28, the leg should measure approximately 6.5 inches (16.5 cm) from the crotch pickup round.
Sleeve Increase Section
Round 7Ch 1, inc in first st, sc across to last st, inc in last st. Turn. (30 sc)
Round 8through 10: Ch 1, sc across. Turn. (30 sc)
Round 11Ch 1, inc in first st, sc across to last st, inc in last st. Turn. (32 sc)
Round 12through 14: Ch 1, sc across. Turn. (32 sc)
Round 15Ch 1, inc in first st, sc across to last st, inc in last st. Turn. (34 sc)
Round 16through 18: Ch 1, sc across. Turn. (34 sc)
Round 19Ch 1, inc in first st, sc across to last st, inc in last st. Turn. (36 sc)
Round 20through 24: Ch 1, sc across. Turn. (36 sc) Checkpoint: The sleeve body should now measure approximately 5.5 inches (14 cm) in length and 9 inches (22.9 cm) wide at the top.Fasten off leaving a long tail for seaming.Fold sleeve lengthwise with RS together. Seam the side edge from Row 1 to Row 24 using mattress stitch. Turn RS out. Attach the cuff ring to the lower edge of the sleeve, sewing evenly around with the rib running perpendicular to the sleeve edge.
Armhole Shaping
Round 11(increase row): Ch 1, inc in first st, sc across to last st, inc in last st. Turn. (34 sc)
Round 12Ch 1, sc across. Turn. (34 sc)
Round 13Ch 1, inc in first st, sc across to last st, inc in last st. Turn. (36 sc)
Round 14Ch 1, sc across. Turn. (36 sc)
Round 15Ch 1, inc in first st, sc across to last st, inc in last st. Turn. (38 sc)
Round 16Ch 1, sc across. Turn. (38 sc)
Round 17Ch 1, inc in first st, sc across to last st, inc in last st. Turn. (40 sc)
Round 18Ch 1, sc across. Turn. (40 sc)
Round 19through 36: Ch 1, sc across each row. Turn after each row. (40 sc) Checkpoint: After Row 36, the back panel should measure approximately 8 inches (20.3 cm) tall and 10 inches (25.4 cm) wide.
Armhole Shaping Left Half
Round 11Ch 1, inc in first st, sc across. Turn. (17 sc)
Round 12Ch 1, sc across. Turn. (17 sc)
Round 13Ch 1, inc in first st, sc across. Turn. (18 sc)
Round 14Ch 1, sc across. Turn. (18 sc)
Round 15Ch 1, inc in first st, sc across. Turn. (19 sc)
Round 16Ch 1, sc across. Turn. (19 sc)
Round 17Ch 1, inc in first st, sc across. Turn. (20 sc)
Round 18Ch 1, sc across. Turn. (20 sc)
Round 19through 36: Ch 1, sc across. Turn after each row. (20 sc)
Crotch Shaping
Round 37Ch 1, sc2tog over first 2 sts, sc across to last 2 sts, sc2tog. Turn. (38 sc)
Round 38Ch 1, sc across. Turn. (38 sc)Step by step: Ch 1, sc across to last 2 sts, sc2tog. Turn. (18 sc).Step by step: Ch 1, sc across to last st, inc in last st. Turn. (20 sc).
Round 39Ch 1, sc2tog, sc across to last 2 sts, sc2tog. Turn. (36 sc)
Round 40Ch 1, sc across. Turn. (36 sc)Step by step: Ch 1, sc across to last 2 sts, sc2tog. Turn. (17 sc).Step by step: Ch 1, sc across to last st, inc in last st. Turn. (19 sc).
Round 41Ch 1, sc2tog, sc across to last 2 sts, sc2tog. Turn. (34 sc)
Round 42Ch 1, sc across. Turn. (34 sc)Step by step: Ch 1, sc across to last 2 sts, sc2tog. Turn. (16 sc).Step by step: Ch 1, sc across to last st, inc in last st. Turn. (18 sc).
Round 43Ch 1, sc2tog, sc across to last 2 sts, sc2tog. Turn. (32 sc)
Round 44Ch 1, sc across. Turn. (32 sc) Fasten off MC. Set back panel aside.
Crotch Shaping Left Half
Round 37Ch 1, sc2tog, sc across. Turn. (19 sc)
Round 38Ch 1, sc across. Turn. (19 sc)
Round 39Ch 1, sc2tog, sc across. Turn. (18 sc)
Round 40Ch 1, sc across. Turn. (18 sc)
Round 41Ch 1, sc2tog, sc across. Turn. (17 sc)
Round 42Ch 1, sc across. Turn. (17 sc)
Round 43Ch 1, sc2tog, sc across. Turn. (16 sc)
Round 44Ch 1, sc across. Turn. (16 sc) Fasten off. Set aside.
Buttonhole Placket (for right front half)
Work identically, but on Row 5 of the placket and then every 1.5 inches (3.8 cm) thereafter, work a buttonhole as follows:
Sc in first 2 sts, ch 2, sk 2 sts, sc in last 2 sts. On the next row, sc in each st and work 2 sc into the ch-2 sp to close the hole. Continue rib pattern. Work 7 buttonholes total evenly spaced.
Sew the plain placket strip to the left front half center edge. Sew the buttonhole placket to the right front half center edge.
Sleeves (Make 2)
Sleeves are worked flat from the cuff upward.
Shoulder Ruffle
After the body panels are assembled and before the sleeves are set in, with RS facing and MC and H-8 hook, join yarn at the neckline corner of one shoulder edge.
Ruffle Row: Work 3 dc in each stitch or row-end evenly along the diagonal shoulder line from neckline to armhole edge. This will span approximately 10 to 12 stitches or row-end points. Fasten off.
Repeat on all 4 shoulder ruffle positions (2 front, 2 back).
Bunny Appliques (Make 6 to 8)
Each bunny is a small dimensional piece made with A1 (white) and G-6 hook.
Carrot Embroidery
Using A2 (orange) threaded on an embroidery needle, work small vertical satin stitch clusters approximately 0.5 inch (1.3 cm) tall directly on the fabric surface in the spaces between bunnies. Each carrot takes approximately 5 to 6 parallel vertical stitches close together, widest at top and tapering to a point.
With A3 (green), work 3 small straight stitches fanning upward from the top of each carrot cluster to create the leafy tops.
Small Floral Clusters
Using A4 (dusty rose or red) and an embroidery needle, work small groups of 5 tiny satin stitch petals arranged in a circle on the fabric between bunnies and carrots. Each petal is 2 to 3 stitches wide and approximately 0.3 inch (7 mm) long. Work a French knot center in A2 or A3. With A3, add 2 to 3 small lazy daisy leaves beside each flower cluster.
Assembly
Step 1Weave in all ends securely with a tapestry needle, taking care to bury ends within the dense single crochet fabric.
Step 2Wet blocking is recommended: Submerge the finished romper in cool water, press gently to saturate, remove and press excess water out with a towel without wringing. Lay flat on a blocking mat and pin to the finished measurements listed above. Allow to dry completely before removing pins.
Step 3For wool content yarns, use steam blocking instead of wet blocking to avoid felting.
Finishing
- Weave in every end with a tapestry needle, tucking them into the dense single crochet fabric.
- Stuff the bunny bodies and heads lightly with fiberfill before closing them up and sewing on the ears.
- Wet block the finished romper to measurements, or steam block instead if you used a wool-content yarn.
Why it works
The back panel starts at the shoulder edge and works downward, so the crotch shaping happens last, not first.
Legs and sleeves each get their own eight-round shaping section, separate from the main increase or decrease rows worked earlier.
The button placket and ribbed collar are worked as narrow strips and seamed on, rather than grown from the main panels.
What it becomes
- A baby shower gift for someone who wants a keepsake instead of a disposable outfit.
- A photo-session outfit, thanks to the button front and bunny appliques that read well in pictures.
- A well-loved layering piece for cooler months, paired with a plain onesie underneath.
FAQ
How long does this romper actually take to finish?
Plan on 18 to 25 hours from foundation chain to the last woven-in end. That includes seaming, ribbing, and all the bunny appliques, so spreading it over a few weeks works well.
Can I skip the bunny appliques and embroidery?
Yes, the romper stands on its own without them. But the appliques and carrot embroidery are what turn a basic button romper into something more special.
Why does the ribbing get worked separately instead of directly on the panels?
Sc in blo worked perpendicular to the edge gives a true knit-like stretch at the collar and cuffs. Working it as its own strip and seaming it on keeps that stretch consistent.
What yarn works best if I don't have Pound of Love?
Paintbox Yarns Simply DK held double or Cascade 220 Superwash in a pale blue both work well. Just avoid fluffy or textured yarns, since they hide the stitch definition needed for the appliques.