Free Pattern
Step-by-Step
Crochet
Home DecorChunky crochet spiral floor basket pattern
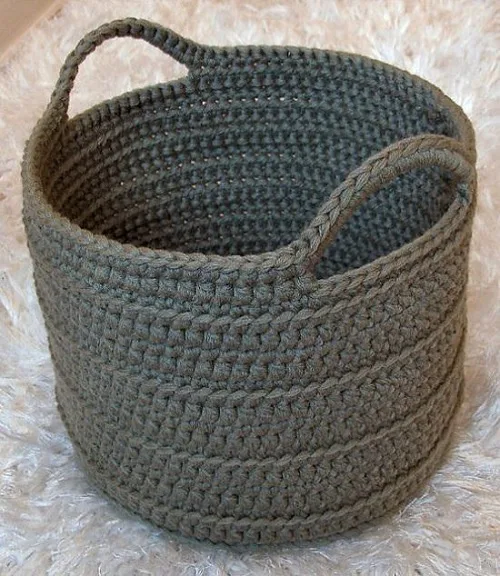
A seamless chunky crochet floor basket worked in spiral single crochet rounds.
- Level
- Intermediate
- Time
- 4-6 hours
- Hook
- 6.5 mm
- Yarn
- Super Bulky
Pattern highlights
- Start with a small ring and build it up with single crochet increases to form a flat circular base.
- Keep working in a continuous spiral without joining, moving a stitch marker up each round to track the start.
- Let the increases taper off once the base reaches its full width, shifting the shape from flat to upright.
- Continue straight single crochet rounds without further increases to build the basket's walls to height.
- Fasten off once the final round is complete and weave in the ends to finish the piece.
About This Pattern
Every collection needs one piece that holds things instead of just sitting there, and this is mine. A floor basket earns its keep fast — blankets, plant pots, stray yarn. I like that it is useful before it is decorative.
The whole thing rides on one move: single crochet worked in a spiral, no joins, increases dropped in on schedule to keep the circle flat before it turns up into walls. It is the kind of pattern where the stitch count does the thinking for you.
What comes off the hook is a sturdy, bowl-shaped basket about 12 inches across and 8.5 inches tall. Worked in a thick ribbon yarn, it has real presence — more furniture than accessory.
Worth knowing
I like projects where the yarn does half the work, and a ribbon-style chunky yarn on a large hook does exactly that. Seventeen rounds sounds like a lot until you realize each one takes under a minute. The spiral construction means no slip-stitch joins to disguise, no seams fighting your tension — just steady single crochet climbing from a flat base into a wall. There is something satisfying about watching a basket rise from a ring this quickly, with stitch markers doing the quiet work of keeping your place. It is a fast, almost meditative make, and the payoff is a basket solid enough to actually hold weight, not just look good empty on a shelf.
Common mistakes
- Losing the round start in the spiral Move the locking stitch marker to the first stitch of every new round as you work it. Without it, the spiral drifts and rounds blur together.
- Increases bunching instead of spacing evenly Count the plain stitches between each increase stitch before moving on. An uneven spread makes the base buckle rather than lie flat.
- Pulling the ribbon yarn too tight Keep stitches relaxed since this yarn is flat and wide, not round like standard yarn. Overly tight stitches twist the ribbon and distort the stitch shape.
- Skipping the taper from base to wall Watch for where increases stop in the later rounds and the stitch count holds steady. Carrying increases too far keeps the piece flat instead of turning upward.

Intermediate
Progress Tracker
0 of 0 rounds
Tap a round to tick it off — your place is saved on this device.
The kit
- Hoooked Ribbon XL — Ice Apricot (exact yarn used) – 262 yards
- Yarniss Large Ergonomic Hook Set — 6.5 mm to 10 mm (includes the 9 mm hook used for this pattern)
- Locking Stitch Markers
- Darning Needles Set
- Craft Scissors
Extras (Optional) — Make It Even Better
- Fabric Basket Liner – Natural Coco Fiber Coir Liner Roll
- Fabric Stiffener for Crochet – Duncan Crafts Aleene's Stiffen Quik
- Hoooked Ribbon XL — Alternative Colors
Main Pattern
Use a stitch marker on each row to locate the first stitch, do not join rounds as this is a seamless pattern.
Round 1Ch4, join with a slip stitch to beg ch to form a ring, ch1 (does not count as a stitch) work 8sc in ring. (8sc)
Round 2Work 2sc in each st around. (16sc)
Round 3* 2sc in next st, 1sc in next st * Repeat around. (24sc)
Round 4* 2sc in next st, 1sc in next 2sts * Repeat around. (32sc)
Round 5* 2sc in next st, 1sc in next 3sts * Repeat around. (40sc)
Round 6* 2sc in next st, 1sc in next 4sts * Repeat around. (48sc)
Round 7* 2sc in next st, 1sc in next 5sts * Repeat around. (56sc)
Round 8* 2sc in next st, 1sc in next 6sts * Repeat around. (64sc)
Round 9* 2sc in next st, 1sc in next 7sts * Repeat around. (72sc)
Round 10* 2sc in next st, 1sc in next 8sts * Repeat around. (80sc)
Rounds 11–121sc in each st around. (80sc)
Round 13Working in Back Loops Only – 1sc in each st around. (80sc)
Round 14Working in Both Loops from here and throughout – 1sc in each st around. (80sc)
Rounds 15–291sc in each st around. (80sc)
Round 301sc in next 14sts, ch12, skip next 12sts (handle made) 1sc in next 28sts, ch12, skip next 12sts (handle made) 1sc in last 14sts
Round 311sc in next 14sts, 12sc in ch12 space, 1sc in next 28sts, 12sc in ch12 space, 1sc in last 14sts. (80sc)
Round 32Slip stitch in each st around, join with a slip stitch to beg stitch. (80sts)
Assembly
Step 1Fasten off and weave in ends!
Finishing
- Weave in the fastened-off end with a darning needle, running it through several stitches on the inside.
- Trim the tail close with craft scissors once it is secured.
- Fit the optional coir liner inside for structure, or apply fabric stiffener to the whole basket if you want it to hold its shape unaided.
Why it works
Increases land evenly across early rounds, each one spacing extra stitches between plain single crochets so the base grows flat rather than cupping or rippling.
The pattern is worked in a continuous spiral with no joining slip stitch, which avoids the stepped seam a joined round would leave running up the side.
A stitch marker moved each round stands in for the join, marking the start point so the spiral stays aligned without a visible seam.
What it becomes
- A floor-level catch-all for throw blankets next to a sofa or armchair.
- A plant basket for a large potted plant, paired with the coir liner for structure.
- Toy or yarn storage in a living room, sized to sit under a side table.
Original pattern: https://crocht.com/diy-free-crochet-floor-basket-pattern/
FAQ
Do I need to join each round?
No. This basket is worked in a continuous spiral with no joining slip stitch. A stitch marker tracks your round start instead.
What is the coir liner for?
It is an optional fabric liner, Natural Coco Fiber Coir, that fits inside the basket for extra body. It is not required, but it helps the basket hold its shape under weight.
Can I use a different yarn color?
Yes, the pattern notes alternative colors of the same Hoooked Ribbon XL yarn as an option. Stick to the same yarn weight so your stitch gauge and finished size stay consistent.
Why does it need a stiffener if it is already sturdy?
The ribbon yarn alone gives good body, but fabric stiffener firms it up further if you want crisp, upright walls. It is listed as an extra, so it is entirely optional.