Free Pattern
Step-by-Step
Crochet
Home DecorMaple leaf table runner in open mesh stitch
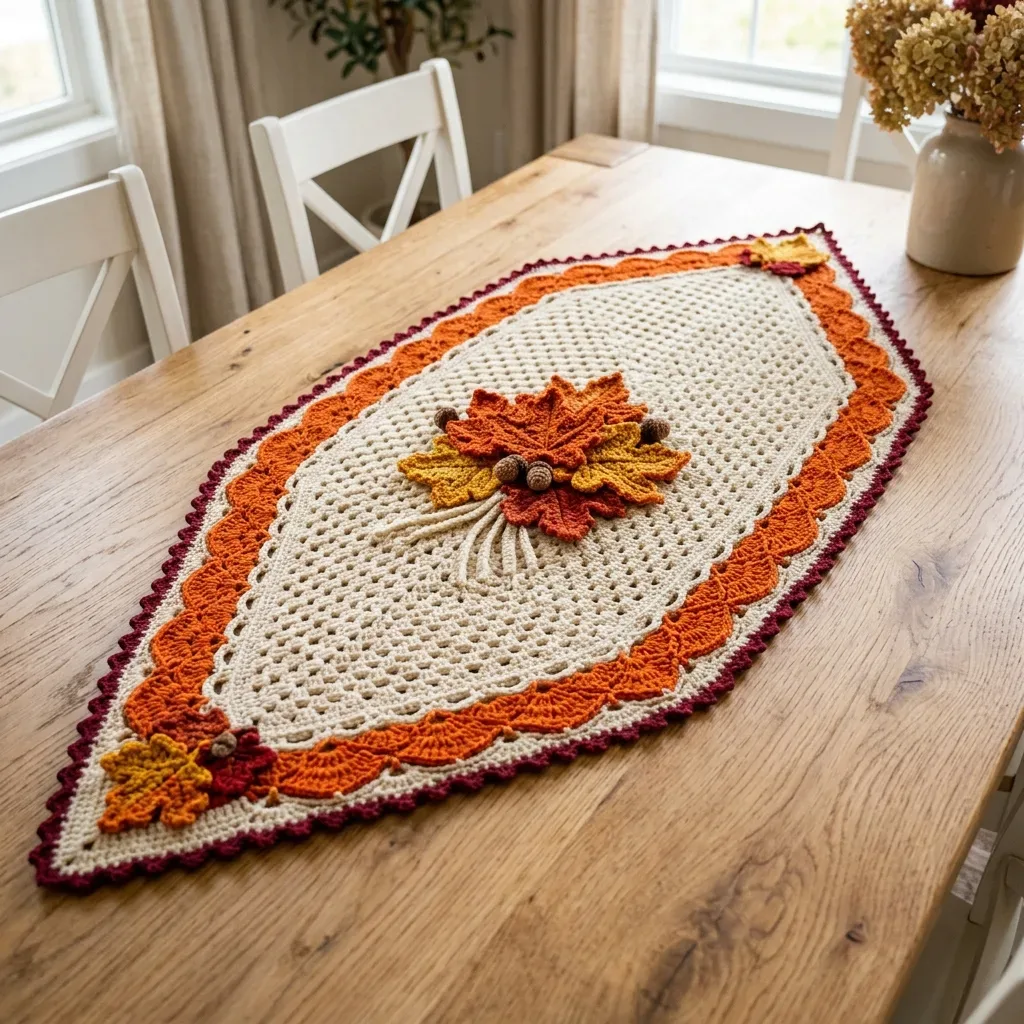
A cream mesh table runner finished with crocheted maple leaves, acorns, and two hook sizes.
- Level
- Intermediate
- Time
- 6-9 hours
- Hook
- 4.0 mm
- Yarn
- Worsted
Pattern highlights
- Start with a long foundation chain in cream cotton, working the first round up one side and back down the other to form both corners.
- Keep building the mesh body in rounds, letting each corner stretch out so the rectangle grows wider without curling.
- Fasten off the cream base once the mesh reaches the right size, then weave in that last end.
- Pin the finished mesh base to a blocking mat and let it dry completely flat before attaching anything.
- Arrange the leaves and acorns across the runner by eye, then sew each one down by hand.
- Weave in any remaining ends and give the whole runner one last light press to finish.
About This Pattern
A table runner like this one sits near the top of my home decor pile. I like mesh backgrounds for a simple reason. They show off applied shapes instead of a busy stitch pattern of their own. This piece fits next to my filet work and other open-background crochet. The background is a canvas here, not the main event. It never fights for attention on a crowded table.
The finished runner measures about 28 inches long and 14 inches wide at its widest point, once blocked. It's a cream mesh field scattered with maple leaves. The leaves come in burnt orange, burgundy, gold and rust, plus a few acorns for good measure. It reads as a long, open-weave table piece, not a dense blanket cousin. I like that it doesn't need a full set of matching placemats to look finished.
Common mistakes
- Losing track of corner spaces Mark each ch-2 corner space with a stitch marker. That way you always know where the next increase belongs.
- Grabbing the wrong hook size Keep the F-5 hook clipped to the applique yarn. That stops you from reaching for the G-6 hook by habit.
- Skipping the sc instead of the chain In the mesh pattern, always skip the ch-1 space, not the sc stitch. Skipping the wrong one throws off every unit count after it.
- Blocking after the appliques go Block the plain mesh base first, while it's still flat and easy to pin square. Adding leaves before blocking makes the edges harder to shape.
- Uneven increases at the corners Count the units at the Round 28 checkpoint to confirm your increase rate matches the pattern. A slow corner shows up as a wavy edge later.


Intermediate
Progress Tracker
0 of 0 rounds
Tap a round to tick it off — your place is saved on this device.
The kit
- Yarn (Worsted Weight, 100% Cotton or Cotton Blend Recommended):
- Color A (Cream/Natural): approximately 350 yards
- Color B (Burnt Orange): approximately 150 yards
- Color C (Deep Burgundy/Cranberry): approximately 80 yards
- Color D (Golden Yellow): approximately 40 yards
- Color E (Rust/Terra Cotta): approximately 40 yards
- Color F (Warm Brown): approximately 20 yards for acorn caps
- Color G (Tan/Caramel): approximately 15 yards for acorn bodies
Hooks
- US Size G-6 (4.0 mm) for base and borders
- US Size F-5 (3.75 mm) for leaf appliques and acorns
Notions
- Yarn needle for seaming and weaving ends
- Rust-proof straight pins for blocking
- Blocking mat or clean towels
- 6 stitch markers
- Scissors
Yarn Suggestions
- Lion Brand 24/7 Cotton works beautifully for this project. It is mercerized, holds stitch definition well, blocks flat, and is machine washable. Paintbox Yarns Simply DK or Drops Paris are also excellent choices.
Main Pattern
Section 1: Base Runner. The base is worked as a flat elongated hexagon using mesh stitch rounds. You will start with a foundation chain that establishes the long axis of your runner.
Mesh Stitch: work sc in one stitch, ch 1, skip the next stitch, then sc in the following stitch; each sc paired with a ch-1 space counts as 2 units.
Fan Stitch: work 5 dc all into the same stitch or space to create a shell or fan shape; a 7-dc fan means working 7 dc into that same spot.
Picot: chain 3, then slip stitch into the first chain you made.
Sc2tog (Decrease): insert hook into first stitch, pull up a loop; insert hook into second stitch, pull up a loop; yarn over and draw through all 3 loops at once.
Round 1(RS): With Color A and your G-6 hook, chain 56; Starting in the second chain from hook: sc in first ch, (ch 1, skip 1, sc) 26 times across to the last chain, work (sc, ch 2, sc) into the last chain for your first corner point; Do not turn; Now working along the opposite side of the foundation chain: (ch 1, skip 1, sc) 26 times back along the underside, ending with (sc, ch 2, sc) into the very first starting chain for your second corner point; Sl st to join to first sc of round. (112 units)
Round 2Ch 1, sc in same st as join; Work (ch 1, skip ch-sp, sc in next sc) across to corner ch-2 space; Into corner ch-2 space work (sc, ch 2, sc); Continue in mesh pattern across the second long side; Into the second corner ch-2 space work (sc, ch 2, sc); Sl st to join. (116 units)
Round 3Continue in mesh pattern exactly as Round 2, working (sc, ch 2, sc) into each corner ch-2 space. (120 units)
Round 4Continue in mesh pattern exactly as Round 2, working (sc, ch 2, sc) into each corner ch-2 space. (124 units)
Round 5Continue in mesh pattern exactly as Round 2, working (sc, ch 2, sc) into each corner ch-2 space. (128 units)
Round 6Continue in mesh pattern exactly as Round 2, working (sc, ch 2, sc) into each corner ch-2 space. (132 units)
Round 7Continue in mesh pattern exactly as Round 2, working (sc, ch 2, sc) into each corner ch-2 space. (136 units)
Round 8Continue in mesh pattern exactly as Round 2, working (sc, ch 2, sc) into each corner ch-2 space. (140 units)
Round 9Continue in mesh pattern exactly as Round 2, working (sc, ch 2, sc) into each corner ch-2 space. (144 units)
Round 10Continue in mesh pattern exactly as Round 2, working (sc, ch 2, sc) into each corner ch-2 space. (148 units)Round 11 (Adding Side Corner Points): Now you will add 2 new corner points at the midpoints of each long side to start creating the hexagonal shape.
Round 11Adding Side Corner Points Ch 1, sc in same st; Work in mesh pattern to the 27th unit along the first long side; Place a stitch marker here; Into this center sc work (sc, ch 2, sc) for your new side corner; Continue in mesh to the end corner, work (sc, ch 2, sc); Continue across the second long side, placing a new side corner (sc, ch 2, sc) at the midpoint; Work (sc, ch 2, sc) at the final end corner; Sl st to join. (156 units)
Round 12Work in mesh pattern, working (sc, ch 2, sc) into each of the 4 corner ch-2 spaces. (164 units)
Round 13Work in mesh pattern, working (sc, ch 2, sc) into each of the 4 corner ch-2 spaces. (172 units)
Round 14Work in mesh pattern, working (sc, ch 2, sc) into each of the 4 corner ch-2 spaces. (180 units)
Round 15Work in mesh pattern, working (sc, ch 2, sc) into each of the 4 corner ch-2 spaces. (188 units)
Round 16Work in mesh pattern, working (sc, ch 2, sc) into each of the 4 corner ch-2 spaces. (196 units)
Round 17Work in mesh pattern, working (sc, ch 2, sc) into each of the 4 corner ch-2 spaces. (204 units)
Round 18Work in mesh pattern, working (sc, ch 2, sc) into each of the 4 corner ch-2 spaces. (212 units)
Round 19Work in mesh pattern, working (sc, ch 2, sc) into each of the 4 corner ch-2 spaces. (220 units)
Round 20Work in mesh pattern, working (sc, ch 2, sc) into each of the 4 corner ch-2 spaces. (228 units)Round 21 (Adding Final Side Corner Points): Add the final 2 corner points to achieve the full 6-corner hexagonal shape. Place new corners at the quarter and three-quarter marks along each long side.
Round 21Adding Final Side Corner Points Work in mesh to 14 units past the end corner along the first long side; Work (sc, ch 2, sc) for a new sub-corner; Continue in mesh 28 units to the existing side corner; Work (sc, ch 2, sc); Continue 14 units to end corner; Work (sc, ch 2, sc); Repeat the same placement along the second long side; Sl st to join. (244 units)
Round 22Work in established mesh pattern with (sc, ch 2, sc) at all 6 corner spaces. (256 units)
Round 23Work in established mesh pattern with (sc, ch 2, sc) at all 6 corner spaces. (268 units)
Round 24Work in established mesh pattern with (sc, ch 2, sc) at all 6 corner spaces. (280 units)
Round 25Work in established mesh pattern with (sc, ch 2, sc) at all 6 corner spaces. (292 units)
Round 26Work in established mesh pattern with (sc, ch 2, sc) at all 6 corner spaces. (304 units)
Round 27Work in established mesh pattern with (sc, ch 2, sc) at all 6 corner spaces. (316 units)
Round 28Work in established mesh pattern with (sc, ch 2, sc) at all 6 corner spaces. (328 units)Fasten off Color A and weave in end after Round 28.Checkpoint: Your base runner should measure approximately 24 inches long and 10 inches wide after Round 28. It should lie flat without curling.
Round 29Foundation Border, Color B Join Color B with a slip stitch to any corner ch-2 space; Ch 3 (counts as first dc); Into the same corner ch-2 space work 2 more dc (3 dc total in corner); Work 1 dc into each sc and 1 dc into each ch-1 space along the edge to the next corner ch-2 space; Into the next corner ch-2 space work 5 dc (fan); Continue around, working 1 dc per unit between corners and 5-dc fans at each of the 6 corner ch-2 spaces; Sl st to top of beginning ch-3 to join. (354 dc)
Round 30Fan Scallop Border Ch 1, sc in same st as join; Work the fan scallop pattern: skip 2 sts, 5 dc in next st (fan made), skip 2 sts, sc in next st; Repeat around the entire perimeter; Sl st to join to first sc of round.
Assembly
Step 1Wet blocking is essential for this project. Submerge the completed runner in cool water. Gently press to saturate but do not wring. Roll briefly in a clean towel to remove excess water. Lay flat on a blocking mat and pin the 6 corner points to measurements: 28 inches along the long axis and 14 inches across the widest point. Allow to dry completely, which may take 12 to 24 hours.
Finishing
- Weave in the Color A tail left after fastening off the base.
- Pin the mesh runner flat on a blocking mat with rust-proof pins and let it dry completely.
- Arrange the leaf and acorn appliques on the blocked base, then sew each down with a yarn needle.
Why it works
Round 1 runs up one side of the foundation chain and back along the other without turning. That sets both corners before any increase happens.
Each round adds four units total, and that growth lands entirely at the two corner ch-2 spaces. That's why the long mesh sides stay even while only the short ends widen.
Every round closes with a slip stitch into the first stitch of that round. That join keeps the mesh worked as true rounds, not a continuous spiral.
What it becomes
- A dining table runner for everyday settings, paired with plain stoneware and a few low candles.
- A dresser or sideboard topper that pairs well with framed photos and one small plant.
- A thoughtful handmade gift for a friend who likes color-changing, detail-heavy crochet projects.
Original pattern: https://crochr.com/autumn-maple-leaf-table-runner-free-crochet-pattern/
FAQ
Why does the pattern use two different hook sizes?
The G-6 hook keeps the mesh base loose enough to drape. The smaller F-5 hook makes the appliques tighter and more detailed, which suits small leaf shapes.
How long does this runner take to finish?
Between the mesh base and six colors of appliques, this isn't a weekend piece. I'd plan for several sittings, especially once you're placing and sewing on leaves.
Can I resize the runner to fit a different table?
Yes, you'd add or remove rounds before Round 28 to change the length and width. Just keep working in the mesh pattern and watch the corners so they stay square.