Free Pattern
Step-by-Step
Crochet
Bags & TotesA circle-in-square granny tote with a scalloped edge
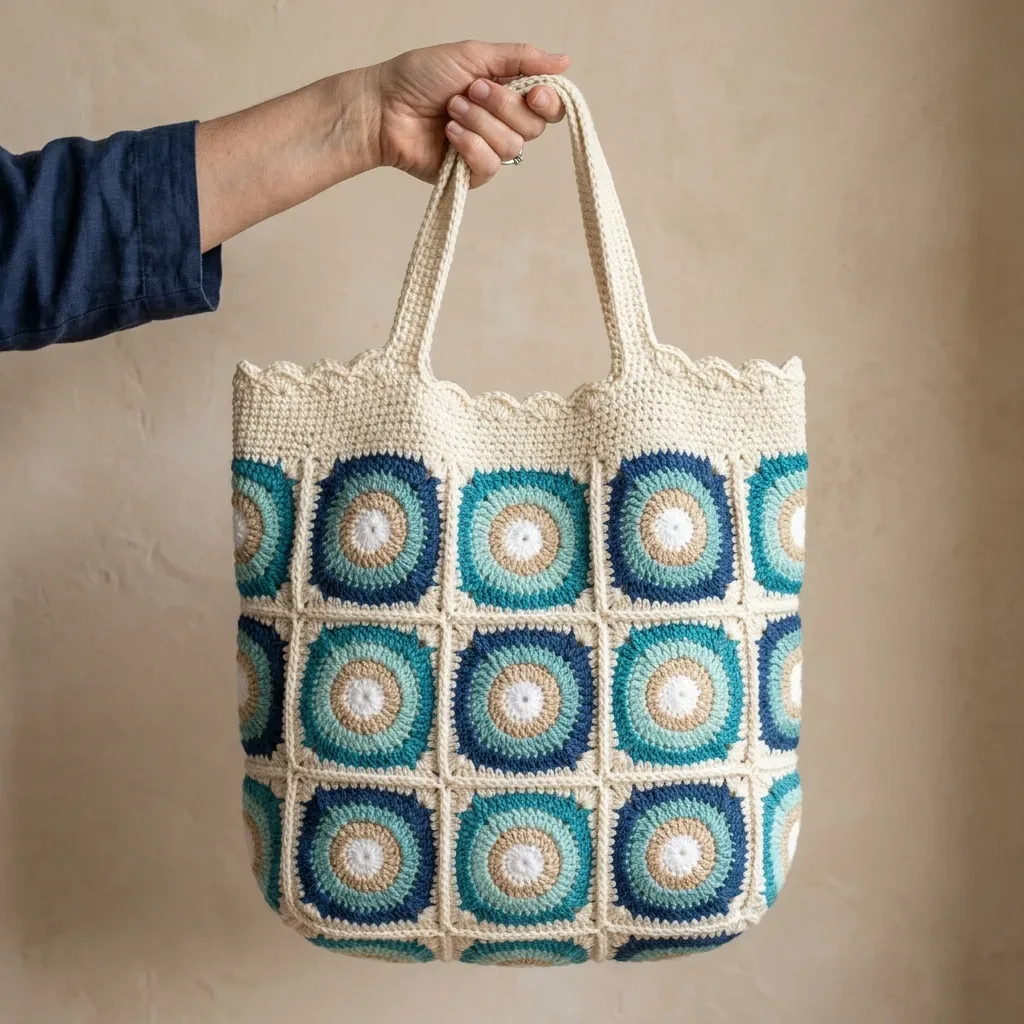
A circle-in-square granny tote built from 30 motifs, joined flat, finished with a scalloped rim.
- Level
- Intermediate
- Time
- 6-10 hours
- Hook
- 4 mm
- Yarn
- Worsted
Pattern highlights
- Work one circle in square motif first and check it measures right before committing to the rest.
- Crochet thirty motifs in the same five-color sequence, changing color on the last stitch of each round.
- Join the motifs into a tube, keeping tension even so the seams neither pucker nor gap.
- Crochet the cream top band directly onto the tube's upper edge for several rounds.
- Add the scalloped edge in one repeat round to finish the rim with texture.
- Make two flat handles and sew them to the inside of the top band.
About This Pattern
Motif totes sit in an odd corner of my notebook. Not quite a garment, not quite a blanket square. This one earns its spot because the circle in square shape reads as complicated from across the room, but it is only five rounds of basic stitches. I keep coming back to bags built from repeated units — they travel well, they forgive a dropped stitch two squares back, and they turn a familiar motif into something with a handle and a purpose.
The stitch list is short: single crochet, half double crochet, double crochet. What makes the motif interesting is the color sequence — five colors per square, changed on the last yarn over so the transition stays clean — and the invisible join that tucks the tail under the first stitch instead of leaving a visible seam. Thirty motifs later, the tube forms itself, no seaming diagrams required.
The finished object is a tote built from thirty joined motifs, a cream top band, two crocheted handles, and a scalloped rim along the opening. It is the kind of bag that looks pieced together on purpose, each square still readable in the finished fabric. Sturdy enough for everyday carrying, and built from pieces small enough to work on a commute.
Worth knowing
What I like about this tote is the sequencing. Each circle in square motif runs through five colors, A through E, so you are never bored for long before the next color change interrupts the rhythm. Round three and round four both tuck increases in at regular intervals, which keeps the motif lying flat instead of curling into a cup. The invisible join is the real skill builder here — threading the tail under the first stitch's top loops instead of slip stitching leaves no telltale ridge. Then there is the scallop edge, a single round of (sc, 3 dc, sc) repeats that turns a plain cream band into something with a little movement. None of it is hard. All of it adds up.
Common mistakes
- Skipping the gauge check Thirty motifs is a lot to redo. Measure your first square against the target size before making the rest.
- Joining colors too loosely A loose invisible join leaves a gap at the seam. Pull the tail snug but not puckered before weaving it in.
- Losing track of the color sequence Five colors per motif is easy to mix up by square ten. Keep the A, B, C, D, E order written down nearby.
- Working the scallop edge unevenly An uneven (sc, 3 dc, sc) repeat shows immediately on a plain cream band. Space the repeats evenly before finishing the round.
- Seaming handles too loosely A floppy handle stretches under weight. Whip stitch the folded edge firmly if you want a sturdier strap.
Intermediate
Progress Tracker
0 of 0 rounds
Tap a round to tick it off — your place is saved on this device.
The kit
- Aran weight yarn
- Worsted weight yarn
- 4 mm crochet hook
The Circle in Square Motif (Make 30)
This motif is worked in continuous rounds from the center out. Change color each round following the sequence A, B, C, D, E. Each finished square measures 3 inches (7.5 cm).
Round 1Color A, White Make a magic ring, ch 1, work 8 sc in ring, pull tight to close center, sl st to first sc. (8 sc)
Round 2Color B, Sand Join B with sl st, ch 1, work 2 sc in each st around, sl st to first sc. (16 sc)
Round 3Color C, Seafoam Join C with sl st, ch 3 (counts as dc), dc in same st, dc in next st, 2 dc in next st , repeat from to around, sl st to top of ch 3. (24 dc)
Round 4Color D, Teal Join D with sl st, ch 3, dc in next st, 2 dc in next st, dc in next 2 sts , repeat from to around to last st, 2 dc in last st, sl st to top of ch 3. (32 dc)
Round 5Color E, Cream, Square Round Join E with sl st, ch 1. Sc in next st, hdc in next, dc in next, (2 dc, ch 2, 2 dc) in next st for corner, dc in next, hdc in next, sc in next 2 , repeat from to 4 times total, sl st to first sc. Fasten off, leaving a 12 inch tail for joining. (44 sts and 4 corner ch-2 spaces)The combination of sc, hdc, and dc around the circle creates the gradual transition from round to square. The corner clusters with chain 2 spaces give you clear corners for joining.
Top Band (Cream Color A)
Round 1Join A at top edge, ch 1, sc evenly around the opening, sl st to first sc. (approximately 110 sc)
Round 2through 5: Ch 1, sc in each st around, sl st to first sc. (110 sc each round)(110)
Handles (Make 2, Cream Color A)
Round 1Ch 9, sc in 2nd ch from hook and each ch across, turn. (8 sc)
Round 2through 90: Ch 1, sc in each st across, turn. (8 sc each row) Handle measures about 22 inches (56 cm) for a 9 inch (23 cm) drop. For a firmer strap, fold lengthwise and whip stitch the long edge closed.Attach: Pin handle ends to the top band, spanning the 2nd and 3rd motif columns on front and back. Sew securely through several stitches on the inside.
Scallop Edge (Cream Color A)
Round 6Ch 1, skip 1 st, (sc, 3 dc, sc) in next st, skip 1 st , repeat from to around, sl st to first sc. Fasten off. (approximately 27 scallops)
The scallop creates a soft, feminine edge that perfectly finishes the coastal feel of this tote.
Assembly
Step 1Weave in all ends on the wrong side and trim close to the fabric.
Step 2Wet block the finished tote over a towel stuffed form to set the shape. This helps the bag hold its structure when in use.
Step 3For extra structure, line the inside with cotton fabric or add a stiff base insert. This is optional but helpful if you plan to carry heavier items.
Finishing
- Weave in every yarn end on the wrong side and trim close to the fabric.
- Wet block the tote over a towel-stuffed form to set its shape before use.
- Sew the handle ends to the top band, then add a fabric lining or base insert if you want more structure.
Why it works
Each motif increases by eight stitches every round through round four, which is what keeps the circle in square shape flat rather than cupped.
The top band is worked in continuous rounds, not back and forth, since a tote's opening has no edges to turn.
Handles are worked flat in rows instead of rounds, because a strap needs two selvage edges to fold and whip stitch closed.
What it becomes
- An everyday market tote, roomy enough from thirty joined motifs to carry produce or bread.
- A project bag for other needlework, paired with a zippered pouch to corral small tools.
- A library or outing tote, sturdy enough with a fabric lining or base insert for heavier loads.
FAQ
Can I use a different yarn weight than aran or worsted?
Yes, but check your motif gauge first. The 3 inch square size depends on hook and yarn working together, so adjust your hook size if your test square runs big or small.
Why do I need to make one motif before starting all thirty?
The circle in square motif has several rounds of increases, and small gauge differences compound fast across that many squares. One test square saves you from reworking a stack of them later.
What does the invisible join actually do?
It replaces the usual slip stitch at the end of a color round. Threading the tail under the first stitch's top loops keeps the round looking continuous instead of showing a seam.
Is the scallop edge hard to get even?
Not technically, but it shows mistakes easily since it's a single repeat round. Keep your stitch spacing consistent around the top band before working it.