
Free Pattern
Step-by-Step
Crochet
AmigurumiColorful Crochet Fish Amigurumi Pattern (Free & Beginner-Friendly)
Make an adorable colorful crochet fish amigurumi with this free pattern featuring magic rings, simple increases, and a cute tail shape for baby gifts.
Level IntermediateTime 4-6 HoursHook 2.5 mmYarn Worsted
Pattern highlights
- Start the head with a magic ring and work six single crochets into it to form the base circle.
- Increase steadily around the head, growing the stitch count from six all the way up to thirty-eight stitches.
- Change to your body color right after finishing the head rounds for a clean two-tone look.
- Continue straight rounds in the body color to establish the fish's plump, rounded midsection.
- Begin decreasing gradually, tapering the stitch count down through the back half of the body toward the tail.
- Shape and attach the Tail Shape and Lower Fin as separate pieces once the body is complete.
- Stuff the body firmly as you close the final rounds, then attach the Eyes to finish the face.
About This Pattern
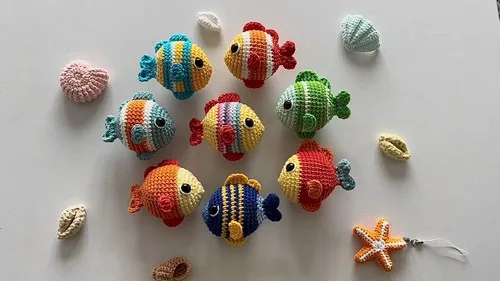
This colorful crochet fish amigurumi is a cheerful little sea creature built from a rounded body, a shapely tail, and a pair of sweet fins that give it real personality. It's designed to be endlessly customizable — swap the body color, mix up the tail shade, or go bold with a rainbow palette — making it perfect for nursery décor, baby toys, or a themed set of ocean friends. Whether you're stitching one for a nursery shelf or a whole school of fish for a baby shower gift, this pattern adapts beautifully to your style.
The construction relies on classic amigurumi techniques: starting with a magic ring, working single crochet increases to shape the rounded head and body, then transitioning into single crochet decreases to taper the tail end smoothly. You'll also work a color change partway through to separate the head from the body, plus add a Tail Shape, Lower Fin, and Eyes as separate pattern parts. This is a great project for confident beginners or advancing crocheters comfortable with basic shaping — expect around 4 to 6 hours from start to finish, including stuffing and assembly.
The finished fish comes together as a compact, huggable amigurumi with a plump rounded body, a tapered tail end, and playful fins that make it look like it's swimming right off your hook. It has that soft, squeezable amigurumi feel babies and toddlers love, while the clean color-blocked design gives it a polished, giftable look. Whether tucked into a gift basket, displayed on a shelf, or handed straight to a little one, this fish is a joyful, quick-to-love handmade treasure.
Variations
One of the best things about this fish pattern is how easily it takes on a whole new personality with just a color swap. Try a bright orange body with white stripes for a classic clownfish look, or go with iridescent blues and purples using a self-striping yarn like Mandala for a mermaid-inspired shimmer effect. For a calming nursery palette, soft pastels like Bernat Baby Blanket in mint or blush work beautifully and keep the amigurumi extra plush and cuddly against the worsted weight structure of the original design. If you want a chunkier, faster finish, size up to a bulky weight yarn and a 5.5mm hook — your stitch counts stay the same, but the fish will grow noticeably bigger and quicker to stuff. Going the opposite direction, a fingering weight yarn with a 2.5mm hook creates an adorable mini keychain-sized fish, though you'll want to reinforce the eyes extra securely at that scale. Consider making a whole school of fish in graduating sizes and coordinating colors for an eye-catching mobile above a crib, or crochet several in ocean-themed hues — teal, coral, and sandy yellow — to build a beach-themed toy basket. You could also swap the Lower Fin color to a metallic or glittery yarn for a bit of sparkle, or add a tiny embroidered smile in contrasting thread for extra charm. For a fun seasonal twist, work the body in cool silver-blue tones with white accents to suggest a wintry ice fish, no holiday branding required. However you customize it, the underlying shaping stays the same, so feel free to get playful with color.
I adore how this fish comes together so quickly once you get into the rhythm of the increase rounds! Starting with that simple magic ring and watching it grow from 6 to 38 stitches feels so satisfying, especially when you hit that color change after Round 7 and suddenly your fish has a distinct head and body. The decrease rounds at the tail end are where the magic really happens — going from 30 down to 20 stitches in just three rounds tapers the shape beautifully without any fiddly counting confusion. I also love that the Eyes, Tail Shape, and Lower Fin are worked as their own separate pieces, which means you can experiment with placement and personality before you commit to sewing them on permanently. There's something so charming about a project this small packing in so much shaping technique — increases, decreases, color changes, and appliqué pieces all in one adorable little amigurumi. It's the kind of pattern that keeps your hands busy but your mind relaxed, and the payoff is an irresistibly huggable fish that never fails to make people smile.
Common mistakes
- Pulling the magic ring closed too loosely, leaving a visible hole at the start of the body.
- After your 6 sc into the ring, tug the tail firmly and check that all six stitches cinch tightly around the center before placing your stitch marker.
- Losing track of the stitch marker and misplacing where each round begins, which throws off the increase pattern.
- Move your stitch marker up into the first stitch of every new round immediately after completing it, rather than waiting until you're mid-round to relocate it.
- Miscounting the mixed increase sequences, like (2 sc, 1 inc) × 2 followed by (1 sc, 1 inc) × 3, which quickly leads to an incorrect stitch count.
- Count out loud or place a removable marker every few stitches within a tricky round so you can quickly verify you're on track before finishing the round.
- Making the color change from the head color to orange (or your body color) mid-stitch, leaving a messy join line.
- Change colors on the last yarn-over of the final stitch of Round 7, so the new color pulls through cleanly and starts the next round without a visible jog.
- Skipping stitches or stitching too tightly during the decrease rounds, causing the tail end to pucker instead of tapering smoothly.
- Work your decreases evenly as directed — 5 sc then 1 dec, repeated — and keep your tension consistent with the rest of the body so the taper looks gradual, not pinched.
- Under-stuffing the body before closing the tail decreases, resulting in a saggy or lopsided fish.
- Stuff firmly in small amounts as you work through the decrease rounds, checking the shape from all sides before the opening gets too small to adjust.


Intermediate
Progress Tracker
0 of 0 rounds
Tap a round to tick it off — your place is saved on this device.
Materials
- 6 sc into the ring.
- Place stitch marker in the first stitch.
- Pull the yarn tail to close.
- 6 increases (2 sc in each stitch) → 12 stitches.
- (1 sc, 1 inc) × 6 → 18 stitches.
- (2 sc, 1 inc) × 2
- (1 sc, 1 inc) × 3
- (2 sc, 1 inc) × 2 → 25 stitches.
- (1 inc, 3 sc) × 2
- (1 inc, 2 sc) × 3
- (1 inc, 3 sc) × 2 → 35 stitches.
- 10 sc
- (1 inc, 3 sc) × 3
- 10 sc → 38 stitches.
- 35 sc per round.
- Change yarn to orange (or body color) after Round 7.
- (5 sc, 1 dec) × 5 → 30 stitches.
- (4 sc, 1 dec) × 5 → 25 stitches.
- (3 sc, 1 dec) × 5 → 20 stitches.
- (2 sc, 1 dec) × 5 → 15 stitches.
- (1 sc, 1 dec) × 5 → 10 stitches.
- 2 sc
- Change yarn to teal (or tail color).
Close Opening
- SC across 1st & 2nd last stitch, then 2nd & 3rd, and so on.
Tail Shape
- Ch 3, turn.
- In last stitch: 2 tr.
Next stitch
- 1 dc, 1 sc.
Next stitch
- 1 sc, 1 dc.
- Last stitch: 2 tr.
- Ch 3, sl st in last stitch.
- Cut yarn, weave in ends.
- Insert hook at Round 17.
- Ch 2, 2 dc in next two rounds.
- Ch 2, sl st in next round.
- Ch 2, 4 tr across next 4 rounds.
- Ch 2, sl st.
- Cut and hide yarn tail.
- Insert hook at Round 9.
- Ch 2, 3 dc across next 3 rounds.
- Ch 2, sl st.
- Cut and weave tail.
- Magic ring.
- Ch 3, 3 dc into ring.
- Ch 3, sl st into ring.
- Pull to close, leave long tail.
- Attach using tail.
- Cut 10 cm white yarn.
- Stitch a highlight over top edge of each eye for a shiny look.
- Milk cotton yarn (multiple colors)
- 2.5 mm crochet hook
- Stitch marker
- 10 mm plastic safety eyes
- Fiberfill stuffing
- Yarn needle
Main Pattern
- Round 1(Yellow or head color): Make a magic ring. 6 sc into the ring. Place stitch marker in the first stitch.Pull the yarn tail to close.
- Round 26 increases (2 sc in each stitch) → 12 stitches. For Round 3: (1 sc, 1 inc) × 6 → 18 stitches.
- Round 4(2 sc, 1 inc) × 2 (1 sc, 1 inc) × 3 (2 sc, 1 inc) × 2 → 25 stitches.
- Round 5(1 inc, 3 sc) × 2 (1 inc, 2 sc) × 3 (1 inc, 3 sc) × 2 → 35 stitches. For Round 6: 10 sc(1 inc, 3 sc) × 3 10 sc → 38 stitches.
- Round 7-1435 sc per round. Change yarn to orange (or body color) after Round 7. Attaching Eyes & Shaping the Body
Add Eyes
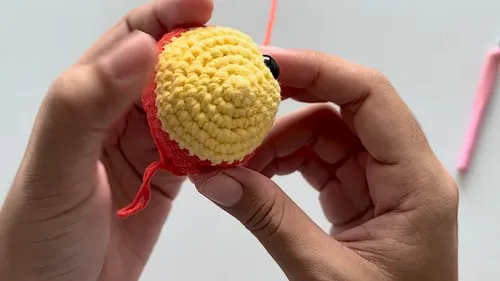
After Round 15, insert 10mm safety eyes between Rounds 5 and 6, 10 stitches apart.
- Round 15(5 sc, 1 dec) × 5 → 30 stitches.
- Round 16(4 sc, 1 dec) × 5 → 25 stitches. For Round 17: (3 sc, 1 dec) × 5 → 20 stitches.
- Round 18(2 sc, 1 dec) × 5 → 15 stitches. Stuff the fish body.
- Round 19(1 sc, 1 dec) × 5 → 10 stitches.
- Round 202 sc Change yarn to teal (or tail color). Making the Tail
Tail Shape
Ch 3, turn.
- Round 1In last stitch: 2 tr.(2)
- Round 2Next stitch: 1 dc, 1 sc.(1)
- Round 3Next stitch: 1 sc, 1 dc.(1)
- Round 4Last stitch: 2 tr.(2)
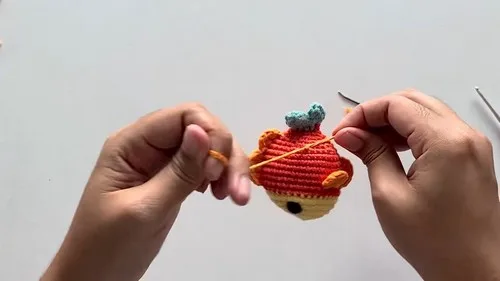
- Round 5Ch 3, sl st in last stitch.Cut yarn, weave in ends.Making and Attaching Fins Upper Fin (Light Orange): Insert hook at Round 17.
- Round 6Ch 2, 2 dc in next two rounds.(2)
- Round 7Ch 2, sl st in next round.
- Round 8Ch 2, 4 tr across next 4 rounds.(4)
- Round 9Ch 2, sl st.Cut and hide yarn tail.
Lower Fin
Insert hook at Round 9.
- Round 1Ch 2, 3 dc across next 3 rounds.(3)
- Round 2Ch 2, sl st.Cut and weave tail.
- Round 3Side Fins (Make 2): Magic ring.
- Round 4Ch 3, 3 dc into ring.(3)
- Round 5Ch 3, sl st into ring.Pull to close, leave long tail.
Important notes
💡 Use a hook one size smaller than the yarn label recommends to keep your stitches tight enough that stuffing won't peek through the fabric.
💡 Keep your stitch marker moving with every round — with stitch counts jumping from 12 to 18 to 25 to 35 stitches, it's easy to lose your place without one.
💡 When changing to orange (or your chosen body color) after Round 7, leave a 6-inch tail on both colors so you have plenty of yarn to weave in securely later.
💡 Stuff the body gradually as you go rather than all at once at the end, especially through the increase rounds where the shape is widest.
💡 Since the Eyes, Tail Shape, and Lower Fin are separate pattern parts, pin them in place with removable stitch markers before sewing to test the look and balance first.
💡 Weave in ends along the inside seam lines of the color change and appliqué pieces so no stray yarn shows through on the finished, brightly colored fish.
More photos
Original pattern: https://crocheteverything.com/colorful-crochet-fish-pattern-free-amigurumi-youll-love-to-hook/
FAQ
What yarn weight works best for this crochet fish pattern?
This pattern is designed for worsted weight yarn, which gives the fish a sturdy, huggable structure. If you want a bigger or smaller finished fish, you can size up to bulky or down to DK weight and adjust your hook accordingly.
Can I make this fish without a stitch marker?
A stitch marker is highly recommended since the pattern moves through several increase and decrease sequences where losing your round start would cause stitch count errors. If you don't have one, a small scrap of contrasting yarn looped through the first stitch works just as well.
How much yarn do I need to complete the whole fish?
Exact yardage depends on your chosen size and colorway, but a single skein of worsted weight yarn in your main body color plus a small amount for the head, Tail Shape, and Lower Fin is typically plenty. Keep extra scraps on hand for the Eyes since those use only a tiny bit of yarn.
Is this pattern suitable for a beginner crocheter?
Yes, as long as you're comfortable with magic rings, basic single crochet increases and decreases, and simple color changes. The shaping is straightforward and repetitive, making it a great next step after mastering basic amigurumi balls.