Free Pattern
Step-by-Step
Crochet
AccessoriesCozy striped cat-ear beanie with crochet star appliqués
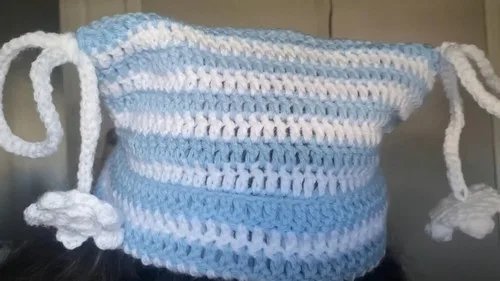
A striped crochet beanie with pointed cat ears and two amigurumi star appliqués.
- Level
- Easy
- Time
- 4-6 hours
- Yarn
- Worsted
Pattern highlights
- Chain a foundation sized to fit your head, then join it into a ring without twisting the chain.
- Work a double crochet round, slip stitching closed to finish the ring's first row.
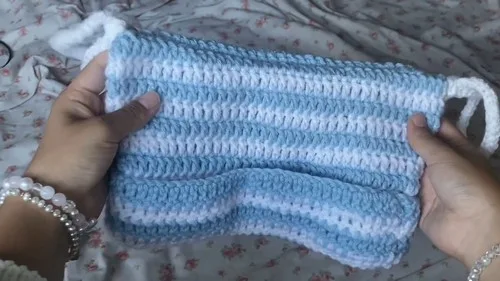
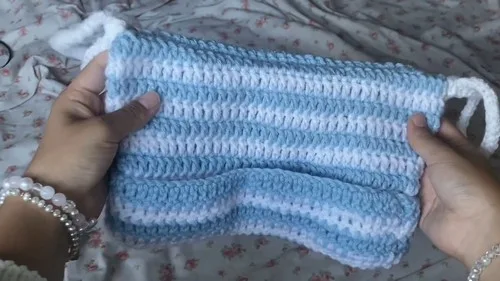
- Alternate blue and white yarn every row to build a striped band in double crochet.
- Keep repeating the stripe pattern until the band reaches your desired length.
- Sew the top of the beanie closed with the tapestry needle, weave in ends, then turn it right side out.
- Increase stitches evenly across several rounds to shape the ear from the band's edge.
- Close each ear's tip with a half double, double, half double, single crochet cluster, then slip stitch down the side.
- Chain a long strand of 60 single crochets, then attach it to the large star and sew the star onto the top of the beanie.
- Crochet both stars separately, then attach them to the beanie with knots, glue, or both.
About This Pattern
The brim starts as a plain foundation ring, double crocheted flat in stripes. Blue and white alternate every row, so the join falls in a new spot each time. The ears come from two separate amigurumi stars, each worked in continuous rounds from a magic ring. The Big Star doubles its stitch count across three rounds, the way granny increases do. The Small Star skips rounds entirely, building five points from chains and double crochets in one go. Both stars finish with a fastened-off center, ready to attach.
Finished, it's a striped slouchy beanie with two oversized ears poking up top. Each ear closes with a half double, double, half double, single crochet combo, giving it a soft point. Two crochet stars, one large and one small, perch on the brim or ears, stacked for depth. The small star can hot glue onto the big one for extra hold. Loops at the strand ends give the whole piece a finished, intentional edge. It lands somewhere between a kid's costume topper and a genuinely wearable winter hat.
Common mistakes
- Twisting the foundation chain Check the chain lies flat before slip stitching it into a ring, or the brim will spiral instead of sitting flat.
- Losing the color-change join Attach the new color through the first double crochet of the previous row every time, not wherever feels convenient.
- Weaving in tails the usual way Work the tail ends over as you stitch each striped row instead of weaving them in later, as the pattern asks.
- Miscounting the Big Star increases Count stitches after each round—ten, then fifteen, then twenty—before moving on, since a missed increase throws off the point spacing.
- Rushing the ear's point stitch Work the half double, double, half double, single crochet cluster into one single stitch, then slip stitch down the side cleanly.
Easy
Progress Tracker
0 of 0 rounds
Tap a round to tick it off — your place is saved on this device.
The kit
- Blue yarn
- White yarn
- Tapestry needle
- Crochet hook
Form the Ring
Starting with Blue Yarn: Begin by making a slip knot and chaining 72. Adjust the number of chains based on the fit around your head.
Without twisting the chain, slip stitch into the first chain to form a ring.
Round 1Chain two, then double crochet in the same stitch. Continue double crocheting around the entire chain. Slip stitch into the initial stitch after the chain two to complete the row. Cut the yarn, chain one, and pull the strand through.
Switching to White Yarn:
Round 2Attach white yarn through the first double crochet of the previous row. Chain two, then double crochet in the same stitch. Double crochet around the entire row, ensuring the tail ends are worked over to avoid weaving in later. Complete the row with a slip stitch into the first double crochet, then cut the yarn and pull through.
Alternating Yarn Colors:
Rows 3–15Repeat the process used in row 2, alternating between blue and white yarn, to create a striped pattern. You will do this for a total of 15 rows or until the desired length is reached.
Big Star
Start with a magic ring using white yarn, and single crochet 5 stitches into the ring. Close the ring.
Round 1Increase in each stitch for a total of 10 stitches.
Round 2[Single crochet, increase] around for a total of 15 stitches.
Round 3[Two single crochets, increase] around for a total of 20 stitches.
Star PointsIn one stitch, do a half double crochet, double crochet, half double crochet, and a single crochet, then slip stitch down the side of the point. Repeat around to create all star points. Fasten off and weave in ends.
Small Star
Magic Ring:
Round 1Start with a magic ring, then single crochet 1, double crochet, chain 2, and double crochet in the ring. Repeat this four more times to create five points. Pull the ring closed, slip stitch, and fasten off.
Assembly
Step 1Foundation Chain: Using blue or white yarn, create a foundation chain of 60 single crochets for strength and flexibility. This will be used to attach the stars to the beanie.
Step 2Attach the long strand to the larger star, then sew this onto the top of the beanie.
Step 3Hot Glue Method (Optional):: You can also hot glue the small star onto the larger one for added decoration.
Step 4Attach the completed stars to the beanie as described, securing with knots and potentially hot glue for extra hold.
Step 5Final Steps:: Create loops at the end of the strands coming from the beanie for added detail.
From the collection
Finishing
- After the final row, cut off a long enough yarn strand to sew the top of the beanie closed.
- Flip the beanie inside out, align the stitches, and use the tapestry needle to sew the beanie closed.
- Weave in any remaining ends, then flip the beanie right side out.
- Weave over the tail ends as you crochet each striped row, instead of hiding them afterward.
- Fasten off the Small Star's center, then hot glue it onto the Big Star if you want it secure.
- Attach both stars to the beanie with knots, then twist the loose strand ends into loops for a finished look.
Why it works
The brim is worked in joined rounds, not a spiral, so each row ends with a slip stitch.
Color changes fall at the start of every row, so the striped join shifts position each time.
The Big Star starts with five stitches in a magic ring, then grows to ten, fifteen, then twenty across three rounds.
What it becomes
- A warm beanie for daily cold-weather wear, paired with a plain scarf so the ears stay the focal point.
- A costume or photo-prop hat for cat lovers, worn with simple layers that don't compete with the stars.
- A handmade gift for a child or teen who collects novelty beanies, paired with mittens in the same blue and white.
Original pattern: https://crocheteverything.com/adorable-cozy-crochet-cinnamoroll-cat-beanie-pattern-for-all-skill-levels/
FAQ
Can I change the beanie's circumference?
Yes, the pattern says to adjust the chain count based on your head's fit. Just keep the row count and striping the same.
Do I have to glue the Small Star onto the Big Star?
No, the pattern lists hot glue as optional. You can skip it and just attach the stars with knots instead.
Why does the color change every single row?
That's what gives the brim its tight stripe pattern across fifteen rows. Attaching through the first double crochet each time keeps the join consistent.
What's the difference between the two stars?
The Big Star grows across three increase rounds to a wider, rounder shape. The Small Star skips rounds entirely and forms five points from chains in one continuous pass.