Free Pattern
Step-by-Step
Crochet
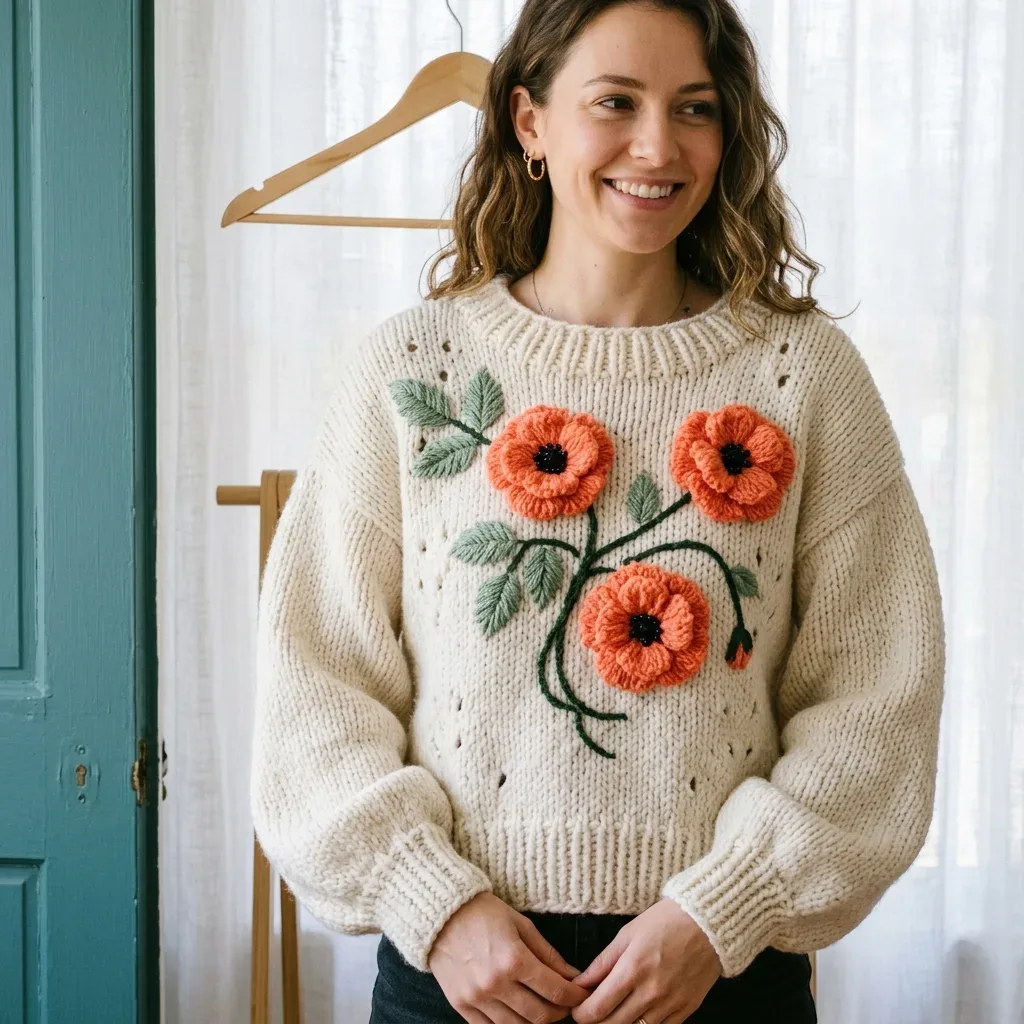
SweatersCream crochet sweater with coral poppy appliqués
A bulky cream sweater worked flat in hdc, finished with crocheted coral poppy appliqués.
- Level
- Intermediate
- Time
- 10-14 hours
- Hook
- 6.5 mm
- Yarn
- Bulky
Pattern highlights
- Chain and work the sideways rib first, then rotate it to pick up stitches for the body.
- Work the back panel flat in hdc blo rows until it reaches the stated height.
- Repeat the front panel the same way, then split the last rows into two shoulders with a gap between.
- Make two sleeves the same way, increasing evenly across a row to shape the upper arm.
- Seam the shoulders together, leaving the back neck and shaped front neck open.
- Fold and seam each sleeve, then set it into the armhole and sew the side seams.
- Crochet the poppies, leaves, and stems separately, then pin and sew them onto the finished sweater.
About This Pattern
A sweater earns a spot in my notebook when it mixes two skills instead of one. This piece pairs plain hdc panels with crocheted appliqués, a combination I don't log often. Most of my garment entries are either textured all over or plain and let the yarn do the work. This one does both: quiet cream fabric first, then flowers pinned on after the fact.
The body is worked flat in bulky hdc blo, with separate rib panels turned sideways to form the hem and cuffs. That rotation trick is one I keep coming back to; it changes a straight edge into a stretchy one. The poppies, leaves, and stems are made separately in finer yarn with a smaller hook, then pinned and sewn on after blocking. Three hook sizes, one sweater.
Finished, this reads as an oversized cream pullover with a scattering of coral poppies across the front and sleeves. The positive ease keeps it roomy rather than fitted, closer to a layering piece than a close-fit cardigan. Two straight panels and two sleeves seam into a simple drop-shoulder shape. The appliqués are what make the extra steps worth it.
Worth knowing
What I like here is the back-loop-only ribbing doing double duty as both cuff and hem, worked sideways and rotated before the body starts. The hdc panels are plain, almost meditative, until I remember the poppies are still to come. Working the appliqués on a smaller hook than the body is a small but satisfying shift in scale. The front panel's split at the shoulders, worked over two groups of stitches with a skipped center section, shapes the neck without any short rows. Then the surface chain stems, worked optionally with a third, smaller hook, add a hand-stitched look without actual embroidery. It's a sweater that rewards patience in three separate stages.
Common mistakes
- Working into the wrong loop It's easy to slip into both loops instead of the back loop only. Check the first few stitches of every row against the rib's ridged texture.
- Skipping the rib rotation Working the body row straight off the rib without turning it sideways gives the wrong stitch count. Rotate the rib so the long edge faces up before picking up stitches.
- Appliqués placed before blocking Sewing on poppies before the panels are blocked can leave them puckered or crooked. Block the body pieces flat first, then pin and sew the flowers on.
- Uneven shoulder split Miscounting the center gap on the front panel throws off the whole neck shape. Count the stitches for each shoulder and the skipped center before working that row.
- Mismatched sleeve increases Spacing the sleeve increases unevenly leaves one sleeve wider than the other. Mark the increase points with locking stitch markers before working across the row.
Intermediate
Progress Tracker
0 of 0 rounds
Tap a round to tick it off — your place is saved on this device.
The kit
- Not sure which yarn to choose? Here are some tested options that work beautifully:
- Lion Brand Hue + Me (acrylic/wool bulky) offers a soft halo and cozy loft with good drape for a boxy pullover.
- Knit Picks Biggo (superwash merino/nylon bulky) gives you plush stitch definition and a polished handmade finish.
- Paintbox Yarns Simply Chunky (acrylic chunky) provides a budget-friendly color range perfect for the coral and sage motifs.
- When substituting yarn, choose a soft bulky yarn that matches both stitch and row gauge after blocking. For the appliqués, slightly smoother yarn gives crisper petals and leaves.
Yarn
- Bulky weight yarn, Craft Yarn Council #5, main color cream: 1,050 to 1,250 yards (960 to 1,145 meters)
- Coral yarn for poppies: 45 to 60 yards (41 to 55 meters)
Sage yarn for leaves
- 35 to 45 yards (32 to 41 meters)
- Deep green yarn for stems: 20 to 30 yards (18 to 27 meters)
- Black yarn or embroidery floss for flower centers: 5 to 8 yards (5 to 7 meters)
Hooks
- US K/10.5 (6.5 mm) hook for the sweater body
- US H/8 (5 mm) hook for appliqués
- US G/6 (4 mm) hook for surface chain stems (optional)
Notions
- Locking stitch markers
- Tapestry needle
- Removable pins
- Measuring tape
- Blocking mats
- Rustproof T-pins
Back Panel
Rotate the rib so the long edge is at the top before working Body Row 1.
Checkpoint: Back panel should measure about 22 inches (56 cm) wide and 19.7 inches (50 cm) tall before the neckband is added.
Round 1Hem rib With cream yarn and the larger hook, chain 9; single crochet in the second chain from hook and each chain across. (8 sc)
Round 2to 66: Chain 1, turn, sc blo across. (8 sc)Body Row 1: Chain 1, work 66 hdc evenly across the rib edge, placing 1 hdc in the end of each rib row. Turn. (66 hdc)
Round 2to 43: Chain 1, turn, hdc blo across. (66 hdc)
Sleeves
Make 2Rotate the rib to work along the long edge before starting Sleeve Row 1.
Checkpoint: Each sleeve should measure about 18 inches (45.5 cm) long from cuff edge to top and 18 inches (45.5 cm) around at the upper edge before seaming.
Round 1Cuff rib With cream yarn and the larger hook, chain 8; single crochet in the second chain from hook and each chain across. (7 sc)
Round 2to 24: Chain 1, turn, sc blo across. (7 sc)Sleeve Row 1: Chain 1, work 27 hdc evenly across the rib edge. Turn. (27 hdc)
Round 2to 4: hdc blo across. (27 hdc)
Round 5Increase 3 evenly: after stitches 6, 13, and 20. (30 hdc)
Round 6to 9: hdc blo across. (30 hdc)
Round 10Increase 3 evenly: after stitches 7, 15, and 23. (33 hdc)
Round 11to 14: hdc blo across. (33 hdc)
Round 15Increase 3 evenly: after stitches 8, 17, and 26. (36 hdc)
Round 16to 19: hdc blo across. (36 hdc)
Round 20Increase 3 evenly: after stitches 9, 18, and 27. (39 hdc)
Round 21to 24: hdc blo across. (39 hdc)
Round 25Increase 3 evenly: after stitches 10, 20, and 30. (42 hdc)
Round 26to 29: hdc blo across. (42 hdc)
Round 30Increase 3 evenly: after stitches 11, 22, and 33. (45 hdc)
Round 31to 34: hdc blo across. (45 hdc)
Round 35Increase 3 evenly: after stitches 11, 23, and 34. (48 hdc)
Round 36to 39: hdc blo across. (48 hdc)
Round 40Increase 3 evenly: after stitches 12, 24, and 36. (51 hdc)
Round 41to 44: hdc blo across. (51 hdc)
Round 45Increase 3 evenly: after stitches 13, 26, and 39. (54 hdc)
Front Panel
Checkpoint: Front panel should match the back in width and height. The front neck opening spans 26 stitches, about 8.7 inches (22 cm) across before the collar.
Work the hem rib and Body Rows 1 to 35 exactly as you did for the Back Panel. (66 hdc)
Round 36, left shoulder: Chain 1, turn, hdc blo in the first 20 stitches, leave remaining stitches unworked. (20 hdc)
Round 37to 43, left shoulder: Chain 1, turn, hdc blo across. (20 hdc) Fasten off.
Round 36, right shoulder: With the right side facing, skip the center 26 stitches, join cream yarn in the next stitch, chain 1, hdc blo in the same stitch and the last 19 stitches. (20 hdc)
Round 37to 43, right shoulder: Chain 1, turn, hdc blo across. (20 hdc) Fasten off.
Assembly
Step 1Shoulder Seams: With right sides together, seam 20 stitches at each shoulder. Leave the center back 26 stitches and the shaped front neck open.
Step 2Mark 21 rows down from each shoulder on the front and back panels. This creates an armhole depth of about 8.4 inches (21.5 cm).
Step 3Fold each sleeve lengthwise and seam from the cuff to the upper edge. Then pin the upper sleeve evenly into the armhole. Seam the sleeve to the body. Finally, sew the side seams from the hem to the underarm.
Step 4Neckband: With the right side facing and the larger hook, join crea
Finishing
- Weave in every end from the panels, sleeves, and each appliqué piece before blocking.
- Block the back panel, front panel, and both sleeves to the stated measurements before seaming anything.
- Pin the poppies, leaves, and stems in place, then sew them on and work the surface chain stems if using.
Why it works
The ribbing for both hem and cuff is worked as a short strip first, then rotated so the long edge becomes the base for the body stitches.
The front panel matches the back through the lower rows, then splits into two separate shoulder sections with a center gap left unworked for the neck.
The sleeve increases are spaced at regular intervals across a single row rather than spread through several rows, shaping the sleeve in one jump before it continues straight.
What it becomes
- A relaxed layering piece over a long-sleeve tee for cool mornings.
- A statement piece for a day that calls for one easy, finished outfit.
- A project to pair with simple wide-leg pants, since the appliqués carry the visual interest.
FAQ
Can I skip the appliqués and just wear the plain sweater?
Yes, the hdc body stands fine on its own. The poppies are added after blocking, so the base sweater is complete without them.
Do I need to rotate the ribbing for both the panels and sleeves?
Yes, each rib strip is worked first, then turned so its long edge becomes the base for picking up body stitches. Skipping that step changes the stitch count for the first body row.
How much ease does this sweater have?
The pattern notes 6 to 10 inches of positive ease, so it's meant to sit loose rather than fitted. I'd size based on how roomy I want the drop-shoulder shape to feel.