Free Pattern
Step-by-Step
Crochet
Home DecorCrochet 3D Rose Flower: Step-by-Step Rolled Petal Pattern
Learn how to crochet a 3D rose flower step by step: roll a simple double crochet strip into petals for easy handmade decor, bouquets and gifts.
Level BeginnerTime 1-2 HoursHook 3.0 mmYarn DK
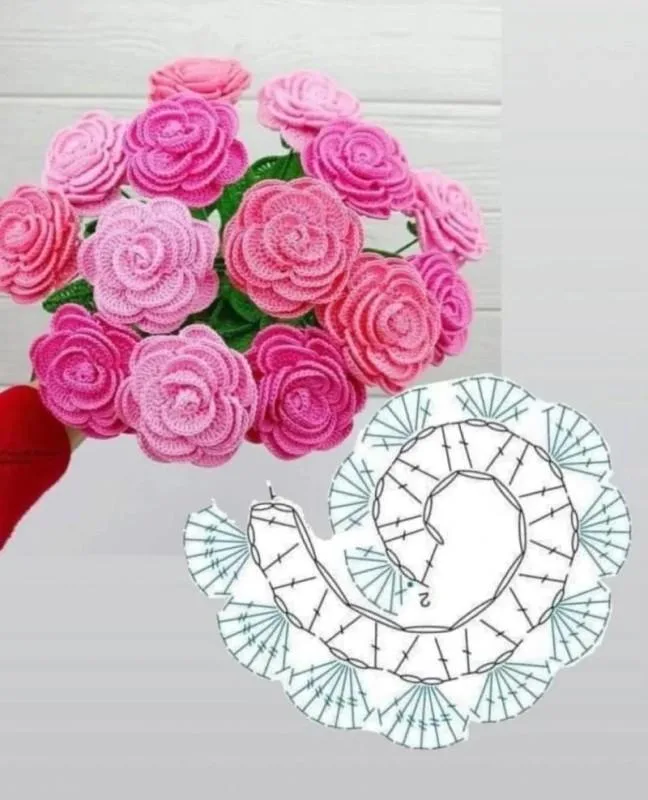
Pattern highlights
- Start with a long foundation chain and work a row of double crochet to build the petal base.
- Turn, then work the petal row: skip a stitch and place a dc, chain, dc into the next.
- Repeat that little shell across the whole row so the strip ruffles as you go.
- Fasten off with a long tail, leaving enough yarn to sew the rolled flower together.
- Roll the strip from one end, keeping the straight edge lined up along the bottom.
- Stitch through the base as you roll so the petals stay layered and secure.
- Add the optional green leaf worked from a short chain, then sew it behind the bloom.
- Weave in the ends and attach the rose to wire, a clip, or a gift.
About This Pattern
This pattern turns one long, flat strip of crochet into a full, dimensional rose that looks like it took far more effort than it did. Instead of working petals in the round and sewing them together, you build a double crochet foundation row, add a row of airy dc, ch 1, dc groups, then roll the whole strip from one end into a layered bloom. It is perfect for anyone who wants a fast, satisfying make with a genuinely impressive result.
The technique list here is short and friendly: a starting chain, double crochet worked into the 4th chain from the hook, a repeating skip 1 st, dc, ch 1, dc sequence, and a little sc-hdc-dc graduation for the optional green leaf. The only slightly fiddly part is the rolling and securing, and that is sewing rather than stitching. Confident beginners can finish a rose in under an hour, and most crafters land somewhere in the one to two hour range including the leaf.
Finished, the rose sits somewhere between a walnut and a small plum depending on your yarn and hook, with soft open petals that flare outward and a dense little base that holds its shape. In deep red it reads classic and romantic, in soft pink it feels sweet and vintage, and in cream it looks like something from a wedding table. Add floral wire and you have a stem, add hot glue and you have a clip, a brooch or a gift topper.
Variations
Color is where this pattern really opens up. The classic trio in the notes, deep red, soft pink and cream, covers romantic, sweet and elegant, but try a two-tone rose by working the foundation dc row in a deeper shade and the dc, ch 1, dc petal row in a lighter one, so the center of the roll looks shadowed and the outer petals look sun-lit. Dusty mauve with sage leaves is my favorite modern combination, and a burnt orange or ochre rose with brown leaves gives you an instant autumn arrangement. For yarn, a mercerized cotton like Scheepjes Catona or DMC Petra in the smaller 1.5 to 2.0 mm hook range gives you a crisp mini rose for earrings and hair clips, while a soft acrylic like Stylecraft Special DK or Paintbox Simply DK on a 4.0 mm hook gives you plush, cuddly blooms for a wreath. Size is purely a matter of chain length: add another 10 or 20 chains to your starting chain before you work the dc row and you get a wider strip, more petal repeats and a noticeably fuller rose. Cut the starting chain roughly in half for a tiny bud. Roll tightly for a bud, loosely for a full-blown bloom, and make three sizes in the same shade for a bouquet that looks professionally arranged. Try a metallic or sparkle yarn held together with your main color for evening pieces, or work a variegated yarn so each petal shifts shade on its own with no color changes at all.
I have made a lot of crochet flowers, and this rolled rose is still the one I reach for when I want maximum payoff for minimum fuss. What I love most is the moment the strip stops looking like a strip. You work that whole row of skip 1 st, dc, ch 1, dc groups thinking it looks like nothing much, a wavy little ribbon, and then you start rolling from one end and a real rose appears in your hands in about thirty seconds. It genuinely feels like magic every single time. The chain-1 spaces do all the heavy lifting, giving each petal that soft outward curl instead of a flat spiral. I also love how forgiving it is. Roll it tightly and you get a tight rosebud, roll it loosely and you get an open garden rose, and both look intentional. The little green leaf worked from a chain of 10 with the sc, hdc, dc graduation is a two-minute addition that makes the whole thing look finished and deliberate. And because there is no stuffing and no assembly diagram, I can make a whole handful while chatting on the couch.
Common mistakes
- Working the first double crochet into the wrong chain, so the foundation row ends up short or the edge looks ragged.
- The first dc goes into the 4th chain from the hook, and the 3 chains you skipped count as your first dc. Count them out loud the first time, and make sure the chain is not twisted before you start. If the edge of your strip looks stepped or uneven, that skipped-chain count is almost always the culprit.
- Losing the skip 1 stitch rhythm across the petal row, which leaves the finished rose lopsided with one crowded side and one gappy side.
- The repeat is strictly skip 1 st, then dc, ch 1, dc all in the next stitch. Say it as a two-beat rhythm while you work, and place a stitch marker every fifth repeat so you can spot a missed skip within a few stitches instead of at the end of the row. If you find one late, frog back only to your last marker.
- Rolling the strip with no attention to the bottom edge, so the finished rose has a wobbly base and will not sit flat.
- As you roll, keep the straight foundation edge lined up against your work surface or between your finger and thumb so it forms one flat plane. Every layer should meet that same line. A flat base is what lets the rose glue cleanly onto a clip or sit upright in an arrangement.
- Securing the roll only at the very end, so the layers slide loose and the rose unwinds as soon as you let go.
- Stitch as you roll, not after. Every full turn or so, take a couple of whip stitches through the base layers with your yarn needle and the long tail you left. By the time you reach the end you will have a solid core, and the final anchoring stitches are just insurance.
- Working the leaf without the sc, hdc, dc graduation, so it comes out as a blunt rectangle rather than a pointed leaf shape.
- Starting in the second chain from the hook, the stitches step up in height, sc then hdc then dc, which is exactly what creates the tapered tip and rounded belly of the leaf. Do not substitute all dc to save time. Block the finished leaf flat under a damp cloth if it wants to curl.
Beginner
Progress Tracker
0 of 0 rounds
Tap a round to tick it off — your place is saved on this device.
Materials
DK yarn
- 3.0 mm to 4.0 mm hook
Worsted yarn
- 4.0 mm to 5.0 mm hook
Crochet thread
- 1.5 mm to 2.0 mm hook
- Cotton or acrylic yarn in your rose color
- Green yarn for leaves, optional
- Crochet hook suitable for your yarn
- Yarn needle
- Scissors
- Stitch marker, optional
- Hot glue or sewing needle if attaching to accessories
- Floral wire or wooden stick if making a bouquet stem
Main Pattern
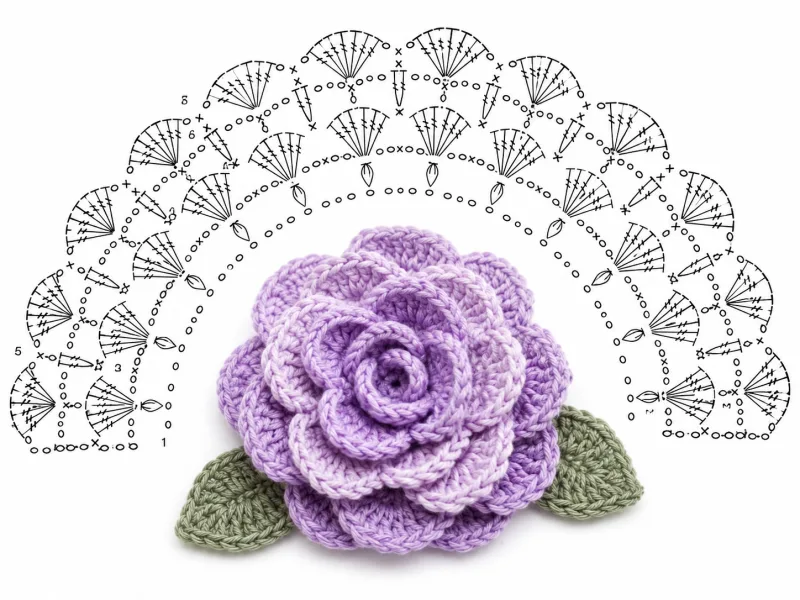
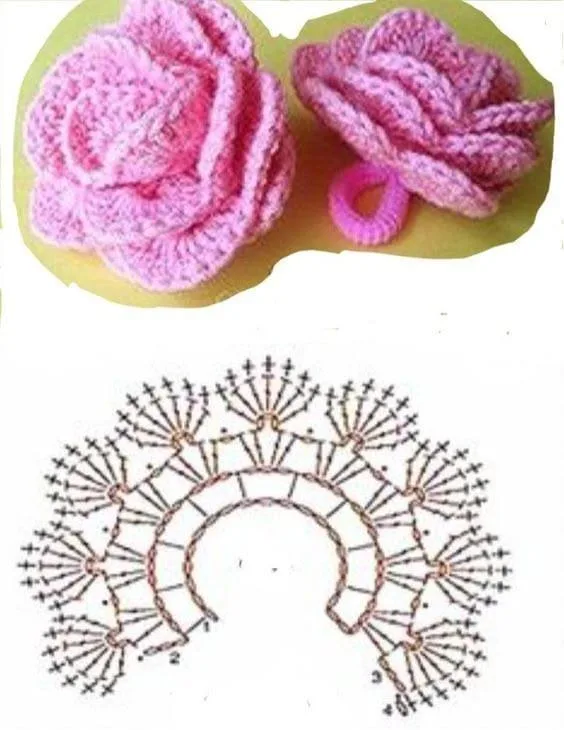
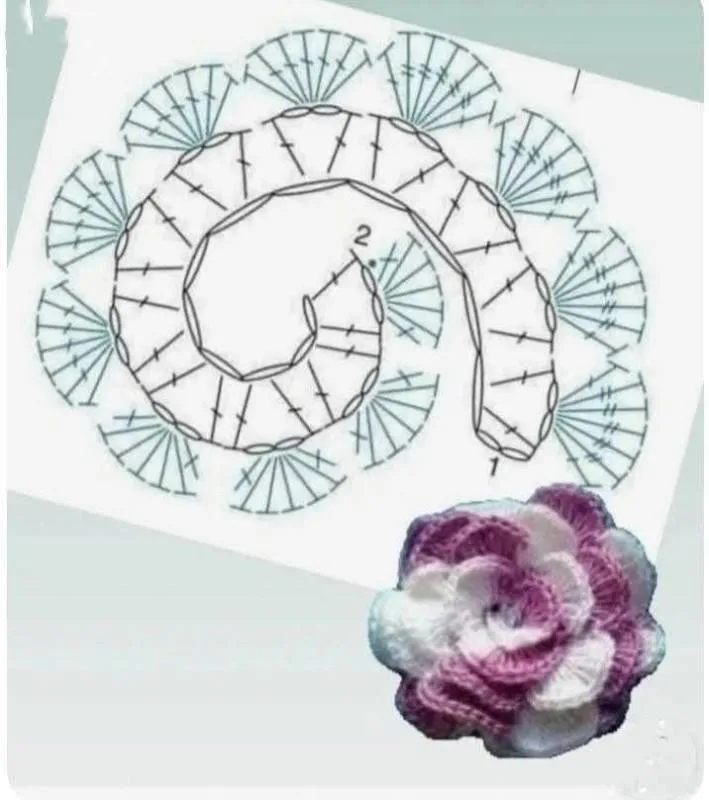
- Round 1Create the Base Work 1 dc into the 4th chain from the hook . Then work 1 dc in each chain across .Turn your work.
At the end of this row, you should have a long strip of double crochet stitches. This row acts as the foundation that helps the flower roll neatly.
- Round 2Create the Petal Spaces Chain 3 . Skip 1 stitch. Work 1 dc, ch 1, 1 dc into the next stitch.Skip 1 stitch.Repeat this sequence across the row: Skip 1 st, work 1 dc, ch 1, 1 dc into next st.Turn your work.
This creates small V-shaped spaces. These spaces are where the petals will be formed.
- Round 3Create the Petals In the first chain space, work: 1 sc, 3 dc, 1 sc This makes a small rounded petal.In the next chain space, work: 1 sc, 5 dc, 1 sc This creates a slightly larger petal.1 sc, 6 dc, 1 sc This gives the outside of the rose a fuller, open shape.Fasten off, leaving a long tail for sewing.Lay the strip flat with the petals facing upward. Start rolling from one end. The beginning of the strip will become the center bud of the rose.Once the rose looks the way you want, turn it over and sew through the base several times with your yarn needle.Make sure to catch all the layers. This keeps the rose from unrolling.Secure the yarn with a knot and weave in the ends.Starting in the second chain from the hook, work: 1 sc 1 hdc 1 dc 2 tr 1 dc 1 hdc 1 sc Now work along the other side of the chain:1 sc 1 hdc 1 dc 2 tr 1 dc 1 hdc 1 sc Slip stitch to close.Fasten off and leave a tail for sewing.
Continue alternating between smaller and larger petals across the strip: 1 sc, 3 dc, 1 sc 1 sc, 5 dc, 1 sc For the last few spaces, you can make the petals larger by working:
Shaping the 3D Crochet Rose Now comes the magic part.
Roll slowly and adjust the petals as you go. Keep the base aligned while allowing the petal edge to open naturally.
Optional Crochet Leaf Pattern A green leaf makes your crochet rose flower look finished and realistic.
Leaf Instructions Chain 10 .
You can sew one leaf underneath the rose or make two leaves for a fuller floral arrangement.
Creative Color Ideas
Classic red roses are always beautiful, but crochet gives you freedom to explore color combinations that do not exist in nature.
Important notes
💡 Hook size is your size dial, not a rule. The 1.5 to 2.0 mm range gives you tiny buds from thread or fine cotton, 3.0 to 4.0 mm gives a classic decor-sized rose in DK, and 4.0 to 5.0 mm in worsted gives a big soft statement bloom. Same pattern, three completely different flowers.
💡 Leave a very long tail before you fasten off the strip, at least 12 inches. You will need it for the whip stitches that hold the roll together, and running out mid-roll means rejoining yarn in the most awkward possible place.
💡 Work slightly tighter than your usual tension on this one. A dense fabric holds the rolled shape without any stiffener, whereas a loose, drapey strip will flop open over time and lose its petal definition.
💡 Place a stitch marker in the very first dc, ch 1, dc group of the petal row. When you finish the row you can count your repeats back to the marker and confirm you did not accidentally skip two stitches somewhere in the middle.
💡 If you are attaching the rose to a hair clip, brooch back or bag, sew rather than glue wherever the piece will be handled or washed. Save the hot glue for wreaths, gift toppers and anything purely decorative, and always let it cool completely before you fluff the petals.
💡 For a bouquet stem, push the floral wire or wooden stick up into the rolled base before you finish your securing stitches, then stitch around it. Adding the stem afterwards means forcing it through a solid core and distorting the petals.
More photos
FAQ
How much yarn do I need for one rose?
Far less than you would think. A single DK rose with its leaf uses roughly 10 to 15 grams, so one standard 50 gram ball will make you a small bouquet of three to five blooms plus foliage. Leftover scraps from bigger projects are ideal for this pattern.
Can I make the rose bigger or smaller without changing the pattern?
Yes, and this is the easiest pattern to resize. Lengthen or shorten your starting chain and everything else stays exactly the same, since the petal row is just the skip 1 st, dc, ch 1, dc repeat worked across whatever you have. A longer strip gives more petal layers and a fuller rose.
My rose keeps unrolling. What am I doing wrong?
You are almost certainly securing it only at the end. Stitch through the base layers with your yarn needle every full turn as you roll, so the core is locked before you reach the outer petals. A slightly tighter tension in the strip itself also helps it hold.
Do I have to make the green leaf?
No, the leaf is completely optional and the rose looks lovely on its own, especially in a cluster of one color. That said, the leaf takes only a couple of minutes from a chain of 10 and it is what makes the finished piece read as a real rose rather than a rolled ruffle.
Does the finished rose need stiffening or blocking?
Not usually. If you worked at a firm tension, the rolled base holds its own shape indefinitely. If your petals feel floppy or you used a very soft acrylic, a light steam or a diluted fabric stiffener on the outer petals only will give them a crisper curl without making the flower feel plasticky.