Free Pattern
Step-by-Step
Crochet
Blankets & ThrowsCrochet Flower Blanket With Rose Motifs and Leaf Border
A granny-style flower blanket finished with sewn-on roses and a chained leaf border.
- Level
- Intermediate
- Time
- 6-10 hours
- Yarn
- Worsted
Pattern highlights
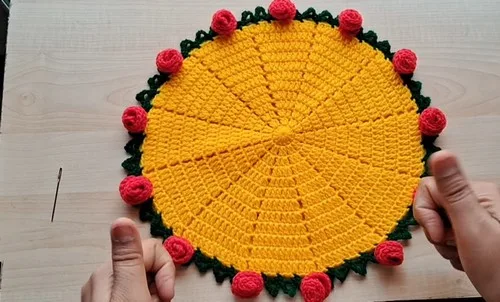
- Start the blanket body with a magic ring and build outward in rounds, increasing steadily as you go.
- Work a scalloped edge of single crochets and chain loops around the last round to frame the piece.
- Make each rose separately, starting from a chained foundation and shells worked into every stitch.
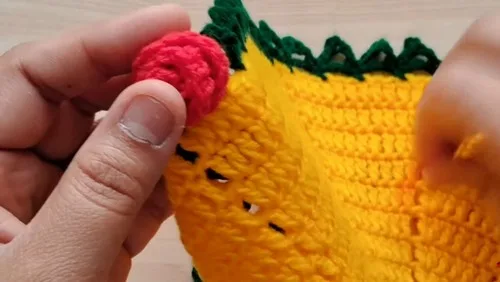
- Join green yarn around the blanket edge and single crochet a leaf-shaped border stitch by stitch.
- Cut yarn on each rose, leaving a tail long enough to sew it onto the finished blanket.
- Space the roses evenly across the surface, leaving a small gap between each one.
- Weave in every loose end so the back looks as tidy as the front.
About This Pattern
I keep a shelf for flower motifs in my head, and this blanket belongs there. It starts the way granny squares start: a magic ring, a ring of double crochets, a slip-stitch join. What makes it a blanket instead of a square is scale — the same increase pattern repeated round after round until the circle is big enough to wrap around a lap. I like that the bones are familiar. The surprise comes from what gets added once the base is done.
The base rounds use a standard magic-ring start, then increases spaced by a single chain to keep the circle flat as it grows. A separate round of single crochets and chain loops builds a scalloped edge, almost leaf-like before the real leaves arrive. Roses are worked apart, from their own chain foundation, then sewn on once the body is finished. Nothing here is one continuous piece — it is base, edge, and flowers, joined afterward by needle and yarn tail.
Finished, this is not a delicate throw. It is sturdy and textured, made to be handled — folded, carried, spread over a lap. The rose accents read like a garden scattered across a plain field, and the green border frames the whole thing like a hedge. Give it as a gift or keep it for the couch. Either way it looks deliberate, not accidental, thanks to the border holding the edge together.
Common mistakes
- Losing the increase chain Skipping the one-chain between increases pulls the round tight and cups the edge. Keep it in every time.
- Leaving the magic ring loose If the center ring stays open after Round 1, tighten the tail before continuing so no hole shows.
- Uneven rose foundation chain A starting chain of varying tension makes lopsided petals. Keep it snug and consistent from stitch to stitch.
- Miscounting the leaf border skip The scalloped edge depends on skipping the right number of stitches before each shell. Miscounting flattens the leaf shape.
- Crowding the roses together Placing roses too close crowds the design. Leave the gap the pattern calls for between each one.
Intermediate
Progress Tracker
0 of 0 rounds
Tap a round to tick it off — your place is saved on this device.
The kit
- Worsted weight yarn
- Crochet hook (size to suit your yarn)
- Green yarn for the leaf border
- Yarn for the rose motifs (same or contrasting color, per your choice)
- Yarn needle for sewing the roses onto the blanket and weaving in ends
Base Pattern
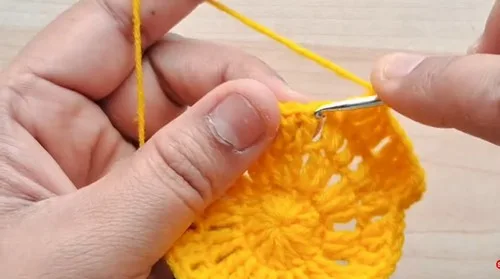
Round 1Create a magic ring and make 12 double crochets inside the ring. Close the ring and join with a slip stitch.(12)
Round 2Chain two (does not count as a stitch). Make two double crochets in the same stitch (increase). Chain one, and repeat the increase in the next stitch. Continue this pattern (increase, one chain) around. End with 24 double crochets.(24)
Round 3Chain one, make a single crochet, then a double crochet in the back loop. Increase in the next stitch. Chain one, skip one stitch, and make a double crochet in the next stitch followed by an increase. Repeat around, ending with 36 double crochets.(36)
Round 4Chain one, make a single crochet, then a double crochet in the back loop. Make one double crochet in the next two stitches, then increase. Chain one, skip one stitch below, and repeat the pattern (two double crochets, increase) around. End with 48 double crochets.(48)
Round 5Chain one, make a single crochet, then a double crochet in the back loop. Make one double crochet in the next three stitches, then increase. Chain one, skip one stitch below, and repeat the pattern (three double crochets, increase) around. End with 60 double crochets.(60)
Rounds 6–12Continue increasing the number of double crochets before each increase, maintaining the chain one and skip one stitch pattern. This forms 12 triangles, increasing stitches on one side of each.
Green Leaf Border
Round 1Join green yarn to any stitch with a chain, then make a single crochet in the same stitch. Chain four, skip two stitches, and make a single crochet in the third stitch. Repeat this pattern around to create loops.
Round 2Single crochet into the loop. Chain four, slip stitch into the second chain. Chain two, single crochet in the same loop. Single crochet into the next loop. Repeat around the blanket.
Rose Pattern
Rose MotifLeave a long tail, make a slip knot, and chain 14. Skip three chains and make three double crochets in the fourth chain. Make three double crochets in each of the remaining chains. Chain two, slip stitch into the same stitch. Chain one and cut the yarn, leaving a long tail for sewing. Roll the piece from one end to form a rose shape and sew the base together to secure.
Assembly
Step 1Sew or tie the roses onto the blanket, spacing them evenly.
Step 2Use a three-stitch gap between each rose.
Step 3Hide all loose ends for a clean finish.
Step 4The blanket can be folded and carried like a bouquet.
From the collection
Finishing
- Weave in the tails left along the blanket body and the leaf border first.
- Sew each rose onto the blanket using its own long tail, spacing them evenly across the surface.
- Give the finished piece a light steam or block to flatten the edge and relax the stitches.
Why it works
Each round of the center adds increases spaced by a single chain, which keeps the circle lying flat instead of cupping.
The rose motif is worked as its own flat piece from a chain foundation, then attached by sewing rather than crochet.
A slip-stitch join closes each round before the next begins, so the rounds stack rather than spiral outward.
What it becomes
- Drape it over a sofa back as a textured throw that doubles as a conversation piece.
- Fold it and carry it like a bouquet for a housewarming gift, since the design is built for that.
- Use it as a lap blanket for reading, paired with a plain-colored cushion so the roses stand out.
Original pattern: https://crocheteverything.com/stunning-crochet-flower-blanket-pattern-with-beautiful-rose-accents/
FAQ
Can I make the roses in a different color than the blanket?
Yes. The roses are worked separately and sewn on, so any contrasting yarn works. Just keep the fiber weight consistent with the base.
Why does the leaf border use chain loops instead of solid stitches?
The chain loops create the scalloped, leaf-like shape along the edge. Solid stitching would flatten that texture.
Do I attach the roses before or after the leaf border?
Finish the blanket body and edge first. Roses go on last, once you can see the full surface to space them evenly.
How many roses do I need for the whole blanket?
The pattern doesn't set an exact count. Space them evenly with a small gap between each one and stop when the coverage looks right.