Free Pattern
Step-by-Step
Crochet
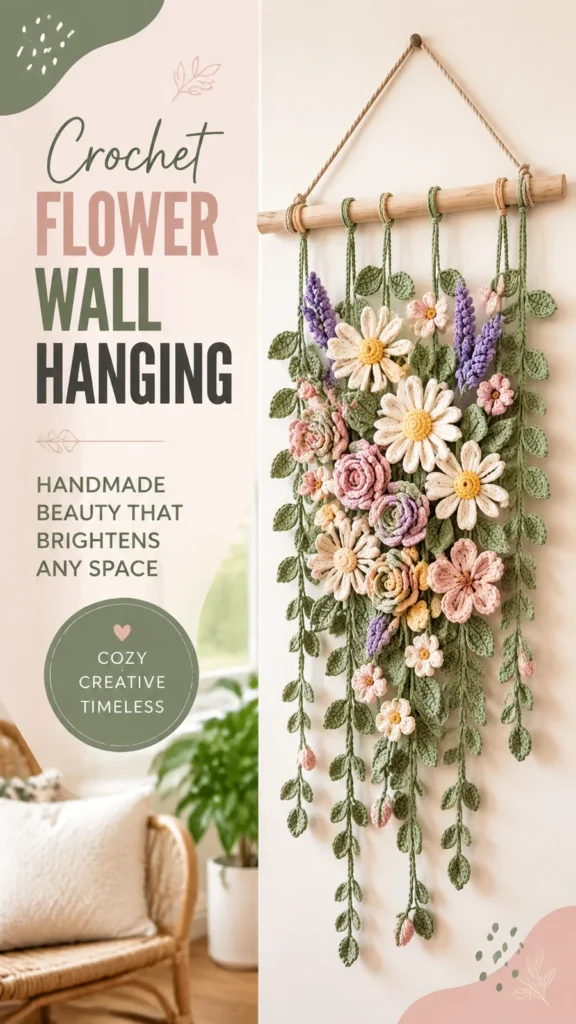
Home DecorCrochet flower wall hanging with layered petals and leaves
A motif-based crochet wall hanging with layered flowers, pointed leaves, and vine stems on a dowel.
- Level
- Confident Beginner to Intermediate
- Time
- 6-8 hours
- Hook
- 3.0 mm
- Yarn
- Fingering
Pattern highlights
- Crochet the large and small flowers separately, each built from a magic ring up through a petaled final round.
- Shape the pointed leaves as flat pieces, working the single crochet border so the tip gathers into a point.
- Chain and single crochet back along long cords to form the hanging stems in green yarn.
- Block the finished flowers and leaves so petals and points hold their shape before anything gets sewn down.
- Sew leaves along the stems at even intervals, then arrange flowers among them before committing to placement.
- Attach the finished stems to the wooden dowel or branch once the whole arrangement looks right to you.
About This Pattern
I keep a shelf for pieces that aren't quite garments and aren't quite home decor. This wall hanging lives there. It's a motif project, which is my favorite kind of complication — small pieces, big payoff. Five large flowers, six small ones, seven stems, all made separately before anything gets joined. That's a lot of fastening off for one finished piece, but it's also a lot of portable, pick-it-up-anywhere crochet.
The flowers start as a magic ring and build outward with straightforward increases — twelve double crochets, then two single crochets in every stitch for round two. The petal round is where it gets interesting: a cluster worked into one stitch, a slip stitch into the next, repeating around. Leaves are worked flat instead of in rounds, shaped by increasing at the tip of a chain and finishing with a single crochet border that bunches three stitches into the point. Three stitch heights, one hook.
What comes off the hook is a hanging garden you build piece by piece. Flowers in cream, pink, lavender, and yellow sit against green leaves and long crocheted stems. Everything attaches to a wooden dowel or branch, so the whole thing reads as one arrangement even though nothing is joined mid-row. It's the kind of piece that looks complicated hanging on a wall and is actually just a pile of small, repeatable motifs.
Worth knowing
There's something satisfying about a project built entirely from repeats you already know. The large and small flowers use the same shaping logic — magic ring, increase round, petal round — just at different stitch counts, so once you've made one, the other isn't a mystery. The petal cluster stitch gives dimension without cables or bobbles; it's just clusters and slip stitches doing the work. Leaves are a nice change of pace, worked flat with shaping at the tip instead of in the round. And because every flower, leaf, and stem is a separate motif, you can carry pieces in a bag, finish them in stolen minutes, and only commit to the full arrangement once everything's sitting in front of you on the table.
Common mistakes
- Skipping the blocking step Unblocked petals curl instead of sitting flat. Mist with water and shape them before sewing anything down.
- Crowding the petal cluster round If clusters sit too close together, the flower stops lying flat. Keep the slip stitch between clusters even and don't skip it.
- Working the leaf in the round The leaf pattern is flat, worked along both sides of a chain. Treat it like a leaf shape, not a motif made in rounds.
- Losing the stem's cord structure The stem relies on single crochet worked back along the chain to feel sturdy. Skipping that pass leaves a floppy chain instead of a cord.
- Sewing motifs on before arranging Permanent stitches are hard to undo on a dowel piece. Lay out the flowers and leaves first, then sew once you're happy.
Confident Beginner to Intermediate
Progress Tracker
0 of 0 rounds
Tap a round to tick it off — your place is saved on this device.
The kit
- Fine cotton or cotton-blend yarn in green, cream, pink, lavender, yellow, and your preferred flower shades.
- 3.0 mm crochet hook.
- Wooden dowel or natural branch approximately 18 inches (46 cm) long.
- Yarn needle.
- Scissors.
- Stitch markers for longer vine sections.
Large Flower
With flower center color, make a magic ring.
Round 1Ch 2, work 12 dc into ring. Join with sl st to first dc. (12 sts)
Round 2Ch 1, work 2 sc in each stitch around. Join. (24 sts)
Round 3Change to petal color. Ch 1, *petal cluster in next stitch, sl st in next stitch.* Repeat around. Join and fasten off. (12 petals)(12)
Small Flower
Make a magic ring.
Round 1Ch 2, work 8 dc into ring. Join. (8 sts)
Round 2Ch 1, work 2 sc in each stitch around. Join. (16 sts)
Round 3Ch 1, *petal cluster, sl st in next stitch.* Repeat around. Fasten off. (8 petals)(8)
Main Pattern
Round 1Sc in second ch from hook, hdc in next stitch, dc in next 3 stitches, 5 dc in last chain.Working along opposite side of chain, dc in next 3 stitches, hdc in next stitch, sc in last stitch. (15 sts)
Round 2Ch 1, sc around the leaf edge, placing 3 sc at the tip. Join with sl st. Fasten off.
Project Details
Project Name Blooming Garden Wall Hanging Skill Level Confident beginner Finished Size Approximately 18 inches wide x 30 inches long (46 x 76 cm)
Suggested Yarn Category 2 fine cotton or cotton-blend yarn Yarn Quantity Approximately 350 yards (320 meters) total Recommended Hook
3.0 mm crochet hook (US C/2)
Gauge Approximate: 24 single crochet stitches x 26 rows = 4 inches square Terminology US crochet terms
Special Stitch
Petal Cluster: In one stitch, work 1 sc, 2 hdc, 1 dc, 2 hdc, and 1 sc. This creates a rounded raised petal.
Assembly
Step 1Blocking helps the crochet flowers and leaves look more polished. Lightly mist the pieces with water, shape the petals and leaves, and allow them to dry completely before assembly.
Step 2Because cotton yarn can collect dust over time, gently hand wash the removable crochet pieces if needed. Allow the wall hanging components to dry flat and reshape the flowers before returning them to display.
Finishing
- Weave in every fastened-off end on the flowers and leaves before they get anywhere near the stem cords.
- Mist each flower and leaf lightly with water, shape the petals and points, and let them dry flat.
- Sew leaves along the stems, arrange the flowers, and attach the finished stems to the dowel or branch.
Why it works
Each flower's increase happens on round two, where two single crochets in every stitch doubles the stitch count before the petals begin.
The leaf is worked flat from a single chain, not in rounds, so the shaping happens at each end rather than in a continuous spiral.
Every flower round closes with a slip stitch to the first stitch, which keeps the piece flat rather than spiraling into a cone.
What it becomes
- Hang it on a blank wall above a reading chair, where the trailing stems catch the light.
- Use it as a backdrop for a shelf of small pottery, letting the flowers echo the colors nearby.
- Give it as a housewarming piece for someone who likes dried flowers but wants something that doesn't fade.
Original pattern: https://duniarecipe.com/crochet-flower-wall-hanging-free-pattern-handmade-floral-decor-ideas/
FAQ
Can I make more or fewer flowers than the pattern suggests?
Yes, the motifs are independent, so you can add or skip flowers without changing any stitch counts. Just keep enough stems to hold whatever you make.
Why are the leaves worked flat instead of in a round?
The leaf shape comes from working both sides of a starting chain, which is how the pointed tip forms. Working it in rounds wouldn't give the same tapered shape.
What yarn weight works best here?
The pattern calls for fine cotton or cotton-blend yarn with a 3.0 mm hook, which keeps the flower edges crisp. A heavier yarn would blur the petal shaping.
Do I need a dowel or can I use something else?
A natural branch works as well as a dowel, since the stems just need something to drape over. Either way, aim for roughly the length noted in the materials list.