Free Pattern
Step-by-Step
Crochet
Home DecorCrochet gratitude jar sleeve with mini heart appliqués
A crocheted sleeve wraps a jar for daily gratitude notes, with hearts and a tie at the top.
- Level
- Intermediate
- Time
- 4-6 hours
- Hook
- 4.0 mm
- Yarn
- Worsted
Pattern highlights
- Start with a magic ring and crochet a flat circle, increasing steadily until it matches your jar's base.
- Work a back-loop-only round to turn the corner from flat base into a straight-sided wall.
- Continue upward in continuous rounds without joining, placing a marker in the first stitch of each round.
- Add a textured band partway up the sleeve to break up the plain single crochet body.
- Work an eyelet round near the top, then finish with a simple top edging.
- Crochet a tie and thread it through the eyelets to cinch the sleeve snugly around the jar.
- Make mini heart appliqués separately in accent colors and sew them onto the finished sleeve.
About This Pattern
This one lands in the jar-cozy corner of my notebook, next to coasters and coffee sleeves. A gratitude jar cover is a strange little category—part amigurumi, part housewares, part keepsake. I like projects that dress up something ordinary instead of replacing it. The jar stays visible, the notes stay visible, and the crochet just adds a collar. It is a small commitment with a clear payoff, which is rare in this hobby.
The construction is a tidy little lesson in shaping. A flat circle grows through increase rounds until it matches the jar's base. Then a BLO round turns the corner, and the wall starts climbing in continuous rounds. A textured band breaks up the plain body partway up. An eyelet round near the top waits for a crocheted tie to thread through. An optional flat label panel is worked in rows instead of rounds. Each piece uses a different skill without feeling crowded.
When it's done, you have a fabric collar around the lower half of a jar. It leaves the top open to the view. The tie cinches the eyelet round, so the sleeve stays put when the jar is picked up. Small heart appliqués sit wherever you sew them, giving each jar its own personality. It is less a container and more a frame for whatever is already inside.
Worth knowing
What I like here is the turning-corner round. Working into the back loop only lets the piece pivot from flat base to straight wall. It's a small trick that does real structural work. The shift from shaped increases to continuous rounds feels satisfying. The piece finally knows what it wants to be. The textured band gives my hands something to focus on after plain rounds of sc. The eyelet round is a neat bit of planning. It exists only so the crocheted tie has somewhere to go. Sewing on the mini heart appliqués at the end feels like a reward, not a chore.
Common mistakes
- Skipping the jar measurement step Measure your jar's diameter before starting the base. Mason jars vary even within the same stated capacity.
- Joining continuous rounds by habit Resist slip-stitching to close each round. The pattern works in a spiral, and joining will throw off the turning-corner round.
- Losing the stitch marker Move the marker up into the first stitch of every new round. Without it the spiral is hard to track.
- Working both loops on Round 9 The turning-corner round calls for back loops only. Working both loops erases the ridge that separates base from wall.
- Sewing hearts before fitting the sleeve Try the sleeve on the jar before attaching appliqués permanently. Placement looks different once the fabric stretches around glass.

Intermediate
Progress Tracker
0 of 0 rounds
Tap a round to tick it off — your place is saved on this device.
The kit
- Approximately 80 to 100 yd / 73 to 91 m worsted weight cotton yarn in the main color
- Approximately 5 to 10 yd / 5 to 9 m each of two or three accent colors for hearts
- 4.0 mm crochet hook, US G/6
- Removable stitch marker
- Yarn needle
- Scissors
- Flexible measuring tape
- Wide-mouth glass or reusable storage jar approximately 4 in / 10 cm across the base
Circular Base
With the main color, make a magic ring.
Round 1Work 6 sc into the magic ring. Do not join. Place marker in first sc. (6 sts)
Round 2Inc in each st around. (12 sts)
Round 3*Sc in next st, inc in next st; repeat from * 6 times total. (18 sts)
Round 4*Sc in next 2 sts, inc in next st; repeat from * 6 times total. (24 sts)
Round 5*Sc in next 3 sts, inc in next st; repeat from * 6 times total. (30 sts)
Round 6*Sc in next 4 sts, inc in next st; repeat from * 6 times total. (36 sts)
Round 7*Sc in next 5 sts, inc in next st; repeat from * 6 times total. (42 sts)
Round 8*Sc in next 6 sts, inc in next st; repeat from * 6 times total. (48 sts) At the recommended gauge, the base should measure approximately 4 in / 10 cm across. Check it against your jar now.
Optional Small Label Panel
If you want a decorative front label area, use an accent color.
Round 1Ch 13. Sc in second ch from hook and each remaining ch across. Turn. (12 sts)
Round 2to 6: Ch 1, which does not count as a stitch. Sc in each of 12 sts. Turn. (12 sts)After Row 6, do not turn.Border: Ch 1. Work sc evenly around all four sides, placing approximately 1 sc into each row end and 3 sc in each corner. Join with a sl st to the first border sc.Fasten off, leaving a long sewing tail.
You can leave this panel plain or embroider a simple heart onto its center with contrasting yarn. Avoid making lettering essential to the design because the small surface works best with uncomplicated decoration.
Turning the Corner
Round 9Working in the BLO of every stitch, sc in each st around. (48 sts) This creates the bottom ridge and begins the vertical wall.
Lower Body
Round 10to 14: Sc in each st around. (48 sts each round)(48)
Textured Band
Round 15Hdc in each st around. (48 sts)
Round 16Sc in each st around. (48 sts)
Round 17Hdc in each st around. (48 sts)
Round 18Sc in each st around. (48 sts) The alternating stitch heights create a subtle horizontal texture without dramatically changing the circumference.
Upper Body
Round 19to 25: Sc in each st around. (48 sts each round) At this stage, try the sleeve on the jar. Depending on your personal gauge, the cover should measure approximately 4 to 4.25 in / 10 to 10.8 cm high from the bottom.
Eyelet Round for the Tie
Round 26*Sc in next 2 sts, ch 1, skip next st; repeat from * 16 times total. (32 sc and 16 ch-1 spaces)
Round 27Sc in each sc and 1 sc in each ch-1 space around. (48 sts)
Top Edging
Round 28Sl st loosely in each st around. Join with a sl st to the first sl st. (48 sl sts)Fasten off, leaving a 6 in / 15 cm tail. Weave the tail securely into the wrong side.
Crocheted Tie
With the main color or an accent color, ch 90.
Beginning in the second ch from the hook, sl st loosely into each chain across. (89 sl sts)
Fasten off and weave in both ends.
Starting at the center front of the sleeve, weave the tie alternately over and under the eyelet spaces from Round 26. Bring both ends back to the front and tie them into a small bow.
Mini Crochet Heart Appliqué
Make 3 hearts in different accent colors.
Round 1Each heart is worked into a magic ring.
Round 2Heart Round Ch 2, work 3 tr, 3 dc, ch 1, 1 tr, ch 1, 3 dc, 3 tr, ch 2, sl st into the ring.(3)
Round 3Carefully pull the magic ring closed. Fasten off, leaving approximately 10 in / 25 cm of yarn for sewing.
The heart should measure approximately 1.25 to 1.5 in / 3 to 4 cm depending on tension.
Optional Color Arrangement
For a warm, cheerful palette, use a neutral cream or oatmeal color for the main sleeve and three contrasting shades for the hearts. Dusty rose, soft yellow, muted blue, sage green, peach, and lavender all work beautifully with colorful paper notes.
For a more playful version, change colors during the body: Rounds 1 to 14: main color Rounds 15 to 18: contrasting color
Rounds 19 to 28: main color To change colors cleanly, work the final stitch before the color change until two loops remain on the hook. Yarn over with the new color and pull through both loops. Continue with the new yarn. Secure and weave in the unused yarn tails afterward.
Assembly
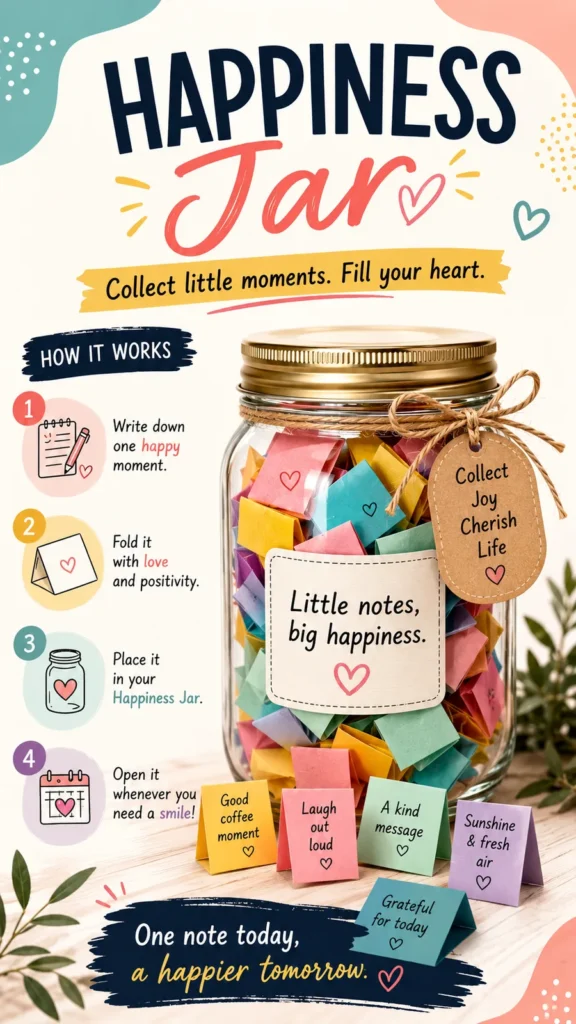
Step 1Using Your Finished Happiness Jar: Cut small pieces of colorful paper and keep them beside the jar with a pen. Write down one happy memory, accomplishment, kind interaction, or meaningful little moment whenever you want to remember it. Fold the paper and drop it into the jar. You could add notes daily, weekly, or simply whenever something worth remembering happens. The transparent upper section lets the growing collection become part of the display. A crochet gratitude jar can also become a thoughtful handmade crochet gift idea. Instead of giving an empty jar, add a small stack of blank colorful notes so the recipient can begin immediately.
Finishing
- Weave in the tail from the magic ring and any color-change ends on the inside of the sleeve.
- Sew the mini heart appliqués onto the lower body or textured band before fitting the sleeve.
- Thread the crocheted tie through the eyelet round and slip the sleeve down over the jar to finish.
Why it works
The circular base increases by six stitches each round, spacing increases further apart as it grows.
Round 9 works into the back loop only. This leaves a visible ridge marking where the base ends and the wall begins.
The optional label panel is worked flat in rows with a turning chain. It gets bordered separately, apart from the continuous-round body.
What it becomes
- Keep it on a kitchen counter as a running tally of good days. Pair it with scrap paper and a pen.
- Set it on a nightstand for a quiet end-of-day ritual. Keep pens or washi tape in a small jar nearby.
- Give it as a starter kit for someone building a new habit. Pair it with a notepad cut into small slips.
Original pattern: https://duniarecipe.com/diy-gratitude-jar-ideas-happiness-jar-for-daily-positive-memories/
FAQ
Can I use a different jar size than the one listed?
Yes, the pattern includes an adjustment formula. Measure your jar's base, then work the circle to that diameter before stopping increases. Keep the same stitch pattern through the rest of the sleeve.
What happens if I forget to work Round 9 into the back loop only?
You'll still get a wall, but without the ridge that marks the turn from base to body. It's a cosmetic detail, not a structural one, so the sleeve will still work.
Do the heart appliqués need to match the main color?
No, they're meant to stand out. The pattern calls for two or three accent colors on purpose. That way the hearts read as a cheerful detail against the main sleeve.