
Free Pattern
Step-by-Step
Crochet
Crochet Home DecorClustered crochet hydrangea bouquet for home decor
A clustered crochet flower bouquet pattern with wired stems for lasting home decor.
- Level
- Intermediate
- Time
- 4-6 hours
- Hook
- 3.0 mm
- Yarn
- DK
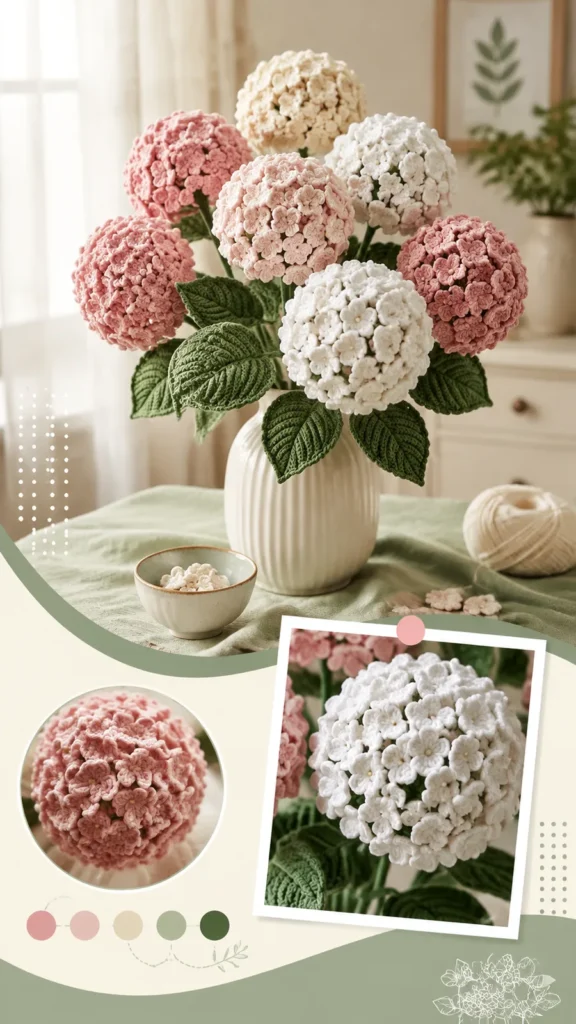
Pattern highlights
- Start each flower with a magic ring center, increasing once before settling into even single crochet.
- Build the petal layer directly onto the center, working one cluster round then a second one behind it.
- Decide whether to stuff the center lightly with fiberfill before the last round closes it up.
- Crochet the leaf flat from a foundation chain, working both sides before edging it in single crochet.
- Attach each flower and leaf to floral wire, then wrap the stem in green floral tape.
- Shape the petals by hand once everything is assembled, easing them apart for a fuller look.
- Group as many finished flowers as you like into one arrangement, varying stem heights if you want.
About This Pattern
I keep a folder of small-object patterns, the kind that sit between amigurumi and lace. This bouquet lands right in the middle. Each flower is its own tiny build, a magic ring center dressed up with layered petals. Multiply it by however many blooms you want, and you have a collection rather than a single project. That's the part I like best about it.
The technique worth noting is the petal cluster worked twice over the same center, once on the surface and once tucked behind it. That double layer is what gives the flower its rounded, hydrangea look instead of a flat daisy shape. The leaf is worked flat from a chain, then edged in a second row of single crochet to firm up its point.
What comes out the other end is a set of flowers on wire stems, dressed in floral tape, ready to stand in a vase without wilting. It reads as a quiet arrangement rather than a showpiece. I'd call it a shelf or table piece, pastel and textured, built to be handled and rearranged whenever the display gets stale.
Worth knowing
The satisfaction here is in repetition with a payoff. Once you've built one flower center and worked the petal cluster twice around it, the rest is confidence, not instruction-checking. I like that the leaf is a small flat exercise on its own, chain, work both sides, edge it, done, a break from the rounds. Stuffing the center lightly before closing is the kind of small decision that changes the whole result, and I appreciate a pattern that trusts me to make that call. By the time the stems go into floral tape, I've made something with real presence, not just a swatch. It's a project that rewards patience with small parts rather than endurance with one long piece.
Common mistakes
- Rushing the magic ring closure Pull the tail firm before working round 1 so the center doesn't gap once petals are added.
- Losing count on the increase round Count stitches at the end of round 2 before moving on, since round 3 depends on that total staying even.
- Placing the second petal cluster in the same spots Offset round 5's clusters behind the gaps left by round 4 so the layers actually overlap for fullness.
- Skipping the leaf's second row Work the single crochet edging row around the whole leaf, including the three stitches at the point, or it will curl.
- Taping the stem before checking placement Hold the flower and leaf against the wire first to confirm position, then wrap with floral tape once satisfied.

Intermediate
Progress Tracker
0 of 0 rounds
Tap a round to tick it off — your place is saved on this device.
The kit
- The flowers are best made with lightweight cotton yarn because cotton holds detailed stitches well and creates structured petals. A smooth acrylic yarn can also work if you prefer softer stems or a more flexible bouquet.
- DK weight cotton yarn in flower colors: pink, cream, and white
- Green DK cotton yarn for leaves and stems
- 3.0 mm crochet hook (US C-2)
- Floral wire or flexible craft wire
- Green floral tape
- Fiberfill stuffing, small amount
- Yarn needle
- Scissors
Flower Center
Round 1Make a magic ring. Work 6 sc into the ring. Join with sl st. (6 sts)
Round 2Ch 1, inc in each stitch around. Join with sl st. (12 sts)
Round 3Ch 1, sc around. Join with sl st. (12 sts)
Main Pattern
Round 1Sc in second ch from hook, hdc in next 2 chains, dc in next 3 chains, hdc in next 2 chains, 3 sc in last chain.Working along opposite side of foundation chain, hdc in next 2 chains, dc in next 3 chains, hdc in next 2 chains, sc in last chain. Turn. (18 sts)
Round 2Ch 1, sc around the leaf edge, placing 3 sc in the pointed end. Join with sl st and fasten off.
Petal Layer
Round 4Ch 1, *petal cluster in next stitch, sl st in next stitch; repeat from * around. Join with sl st. (6 petals)(6)
Round 5Ch 1, *petal cluster behind previous petal layer in next available stitch, sl st in next stitch; repeat around. Join and fasten off.
Lightly stuff the flower center with fiberfill before closing if you want a rounded blossom shape.
Project Name: Pastel Garden Crochet Bouquet
Project Description: A decorative crochet flower bouquet featuring rounded textured blossoms, simple leaves, and structured stems. This original pattern creates a hydrangea-inspired arrangement using individual crochet components.
Skill Level Confident Beginner Finished Size Approx. 12 inches tall x 8 inches wide (30.5 cm x 20.3 cm)
Yarn Suggested DK cotton yarn, approximately 250 yards (229 meters)
Hook Recommended 3.0 mm crochet hook (US C-2)
Gauge Approx. 22 single crochet stitches x 24 rows = 4 inches (10 cm)
Terminology US crochet terms
Special Stitch: Textured Petal Cluster
To make one textured petal cluster, work 3 hdc stitches into the same stitch, then secure with a slip stitch into the next stitch. This creates a small raised petal shape.
Stem Construction
Cut floral wire approximately 14 inches (35.5 cm) long.
Insert the wire into the flower base.
Wrap green yarn around the wire while securing with small stitches or floral tape.
Attach leaves at different heights for a natural appearance.
Assembly
Step 1Shape each flower after assembly by gently separating the petals with your fingers. If needed, lightly steam the pieces while keeping the iron away from the yarn surface.
Step 2For cleaning, spot clean the bouquet with a damp cloth. Avoid soaking wired stems because moisture can affect the internal structure.
Finishing
- Weave in loose ends from the flower center and petal layers before adding stuffing, so nothing pulls loose once stuffed.
- Add a small amount of fiberfill to the center only if you want the finished flower to sit rounded rather than flat.
- Close the last petal round and fasten off, then attach the flower and leaf to the wired stem and secure with floral tape.
Why it works
The flower center doubles its stitch count in round 2 only, then holds steady in round 3, which keeps the base flat before petals start adding volume.
The petal layer is worked in two passes over the same center stitches, with the second cluster placed behind the first to build depth rather than width.
The leaf is worked as a flat piece from a chain rather than in the round, because a single pointed shape doesn't need the stability a joined round provides.
What it becomes
- A grouped centerpiece for a dining table, paired with plain ceramic or glass vases.
- A small bedside or shelf accent, especially nice alongside other soft-fiber textures.
- A handmade gift arrangement for a housewarming, sized up or down by changing flower count.
Original pattern: https://duniarecipe.com/beautiful-crochet-flower-bouquet-ideas-for-handmade-home-decor/
FAQ
Can I make the bouquet smaller without changing the pattern?
Yes, the notes say three flowers with fewer leaves works for a smaller bouquet. The flower and leaf construction stay exactly the same.
Why does the pattern suggest cotton yarn over acrylic?
Cotton holds the petal cluster's texture and structure better than a softer fiber. Acrylic is listed as an option if you want more flexible, bendable stems instead.
Do I have to stuff the flower center?
No, it's optional. Stuffing before closing the petal layer gives a rounder, more dimensional blossom, but the flower holds its shape without it too.
How do I keep the finished bouquet clean?
Spot clean with a damp cloth only. Avoid soaking the piece, since moisture can affect the wire inside the stems.