Free Pattern
Step-by-Step
Crochet
Bags & AccessoriesCrochet Kitty Face Tote Bag: Cozy Tan Cat Pattern
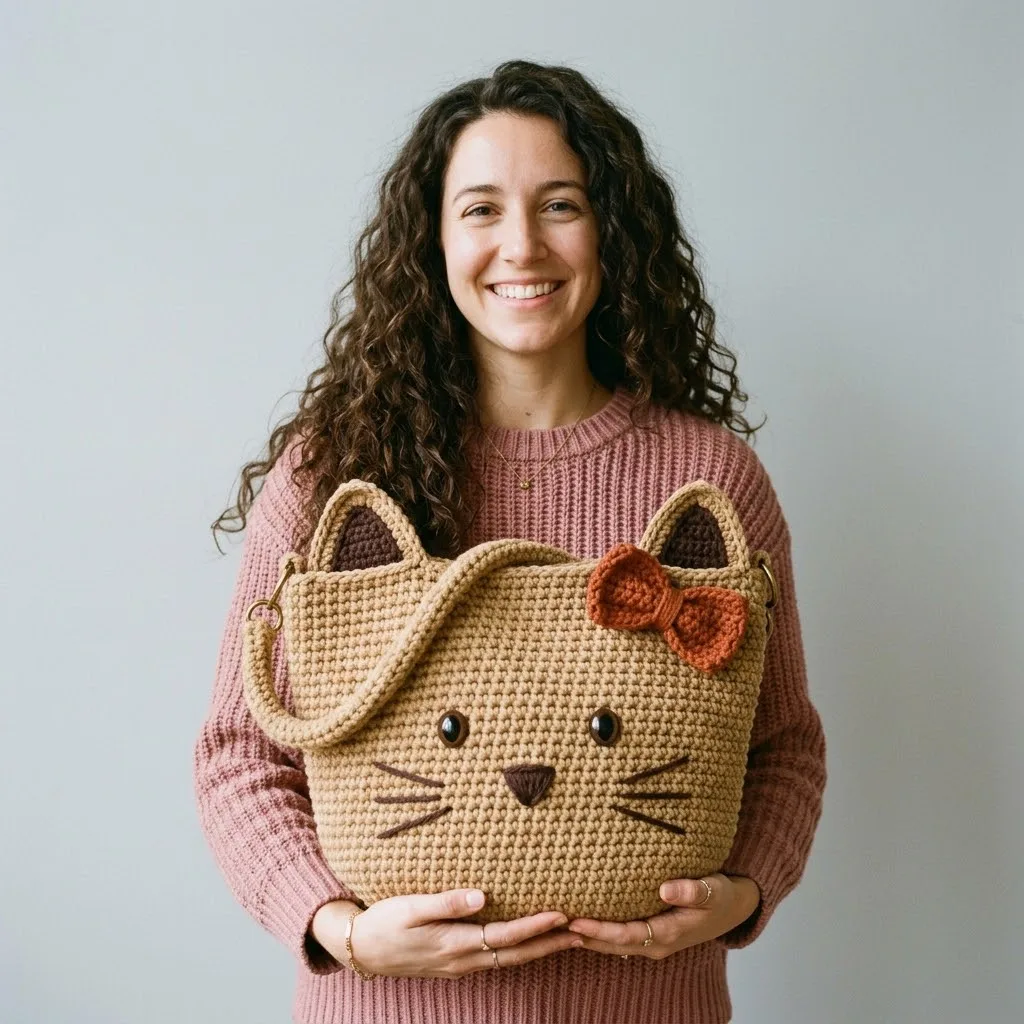
Make an adorable tan kitty face tote bag with this crochet pattern featuring ears, a bow, and D-ring straps. Beginner-friendly and full of charm.
Level IntermediateTime 4-6 HoursHook 5.0 mmYarn Worsted
Pattern highlights
- Crochet two matching main body panels in tan yarn, working straight single crochet rows until each measures the intended width and height.
- Shape two outer ears using gradual decreases so each piece tapers to a neat rounded point at the top.
- Work two smaller inner ear pieces in dark brown yarn, using the same decrease shaping for a coordinating tapered shape.
- Crochet the small triangle nose in dark brown yarn to prepare it for placement on the face.
- Center each inner ear on top of an outer ear, leaving a tan border, and whip stitch them together.
- Attach the completed ears, nose, safety eyes, and embroidered or attached whiskers onto one main body panel to form the face.
- Assemble the decorative bow by looping and stitching the bow loop pieces together, then wrapping the bow center piece around them tightly.
- Sew the two D-ring tabs in place, join the front and back panels together, and attach the bow to complete the tote.
About This Pattern
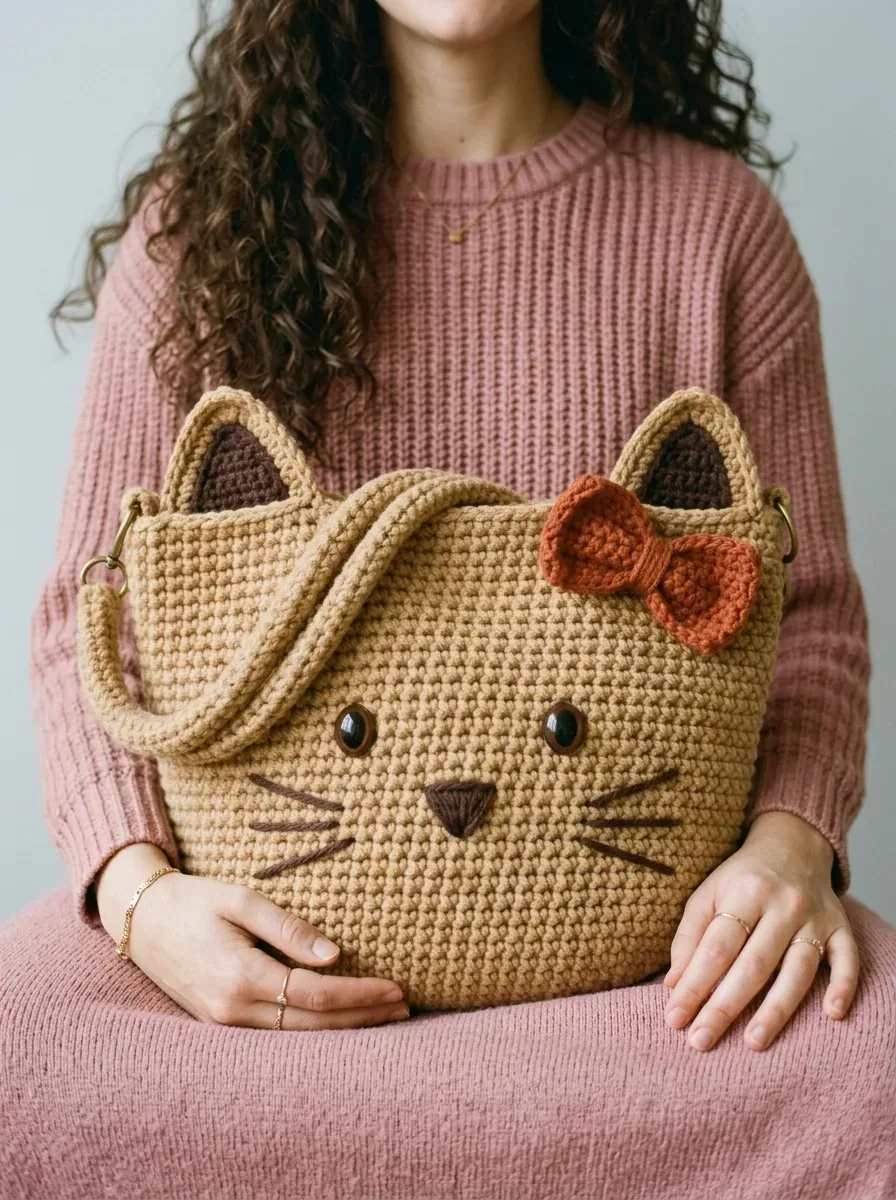
This cozy tan kitty face tote bag turns two simple single crochet panels into the sweetest feline-inspired accessory you'll want to carry everywhere. With perky outer and inner ears, a triangle nose, whisker details, and gleaming safety eyes, this project transforms basic stitches into a face full of personality. It's perfect for cat lovers, gift-givers, and anyone who wants a handmade bag that gets compliments the moment they walk into a room.
The technique here is refreshingly approachable: the two main body panels are worked flat in straight rows of single crochet, so once you've got your foundation chain going, the rest is just steady, meditative stitching. The ears use simple decrease shaping to taper into rounded points, and the tiny bow and D-ring tabs add just enough finishing detail to feel special. Expect to spend somewhere around 4 to 6 hours total, making this a great weekend project for a confident beginner ready to level up.
When it's all sewn together, you'll have a tote measuring approximately 14 inches wide by 12 inches tall, sturdy enough for everyday errands yet charming enough to double as a statement piece. The tan body with dark brown inner ears, nose, and whiskers gives it that classic tabby-cat softness, while the rust bow adds a pop of color. It makes a wonderful handmade gift for a cat-obsessed friend, a birthday, or simply a treat for yourself.
Variations
One of the best things about this kitty face tote is how endlessly customizable it is with just a few color swaps. Want a silver tabby? Swap the tan main color for a soft heathered gray and keep the dark brown inner ears and nose for contrast. For a ginger cat vibe, use a warm orange or pumpkin worsted weight yarn as your main color instead of tan, and consider swapping the bow to a cream or white for balance. Feeling bold? A solid black main color with the same dark brown or even charcoal inner ear accents creates a sleek, moody version that still reads unmistakably as a cat. If you want to skip the bow entirely, this pattern works beautifully as a more minimalist, gender-neutral design too — just proceed straight to attaching the D-rings after the ears and face are sewn on. You could also experiment with the bow color: try a soft blush pink, a classic red, or even a plaid-look yarn for a different personality. For yarn substitutions, any worsted weight cotton or cotton-blend will work well since the fabric benefits from structure, but a cotton-acrylic blend can add a touch more drape if you prefer a slouchier tote. If you'd like a smaller bag, consider making the panels a few inches narrower and shorter while keeping the same row gauge, adjusting your foundation chain accordingly. And if you want to make it extra plush, add a touch more stuffing to the ears for a more three-dimensional, perky look rather than the flatter, structured version.
I designed this kitty face tote because I wanted a bag that felt like a stuffed animal grew up and became functional. What I love most is how the simple single crochet panels do all the heavy lifting for structure, while the smaller pieces — the outer ears with their tapering decreases, the tiny inner ears in dark brown, that perfect triangle nose — are where all the personality comes in. There's something so satisfying about watching a flat rectangle of stitches slowly become a face once you start placing the safety eyes and whiskers. The D-ring tabs are a small detail but they make the bag feel genuinely well-made, like something you'd find in a boutique. And don't even get me started on the bow — wrapping that little center strip around the loops to create the pinched shape is one of my favorite parts of any project, ever. This pattern rewards patience during the long body rows with an incredibly cute payoff at assembly.
Common mistakes
- Working the foundation chain too tightly, which pulls in the width of the main body panels.
- Use a slightly larger hook for just the foundation chain, or consciously relax your tension so your starting chain matches the width of your single crochet rows.
- Losing count on the long straight rows of the main body panels and ending up with an uneven stitch count.
- Place a stitch marker every 10 stitches as you work across each row so you can quickly spot-check your count without recounting from the beginning.
- Forgetting to decrease evenly on the outer ears, resulting in a lopsided or crooked ear shape.
- Always work the decrease at the very start and very end of the row as instructed, and count your stitches after every decrease round to confirm you're on track.
- Attaching the safety eyes before finalizing the face layout, leading to asymmetrical placement.
- Lay out the ears, nose, and eyes on the panel first and pin or hold everything in place, stepping back to check symmetry before pushing any safety eye backs into place.
- Sewing the inner ear too close to the edge of the outer ear so no tan border shows.
- Center the inner ear piece carefully, leaving a small consistent border of the outer ear color all the way around before whip stitching it down.
- Wrapping the bow center piece too loosely, so the bow loses its classic pinched shape over time.
- Pull the bow center piece snugly around the loops before stitching, and secure with several small stitches on the back rather than just one or two.

Intermediate
Progress Tracker
0 of 0 rounds
Tap a round to tick it off — your place is saved on this device.
Materials
- Main color (tan/beige): Approximately 400 yards of worsted weight yarn (category 4). I recommend a cotton or cotton blend for structure.
- Approximately 30 yards for the inner ears, nose, and whiskers
- Rust/burnt orange: Approximately 20 yards for the bow
- Size H/8 (5.0mm) crochet hook, or size needed to achieve gauge
- Two 18mm black safety eyes (or buttons if preferred)
- Yarn needle for weaving ends and assembly
- Stitch marker
- Scissors
- Polyester fiberfill for light ear stuffing (optional)
Main Body Panels
Make 2With tan yarn and H hook.
At the end of Row 48, FO and weave in ends.
Your panel should measure approximately 14 inches wide by 12 inches tall. If it is significantly smaller, try going up a hook size.
Helpful tip: Place a stitch marker at the beginning of your rows to keep track of where you started. It is easy to accidentally skip or add stitches at the edges.
Step by step: With dark brown yarn; FO, leaving a tail for sewing.
Step by step: With tan yarn; FO, leaving a long tail.
- Round 1Ch 50. Sc in 2nd ch from hook and in each ch across. (49 sts)Step by step: through 8: Ch 1, turn. Sc in each st across. (7 sts).
- Round 2Ch 1, turn. Sc in each st across. (49 sts)
- Round 3through 48: Repeat Row 2. (49 sts each row)(49)
Outer Ears
Make 2With tan yarn.
FO, leaving a long tail for sewing.
- Round 1Ch 16. Sc in 2nd ch from hook and in each ch across. (15 sts)
- Round 2Ch 1, turn. Sc in each st across. (15 sts)
- Round 3Ch 1, turn. Dec, sc across to last 2 sts, dec. (13 sts)
- Round 4Ch 1, turn. Sc in each st across. (13 sts)
- Round 5Ch 1, turn. Dec, sc across to last 2 sts, dec. (11 sts)
- Round 6Ch 1, turn. Sc in each st across. (11 sts)
- Round 7Ch 1, turn. Dec, sc across to last 2 sts, dec. (9 sts)
- Round 8Ch 1, turn. Sc in each st across. (9 sts)
- Round 9Ch 1, turn. Dec, sc across to last 2 sts, dec. (7 sts)Step by step: Ch 1, turn. Sc in each st across. (7 sts).
- Round 10Ch 1, turn. Dec, sc across to last 2 sts, dec. (5 sts)
- Round 11Ch 1, turn. Dec, sc, dec. (3 sts)
- Round 12Ch 1, turn. Sc3tog. (1 st)
Triangle Nose
With dark brown yarn.
FO, leaving a long tail for sewing.
- Round 1Ch 8. Sc in 2nd ch from hook and in each ch across. (7 sts)
- Round 2Ch 1, turn. Dec, sc 3, dec. (5 sts)
- Round 3Ch 1, turn. Dec, sc 1, dec. (3 sts)
- Round 4Ch 1, turn. Sc3tog. (1 st)
Decorative Bow - Bow Center
With rust yarn.
FO, leaving a long tail.
- Round 1Ch 5. Sc in 2nd ch from hook and in each ch across. (4 sts)
- Round 2through 6: Ch 1, turn. Sc in each st across. (4 sts)
Decorative Bow - Bow Loops
Make 2FO, leaving a tail.
- Round 1Ch 12. Sc in 2nd ch from hook and in each ch across. (11 sts)
- Round 2through 4: Ch 1, turn. Sc in each st across. (11 sts)
Assembly
- Step 1To assemble the bow: Take one bow loop piece and bring the short ends together to form a loop. Whip stitch the ends together. Repeat with the second loop piece. Stack both loops on top of each other, slightly offset. Wrap the bow center piece around the middle tightly, stitching in place on the back. This creates that classic pinched bow shape.
- Step 2Step 1: Prepare the Ears - Lay one inner ear piece on top of one outer ear piece, centering it with a small border of tan showing around the edges. Whip stitch the inner ear to the outer ear around all edges. Repeat for the second ear. Optional: Before closing completely, add a small amount of fiberfill to give the ears slight dimension. This is purely decorative and not required.
- Step 3Step 2: Attach Facial Features to Front Panel - Lay one body panel flat with the right side facing up. This will be your front panel. Safety eyes: Position the eyes approximately 4 inches down from the top edge and 4 inches apart from each other. Push the posts through the fabric and secure the backs. Once attached, safety eyes cannot be repositioned, so take a moment to make sure the placement looks good. Nose: Center the triangle nose approximately 2 inches below the eyes, with the point facing down. Whip stitch in place using the dark brown tail. Whiskers: Using dark brown yarn and a yarn needle, embroider three straight stitches on each side of the nose, angling outward. Each whisker should be about 1.5 to 2 inches long. Bow: Position the assembled bow near the right ear area, about 2 inches from the top edge and 2 inches from the right side. Stitch securely in place.
- Step 4Step 3: Attach D-Ring Tabs - Thread one D-ring onto a tab piece. Fold the tab in half lengthwise with the D-ring at the fold. Position at the top corner of the front panel, about 1 inch from the side edge. Stitch the raw ends of the tab to the inside of the panel securely. Repeat on the opposite corner.
- Step 5Step 4: Join Front and Back Panels - Hold both panels together with wrong sides facing out (so right sides are touching). Starting at one top corner, single crochet through both layers down the side, across the bottom, and up the other side. Leave the top open. Turn the bag right side out. For a cleaner edge: You can also whip stitch the panels together if you prefer an invisible seam.
- Step 6Step 5: Attach Ears - Position the ears on the top edge of the front panel only, placing them about 3 inches from each side edge. The base of each ear should overlap the top of the bag by about 1 inch. Whip stitch securely along the base, stitching through the front panel only.
- Step 7Step 6: Finishing Touches - Weave in all remaining ends. Give your bag a gentle steam block if desired to help everything lay flat.
Important notes
Check your gauge before starting the main body panels, since 14 sc and 16 rows should measure 4 inches; if your panel comes out noticeably smaller, size up your hook to keep the finished tote at the intended 14 by 12 inch dimensions.
Use a cotton or cotton-blend worsted weight yarn for the main color, since this gives the tote panels enough structure to hold their shape once you start filling the bag with everyday items.
Save your longest yarn tails when finishing off the outer and inner ears, since these tails are what you'll use to whip stitch the ear pieces together and then attach them to the body panel.
Insert the safety eyes before you sew the two main body panels together, since it's much easier to secure the backs properly while you still have full access to the wrong side of the fabric.
If you're skipping the bow for a more minimalist or masculine look, you can proceed directly from attaching the ears and face details to installing the D-ring tabs without any other pattern changes.
Consider adding a light amount of polyester fiberfill inside the outer ears before sewing on the inner ears, which gives the ears a slightly puffed, three-dimensional look rather than lying completely flat.
Finished dimensions: Approximately 14 inches wide by 12 inches tall (not including ears).
Skill level: Confident beginner to intermediate.
Add a strap: Purchase a chain strap or crochet a long strap to clip onto the D-rings for crossbody wear.
Skip the bow: For a more minimalist look or a boy cat vibe, simply leave off the bow.
Use buttons instead of safety eyes: If this bag is for a small child, buttons sewn on securely are a safer alternative.
More photos
FAQ
What size hook do I need for this kitty face tote bag?
You'll want a size H/8 (5.0mm) crochet hook, though you can size up or down slightly to match your gauge. The goal is to hit 14 single crochet stitches and 16 rows per 4 inches so your finished panels measure correctly.
Can I use buttons instead of safety eyes for the cat face?
Yes, buttons work as a lovely alternative to the 18mm black safety eyes if you prefer, or if the tote is going to a home with small children where safety eyes might pose a risk. Just be sure to sew them on very securely with doubled thread.
How much yarn do I need in total for this project?
You'll need roughly 400 yards of tan worsted weight yarn for the main body and ears, about 30 yards of dark brown for the inner ears, nose, and whiskers, and around 20 yards of rust or burnt orange if you're adding the bow.
Do I need to add a strap to make this a wearable tote?
The pattern includes D-ring tabs, but you'll need to add your own strap since it isn't included in the base pattern. A purchased chain strap or a simple crocheted strap clipped onto the gold D-rings both work beautifully for crossbody wear.
Is this pattern good for a confident beginner, or do I need advanced skills?
This pattern is designed for a confident beginner to intermediate crocheter. The stitches used are just single crochet, increases, and decreases, so if you're comfortable with basic shaping, you'll be able to complete this project successfully.