Free Pattern
Step-by-Step
Crochet
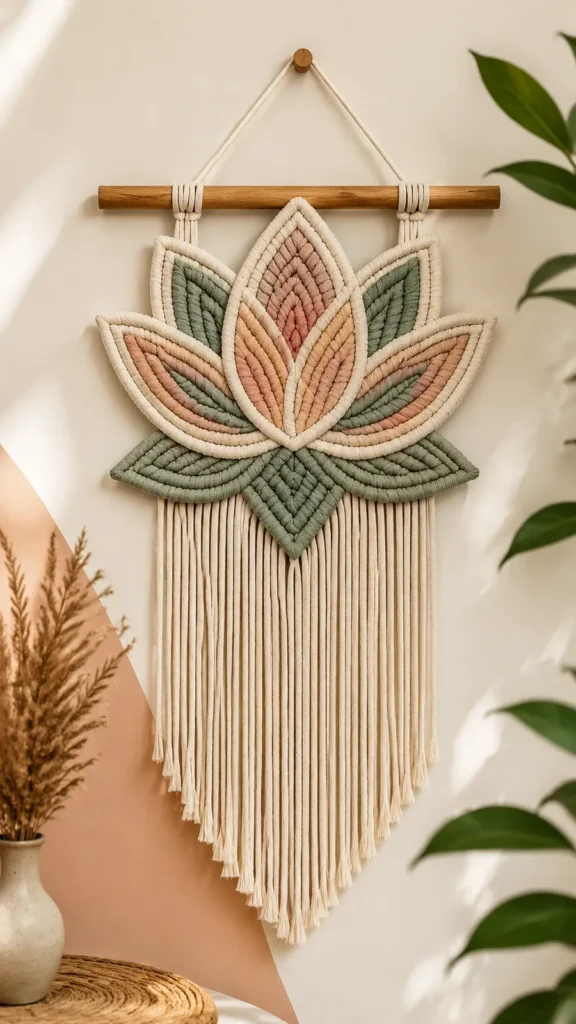
Home DecorCrochet leaf wall hanging with raised vein detail
A crocheted leaf wall hanging with raised center veins and soft fringe, made from DK cotton.
- Level
- Confident Beginner
- Time
- 6-8 hours
- Hook
- 3.75 mm
- Yarn
- DK
Pattern highlights
- Start each leaf at its pointed tip, then crochet flat rows that widen with simple increases.
- Work straight rows once the leaf reaches its widest point, keeping the stitch count steady across each row.
- Taper the tip at the end with decreases worked in careful alignment with the earlier increases.
- Once a leaf is finished, stitch a surface slip stitch vein along its center for raised texture.
- Repeat the shaping for medium and small leaves, stopping the increase rows earlier for each smaller size.
- Block every leaf by pinning, misting, and letting it dry flat before assembly begins.
- Arrange the leaves on the dowel, then finish the lower edge with long, flowing fringe.
About This Pattern
In my collection, wall hangings sit apart from sweaters and amigurumi. They don't need to fit anyone. This leaf piece belongs with my decorative projects, the slow-afternoon kind. Shape matters more than wearability here. I like that it asks for patience with counting rather than speed. It's a quiet, three-dimensional cousin to flat granny squares, built to hang still and hold its form.
The technique here is simple in theory. Rows of single crochet, increases at the edges, decreases to taper. What makes it interesting is the surface slip stitch vein. It's worked after each leaf is done, tracing the center line to raise it. That single detail turns a flat leaf into something with a spine. It's a bit of botanical honesty I didn't expect from basic shaping.
The finished piece gathers five leaves of three sizes onto a wooden dowel. The large leaf sits centered, smaller ones layered around it for balance. Cream, sage green, and dusty pink keep the palette calm. Long fringe below gives the whole thing movement, the kind that shifts gently whenever a door opens nearby. It reads as modern botanical, not twee.
Skill level: confident beginner to intermediate. Finished size: approximately 18 inches wide x 28 inches long (46 x 71 cm). Gauge: approximately 18 single crochet stitches x 20 rows = 4 inches x 4 inches (10 x 10 cm).
Worth knowing
What I love about this piece is the shaping math. Each leaf starts at a point, then grows through plain rows. It widens with paired increases, then narrows back down to a tip. Watching that happen in real time is satisfying. The surface slip stitch vein is the real reward, though. It's a line of slip stitches worked into the surface loops after the leaf is finished. That turns something flat into something sculptural. Making five leaves in three sizes means repeating the shaping until it's muscle memory. Assembly is low-stakes too. Pin, mist, let dry, then tie onto a dowel. No seaming, no fuss, just leaves finding their place.
Common mistakes
- Curled leaves Try blocking the pieces or using a smaller hook size for firmer stitches.
- Uneven leaf shapes Count every increase and decrease row carefully.
- Loose fringe Secure each strand with consistent knots and trim evenly.
- Heavy wall hanging Choose a lightweight yarn and avoid oversized motifs.

Confident Beginner
Progress Tracker
0 of 0 rounds
Tap a round to tick it off — your place is saved on this device.
The kit
- DK weight cotton yarn in cream, sage green, dusty pink, and a natural fringe color, approximately 450 yards (411 meters) total.
- 3.75 mm crochet hook (US F-5).
- Wooden dowel approximately 20 inches (51 cm) long.
- Yarn needle.
- Scissors.
- Tape measure.
- Optional fabric stiffener for extra leaf structure.
Large Leaf
Make 5 leaf motifs: 1 large center leaf, 2 medium leaves, and 2 smaller side leaves. Adjust size by changing the number of rows.
With leaf color yarn, ch 3.
Row 1(RS): 2 sc in second ch from hook, sc in next ch. Turn. (3 sts)
Row 2Ch 1, sc across. Turn. (3 sts)
Row 3Ch 1, inc in first st, sc in next st, inc in last st. Turn. (5 sts)
Row 4Ch 1, sc across. Turn. (5 sts)
Row 5Ch 1, inc in first st, sc across, inc in last st. Turn. (7 sts)
Row 6Ch 1, sc across. Turn. (7 sts)
Row 7Ch 1, hdc in first st, dc across center stitches, hdc in last st. Turn. (7 sts)
Row 8Ch 1, sc across. Turn. (7 sts)
Row 9Ch 1, dec, sc across until 2 sts remain, dec. Turn. (5 sts)
Row 10Ch 1, sc across. Turn. (5 sts)
Row 11Ch 1, dec, sc across, dec. Turn. (3 sts)
Row 12Ch 1, dec, sc across last stitch. Fasten off. (2 sts)Use a contrasting yarn color to add inner leaf detail if desired. Create a center vein with surface slip stitches.
Special Stitch
Surface Slip Stitch Vein: After completing a leaf, insert your hook through the surface loops along the center line, pull yarn through, and create slip stitches following the natural curve of the leaf. This creates the raised center vein.
Medium and Small Leaves
Follow the large leaf instructions but adjust the widest point:
Medium leaf: Stop increasing after Row 7, then begin decreases. Finished size approximately 5 inches (13 cm).
Small leaf: Stop increasing after Row 5, then begin decreases. Finished size approximately 3.5 inches (9 cm).
Adding the Fringe
Cut approximately 40 strands of yarn measuring 24 inches (61 cm).
Fold each strand in half.
Attach strands along the bottom edge of the crochet piece using a lark’s head knot.
Trim the fringe into a soft V shape.
Fasten off all yarn ends securely and weave them into the back of the crochet leaves. Light blocking can help flatten the motifs and define the pointed edges.
Assembly
Step 1Arrange the center large leaf vertically in the middle.
Step 2Place two medium leaves diagonally behind the center leaf.
Step 3Add the two smaller leaves near the outer edges.
Step 4Stitch the motifs together using matching yarn and small whip stitches.
Step 5Attach the completed leaf arrangement to the wooden dowel using secure loops.
Finishing
- Weave in every yarn end along the leaf edges before blocking, so nothing pulls loose once it's pinned.
- Block each leaf by pinning it into shape, misting lightly with water, and letting it dry completely.
- Attach the blocked leaves to the dowel, then trim and even out the fringe along the lower edge. For long-lasting beauty, display the finished piece away from direct sunlight and excessive moisture, and spot clean with mild soap and water if needed.
Why it works
Each leaf begins at a single stitch. Paired increases at the start and end of alternating rows build its point.
The leaves are worked flat in rows, not in the round. A two-dimensional shape with a surface vein doesn't need continuous rounds.
The surface slip stitch vein is added after the leaf is complete. It floats on top of the fabric instead of being built into the row structure.
What it becomes
- Hang it above a reading nook chair, where it pairs well with rattan furniture and linen cushions.
- Use it as a focal point on an entryway wall, next to a console table and dried grasses.
- Give a bare stretch of wall above a bed some texture, paired with woven baskets and plants.
Original pattern: https://duniarecipe.com/diy-macrame-wall-hanging-ideas-for-a-cozy-boho-home-decor-look/
FAQ
Can I use a different yarn weight than DK cotton?
You can, but the leaf shaping relies on crisp stitches to hold its form. A smooth, medium-weight cotton keeps the points and vein looking tidy.
Why does the pattern use rows instead of working in the round?
Each leaf is a flat motif, not a tube or vessel, so rows suit the shape better. Working flat also makes the increases and decreases easier to track.
Do I need fabric stiffener for this project?
No, it's optional. Blocking alone holds the leaf shape well, but stiffener adds extra structure if you want firmer leaves.
How do the medium and small leaves differ from the large one?
They follow the same instructions but stop increasing earlier, after fewer rows, before starting the decreases. That's what makes them finish smaller than the large leaf.