Free Pattern
Step-by-Step
Crochet
Bags & TotesCrochet mesh market bag pattern for everyday errands
An oval base, open mesh sides, and built-in handles make this cotton tote easy to carry.
- Level
- Intermediate
- Time
- 4-6 hours
- Hook
- 4.5 mm
- Yarn
- Worsted
Pattern highlights
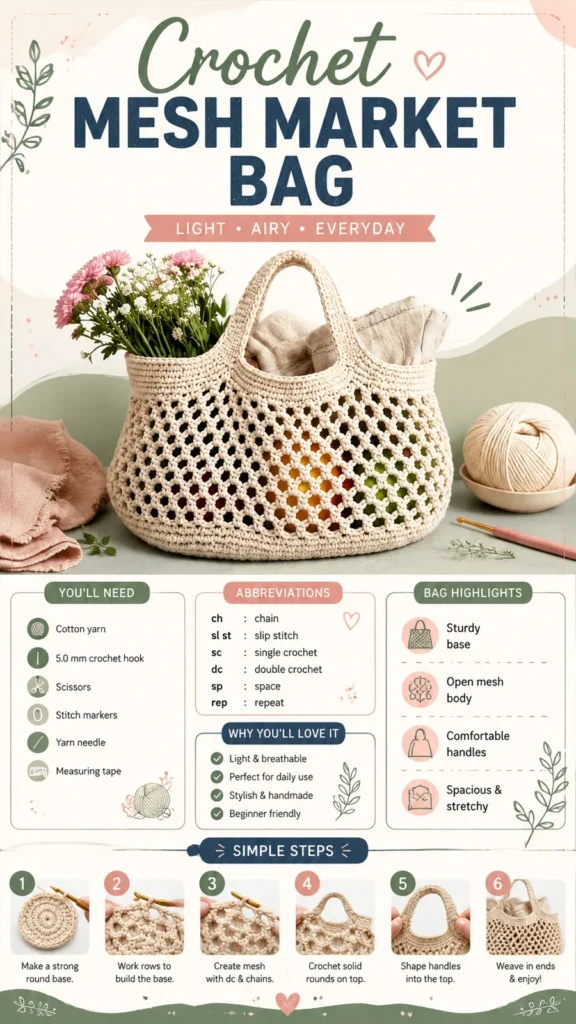
- Build an oval foundation in joined rounds, shaping it with increases at the two rounded ends.
- Work several solid single crochet rounds to square up the base before moving to the sides.
- Close the mesh section with a round of single crochet to firm the fabric back up.
- Mark handle positions, then chain across each gap to form the two handle loops.
- Reinforce the handles with a round of single crochet worked into the handle chains.
- Finish with a last round, fasten off, and block the whole bag to open up the stitches.
About This Pattern
Mesh bags sit in a useful corner of my collection. They are not fussy showpieces, they are the thing you grab on the way out the door. This one earns its place with an oval base and an airy body that collapses flat when empty, which matters more than I expected the first time I tried to fit one in a drawer.
The construction leans on two skills: shaping an oval in joined rounds, then settling into a repeating dc-and-chain mesh for the body. The handles are not separate pieces sewn on later. They grow straight out of the top rounds as long chains, then get reinforced with a round of single crochet so they can actually hold weight.
What comes off the hook is a cream tote with a firm, flat bottom and a lattice of diamonds you can see through. It is sized for real errands, not for decoration. The finished bag reads handmade without reading fussy, which is the balance a market bag ought to hit.
Finished size is approximately 15 inches wide by 13 inches tall, excluding the handles (38 x 33 cm). Gauge runs about 16 single crochet stitches by 18 rows for 4 inches (10 cm), so check a swatch if the exact size matters to you.
Worth knowing
The satisfaction here is structural. The oval base locks in with increases at just the rounded ends, so the bottom lies flat instead of cupping. Then the mesh takes over: skip a stitch, dc in the next, chain one, round after round, and a diamond lattice appears almost by accident. I like that the handles are not an afterthought sewn on at the end. They are long chains worked straight out of the body, then stabilized with a round of sc so they will not stretch into string under a load of groceries. It is a project where every round has a job, and the open mesh means you can watch your progress from both sides. Blocking afterward is the quiet reward, letting the stitches settle into their diamonds.
Common mistakes
- Losing count on oval increases Use a stitch marker at the start of each round so you can see exactly where the increases of Round 2 and Round 4 land. A flat oval depends on hitting those spots, not just the total.
- Mesh rounds drifting out of alignment Check that each dc lands in the skipped pattern from the round below, not in a chain space. Drifting here blurs the diamond shape over the 8 inch mesh section.
- Joining too tightly at the end of rounds A snug join pulls the top of the bag into a cone. Keep your join stitch as relaxed as the rest of the round.
- Handle chains worked too loose or tight Chain the 45 stitches for each handle at the same tension as your sc rounds. Uneven handles show immediately once the bag has weight in it.
- Skipping the stitch marker step before handles Placing markers 18 stitches apart before Round 21 keeps both handle openings even. Guessing the spacing by eye tends to leave one handle off-center.
Intermediate
Progress Tracker
0 of 0 rounds
Tap a round to tick it off — your place is saved on this device.
The kit
- 500 yards medium weight cotton yarn
- 4.5 mm crochet hook
- Stitch marker
- Yarn needle
- Scissors
- Tape measure
Main Pattern
The bag is worked from the bottom upward. Joined rounds are used throughout. The turning chain does not count as a stitch. Slip stitches are used only for joining and do not count in stitch totals.
Round 1Ch 31. Sc in 2nd ch from hook and across 29 chains. Work 3 sc in the last chain. Turn and work along the opposite side of the chain. Sc across 29 stitches, then work 2 sc in the final stitch. Join with sl st. (64 sts)
Round 2Ch 1. Sc around, increasing 2 stitches evenly at each rounded end. Join. (68 sts)
Round 3Ch 1. Sc around evenly. Join. (68 sts)
Round 4Ch 1. Sc around, increasing 8 stitches evenly around the oval. Join. (76 sts)
Building the Mesh Body
Round 5Ch 2. Dc in each stitch around. Join. (76 sts)
Round 6Ch 2. Work mesh repeat around: skip 1 stitch, dc in next stitch, ch 1. Join with sl st. (38 dc and 38 ch spaces)
Round 7Sl st into first ch space. Ch 2. Work mesh repeat around. Join.
Rounds 8–18Repeat Round 7 nine more times until the mesh section measures approximately 8 inches (20 cm).
Round 19Ch 1. Sc in each dc and 1 sc in each ch space around. Join. (76 sts)
Round 20Ch 1. Sc around. Join. (76 sts)
Creating the Handles
Flatten the opening so the sides align.
Place stitch markers 18 stitches apart on each side to mark handle sections.
Round 21Sc until the first marker. Ch 45 for the first handle. Skip 18 stitches. Sc across the next section. Ch 45 for the second handle. Skip 18 stitches. Sc remaining stitches. Join.
Round 22Sc around, working 45 sc into each handle chain space. Join. (76 sts)
Round 23Sc around. Join and fasten off.
Special Stitch
Mesh Repeat: Skip 1 stitch, work 1 dc in next stitch, ch 1. Repeat this sequence around the round. This creates the open mesh texture.
Assembly
Step 1Blocking helps the mesh stitches relax and creates a more polished shape. Gently wet the finished bag, reshape it, and allow it to dry completely before using it.
Step 2Hand wash or use a gentle wash cycle when needed.
Step 3Lay flat to dry to help maintain the shape.
Step 4Avoid overloading the bag to protect the handles.
Step 5Store in a dry place when not in use.
Finishing
- Weave in the starting tail at the oval base and any ends left from joining rounds.
- Wet-block the finished bag so the diamond mesh relaxes and opens up evenly.
- Lay it flat to dry, reshaping the base and handles before it sets.
Why it works
The increases in the oval base land only at the two rounded ends, so the bag lengthens without bulging along the sides.
The mesh body is worked in joined rounds rather than turned rows, which keeps the diamond pattern lined up instead of spiraling.
A solid sc round sits right before the handle round, turning open mesh back into firm fabric so the handle chains have something sturdy to anchor into.
Cotton yarn can feel firm while you work it, but it softens beautifully after washing and blocking. Keeping relaxed tension as you go helps the mesh stitches open evenly.
The bag is easy to resize: add foundation chains in multiples of 2 for a wider bag, work additional mesh rounds for a taller tote, shorten the base and work fewer mesh repeats for a smaller bag, or use a tighter cotton yarn with an extra solid round before the mesh section for a stronger everyday bag.
What it becomes
- A farmers market carrier for produce, paired with a cotton liner if you want extra support for heavy items.
- A grocery run bag that folds flat in a car door pocket between trips.
- A beach or pool tote for towels and flip-flops, since the open mesh lets sand fall through and lets things dry.
Original pattern: https://duniarecipe.com/crochet-mesh-market-bag-pattern-easy-handmade-reusable-tote-idea/
FAQ
Can I use a different cotton yarn weight?
The pattern is written for a medium-weight cotton with a 4.5 mm hook, and that pairing keeps the mesh crisp. A thinner cotton would need a smaller hook and will change the finished size.
Will the mesh stretch out of shape with use?
Some give is normal and even useful for fitting bulky items into the bag. Blocking after finishing helps the stitches settle so the stretch stays even instead of sagging in one spot.
Do I need to stiffen the base for it to stand up?
The oval base worked in joined rounds is firm enough on its own with cotton yarn. No extra stiffening is called for in this pattern.
How do I keep the handles from stretching under weight?
The reinforcing round of sc worked into each handle chain is what gives them strength. Avoid overloading the bag, and the handles should hold their shape over time.