
Free Pattern
Step-by-Step
Crochet
Baby HatsCrochet mouse baby hat with ears and bow
A crocheted mouse baby hat pattern with ear flaps, ears, and a bow for 3-6 months.
- Level
- Intermediate
- Time
- 4-6 hours
- Hook
- 6 mm
- Yarn
- Worsted
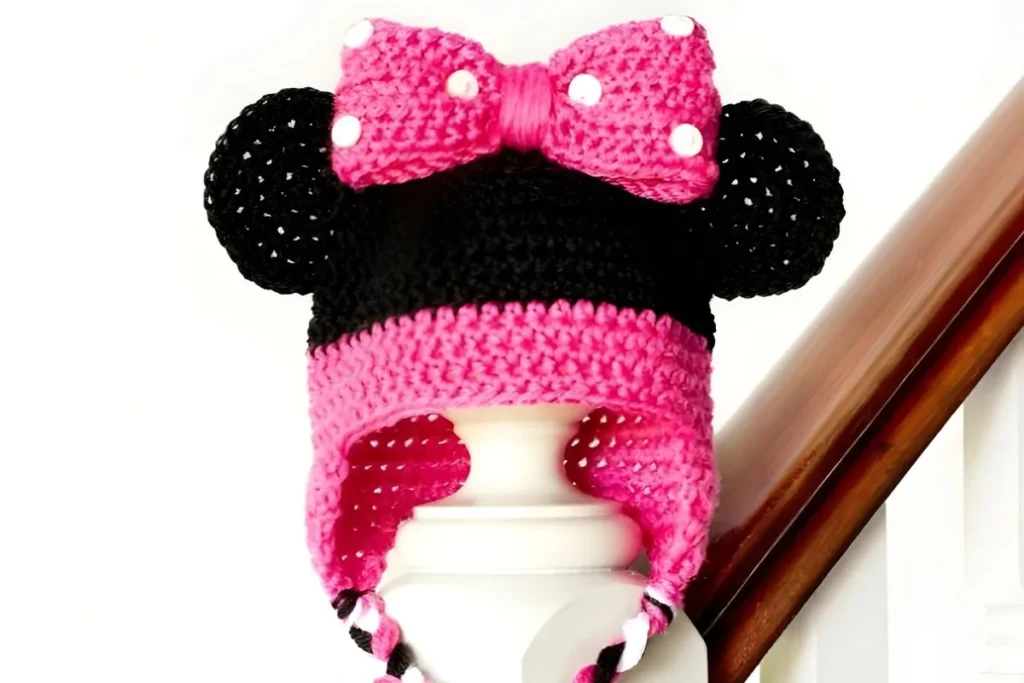
Pattern highlights
- Start the crown at the center top and increase steadily in dc and hdc rounds to shape the dome.
- Work each hat ear flap flat, decreasing with hdc2tog until it tapers to a point.
- Crochet two separate ears using the same increase pattern as the crown, on a smaller scale.
- Sew the ears to the top of the hat, spaced evenly apart.
- Assemble the bow by seaming a rectangle, wrapping its center tightly, and securing the knot.
- Attach the finished bow to the center top of the hat between the ears.
About This Pattern
Animal hats earn their own shelf in a collector's notebook. They are small, they photograph well, and they teach increases without punishing a beginner. This mouse hat sits comfortably there, a working piece rather than a display one, meant to sit on an actual head.
The techniques are the familiar amigurumi vocabulary: dc and hdc increase rounds worked in a spiral for the crown, then a flat, decrease-shaped piece for each ear flap. The bow is its own small exercise in rolling a rectangle into shape and wrapping a center tightly.
Finished, it is a raspberry pink crown with two dimensional ears on top, ear flaps that frame the face, and a wrapped bow at center front. Made for the 3-6 month range, it reads as a costume piece that still functions as a real hat.
Worth knowing
The satisfaction here is in watching a flat circle become a dome, round by round, without any pattern trickery. The ear flaps are the clever bit: worked flat with hdc2tog decreases on each side, they taper to a point in just four rounds. The ears themselves repeat the hat's own increase sequence at a smaller scale, so the second time you work it, you already know the rhythm. Wrapping the bow center by hand, fifteen times with a long tail, feels almost like tying an actual ribbon rather than crocheting one. It's a small piece with several distinct skills packed into it, which keeps it from feeling repetitive.
Common mistakes
- Losing count on the dc increase rounds Use a stitch marker at the start of each round and check your total against the number given before moving on.
- Ear flaps coming out lopsided Work the hdc2tog decreases at both edges of the row, not just one, so the flap narrows evenly on each side.
- Bow wraps loosening after tying off Hold tension on the wrapping thread as you knot it at the back, and take an extra secure stitch through the wraps.
- Ears placed unevenly on the crown Measure the gap between where each ear will sit before stitching either one down.

Intermediate
Progress Tracker
0 of 0 rounds
Tap a round to tick it off — your place is saved on this device.
The kit
- Crochet hook 6 mm
- Crochet hook 5 mm
- Three colors of yarn (50 gr): raspberry pink, jet black, snow white
- 6 white buttons (1 cm × 1 cm)
- Scissors
- Chenille needle or large eye needle
Hat
Note: the ch at the beginning of each row counts as 1 dc for that row.
Through row 6, chain 2 at the beginning of each row and work 1 dc in the same stitch; end each row with a slip stitch in the second chain of the previous row.
Attach pink yarn before working rounds 11-14.
Round 1Ch 2, 7 dc in first ch. (8)
Round 22 dc in each st around. (16)
Round 3*1 dc in next st, 2 dc in next st* repeat around. (24)
Round 4*1 hdc in each of next 2 sts, 2 dc in next st* repeat around. (32)
Round 5*1 hdc in each of next 3 sts, 2 dc in next st* repeat around. (40)
Round 6*1 hdc in each of next 2 sts, 2 dc in next st* repeat around. (53)
Round 7-10Ch 2, 1 hdc in each st around.
Round 11-14Ch 2, 1 hdc in each st around.
Round 15Ch 2, 1 hdc in next 35 sts, 1 dc. (Begin working the back of the hat and the ears.)
Round 16Ch 2, 1 hdc in next 35 sts, 1 dc. (Do not cut thread; continue to knit the left ear of the hat from this point.)
Hat Ear Flaps
Make 2Continue knitting the left ear flap directly from round 16 with the same thread.
For the right ear flap, attach pink yarn to the last loop of round 16, parallel to the left ear flap.
Round 1Ch 1, hdc2tog, 1 hdc in next 6 sts, hdc2tog.
Round 2Ch 1, hdc2tog, 1 hdc in next 4 sts, hdc2tog.
Round 3Ch 1, hdc2tog, 1 hdc in next 2 sts, hdc2tog.
Round 4Ch 1, hdc2tog twice. Fasten off and weave in the remaining tail.
Ears
Make 2Chain 2 at the beginning of each row and work 1 dc in the same stitch; end each row with a slip stitch in the second chain of the previous row.
Use a 5 mm hook and jet black yarn for the ears.
Round 1Ch 2, 7 hdc in first ch. (8)
Round 22 dc in each st around. (16)
Round 3*1 dc in next st, 2 dc in next st* repeat around. (24)
Round 4*1 hdc in each of next 2 sts, 2 dc in next st* repeat around. (32)Repeat the pattern twice to make two ears.
Bow
Cast on 40 ch with a 5 mm hook and pink yarn before starting Row 1.
Round 1Ch 2, skip 2 sts from hook, 1 dc in each st to end of row.
Round 2-8Ch 2, 1 dc in each st to end of row.
Assembly
Step 1Sew both ears onto the top of the hat at an equal distance from each other; cut the thread and weave in the tail.
Step 2Sew the two short ends of the bow rectangle together using slip stitch, turning the seam to the inside.
Step 3Leaving a 55 inch (140 cm) tail, wrap the thread tightly around the middle of the rectangle about 15 times to form the bow shape and secure the knot at the back of the bow.
Step 4Sew the bow to the center top of the hat using a chenille needle; cut the thread and weave in the tail.
Step 5Sew the 6 white buttons onto the bow at different distances from each other with white thread, giving the bow a polka-dot look.
Step 6Cut 9 strands of yarn (3 of each color: black, white, pink), 75 cm long, and attach them as braids to the ears; repeat for the braid on the right ear of the hat.
Finishing
- Weave in the tail left from each ear flap after the final hdc2tog round.
- Sew both ears to the crown at an even distance apart, then weave in that tail.
- Seam and wrap the bow, then stitch it to the center top of the hat with a chenille needle.
Why it works
The hat crown increases every round through round 5, spacing extra stitches between plain hdc stitches so the dome grows evenly rather than fluting at one edge.
The hat ear flaps are worked flat, turning at the end of each row, because a flat taper with a chain-2 edge sits naturally against the head instead of curling.
Each flap's paired hdc2tog decreases mirror each other on both sides, which pulls the flap into a symmetrical point rather than an angled one.
What it becomes
- A photo-session prop for a newborn, paired with a plain onesie so the hat stands out.
- A baby shower gift alongside a soft blanket in a matching pink or white.
- A costume piece for a themed outfit, worn with mouse-print pajamas or a gray sleeper.
FAQ
What size baby does this hat fit?
It's sized for 3-6 months, with a head circumference of about 16 inches and a hat depth of 6.5 inches. Check those two measurements against your baby's head before starting.
Why are the ear flaps worked flat instead of in the round?
A flat, turned piece tapers cleanly to a point with the hdc2tog decreases, which a round worked in a spiral wouldn't do as neatly. It also lets the flap lie flat against the head.
How tight should I wrap the bow center?
Wrap it firmly enough that the rectangle pinches into a defined bow shape, about fifteen wraps as the pattern specifies. Too loose and the shape sags once it's sewn on.