
Free Pattern
Step-by-Step
Crochet
AmigurumiCrochet siu mai amigurumi: a dumpling in two shades
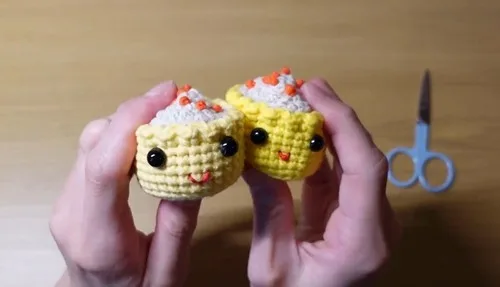
A two-piece amigurumi dumpling worked in matching rounds of increasing single crochet.
- Level
- Intermediate
- Time
- 4-6 hours
- Yarn
- Worsted
Pattern highlights
- Start the yellow skin with a magic ring and build it outward through four rounds of single crochet increases.
- Make a second, smaller shell in flesh-colored yarn using the same increase sequence for the filling.
- Add safety eyes or embroidered eyes partway through the filling shell, before it closes.
- Stitch a simple red smile by hand once both pieces are shaped.
- Stuff the skin, then sew the filling piece into its open top.
- Weave in every loose yarn end and check the join is secure.
About This Pattern
This one lands in the food-amigurumi drawer, next to anything shaped like a snack. I keep a running list of dim sum projects and this siu mai fills a gap — not a dumpling exactly, open-topped, built in two matching domes. It reads as a small study piece more than a showpiece.
The technique is the familiar amigurumi ramp: magic ring, then four rounds of steady increase, each one adding a stitch per repeat. The back loop only round is the quiet trick here, it's what turns a flat disc into a cupped shape without a single decrease anywhere.
Finished, it's a two-part plush — skin and filling, worked as separate shells and joined. Safety eyes or embroidery go on early, before the piece closes up on itself. Small, soft, a little absurd on a shelf. I like that about it.
Worth knowing
I like projects where the shaping logic is visible at a glance. Every increase round here adds exactly one stitch per repeat — 6, 12, 18, 24, 30 — and you can watch the math hold. The back loop only round is the one moment of real decision-making: work into the wrong loop and the whole silhouette changes. Making the filling as its own small shell, worked through the same five rounds as the base, is satisfying in a tidy, repeatable way. Then there's the mouth, hand-stitched in red, which is the only freehand part in an otherwise rule-bound pattern. It's a short make with one genuine technique to get right, which suits an evening when I don't want six hours of counting.
Common mistakes
- Working both loops on round six Check for the ridge after round six — if the surface is smooth, you likely caught both loops. Frog back to round five and work the back loop only, deliberately.
- Losing the stitch marker Move the marker up into the new first stitch every round, not just the increase rounds. It's easy to forget on a six-round piece and lose your place.
- Mismatched filling size Stop the filling shell at the same round as instructed, even if it looks small. It's meant to nest inside the skin, not match its full width.
- Eyes placed too late Set safety eyes or embroider them between rounds 2 and 3 of the filling, while the opening is still wide enough to reach inside.
- Loose mouth stitching Knot the red yarn ends inside the piece before trimming, not just on the surface. A loose knot works its way out with handling.


Intermediate
Progress Tracker
0 of 0 rounds
Tap a round to tick it off — your place is saved on this device.
The kit
- Yellow yarn (for skin)
- Flesh-colored yarn (for meat)
- Orange yarn (for fish roe)
- Red yarn (for mouth embroidery)
- Crochet hook
- Safety eyes or black thread for embroidery
- Stitch marker
- Scissors, yarn needle, stuffing
Creating the Base of the Siu Mai (Yellow Yarn)
Magic RingCreate a magic ring. Work 6 SC into the ring. Pull tail tight to close. (6 SC)
Round 2CH 1, work 2 SC in each stitch around. (12 SC total)Place stitch marker in the first stitch.(12 SC)
Round 3CH 1, then (1 SC, 2 SC in next stitch) repeat around. (18 SC)
Round 4CH 1, then (1 SC, 1 SC, 2 SC) repeat around. (24 SC)
Round 5CH 1, then (1 SC, 1 SC, 1 SC, 2 SC) repeat around. (30 SC)
Forming the Sides of the Siu Mai (Yellow Yarn)
Round 6 (BLO)CH 1, 1 SC in the back loop of each stitch. (30 SC)
Rounds 7–13CH 1 at the start of each round. 1 SC in both loops of each stitch around. (30 SC per round)(30 SC)
Shaping the Top Edge of the Siu Mai
Round 14 (Dec)CH 1, (1 SC, 1 SC, invisible decrease) repeat around. (20 SC)Cut yarn and weave in the end. Sew the top opening closed.
Adding the Decorative Bottom Edge
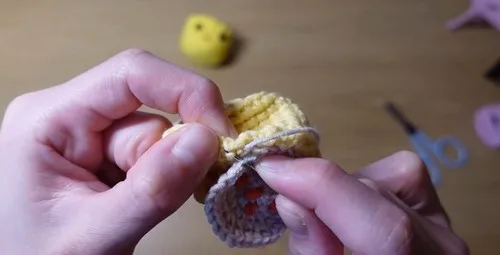
Attach yellow yarn to Round 6 (back loops).
EdgingRepeat around: CH 3, skip 1 stitch, SC in next stitch.
Once done, cut yarn and secure knot inside.
Eyes
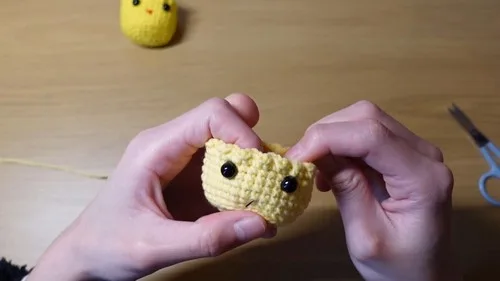
Place safety eyes or embroider between rounds 2–3.
Mouth
Use red yarn. Stitch from one side to the middle and to the other side to create a smile.
Secure yarn ends with a knot inside.
Crocheting the Filling (Flesh-Colored Yarn)
Repeat same pattern as the siu mai base (Rounds 1–5):
Magic Ring→ 6 SC(6 SC)
Round 2→ 12 SC
Round 3→ 18 SC
Round 4→ 24 SC
Round 5→ 30 SC
Adding the Fish Roe (Orange Yarn)
Attach orange yarn to the top of the meat portion.
Create small bobbles/puff stitches randomly to resemble fish roe.
Use different entry points for each puff for realism.
Add as many as you like.
Assembly
Step 1Stuff the siu mai plush with cotton filling.
Step 2Sew the meat portion into the top of the siu mai skin.
Step 3Weave in any remaining yarn ends.
Step 4Ensure everything is securely fastened.
From the collection
Finishing
- Weave in the tail from the magic ring and any color-change ends before stuffing.
- Stuff the skin piece firmly enough to hold its cupped shape from the back loop round.
- Sew the filling shell into the open top of the skin, then weave in the last ends.
Why it works
The first five rounds add one stitch per repeat each time, which is the standard flat-circle increase and sets the base diameter before shaping begins.
The back loop only round for round six works only the front loops free, which creates a ridge and turns the disc into a cupped wall for the sides.
The filling shell repeats the same five-round increase sequence as the base, so both pieces grow at matching rates and meet without puckering at the seam.
What it becomes
- A desk companion for anyone who collects food-shaped amigurumi alongside sushi or dumpling plushies.
- A small gift for a friend who cooks or loves dim sum, paired with a handwritten care tag.
- A photography subject for a food-crochet portfolio, shot next to real steamer baskets for scale.
FAQ
Can I skip the back loop only round?
You could work both loops, but the piece will stay flatter and lose the cupped side wall. The ridge from that round is doing real shaping work here.
Do I need safety eyes or can I embroider instead?
Either works — the pattern lists both as options. Embroidery is softer and safer for very young recipients; safety eyes are faster to place.
Why does the filling get its own five rounds?
It's built as a separate shell so it can nest inside the skin rather than attach flat. Matching the increase sequence keeps the two pieces proportional.
How tight should the stuffing be?
Firm enough that the cupped shape from the back loop round holds without collapsing. Too loose and the sides sag once the filling is sewn in.