
Free Pattern
Step-by-Step
Crochet
AmigurumiCrochet Snake Amigurumi with a Wire Tail Pattern
Make a coiling crochet snake amigurumi with a poseable wire tail, safety eyes, and a sweet embroidered face using this detailed stitch-by-stitch pattern.
Level IntermediateTime 4-6 HoursHook 2.0 mmYarn Fingering
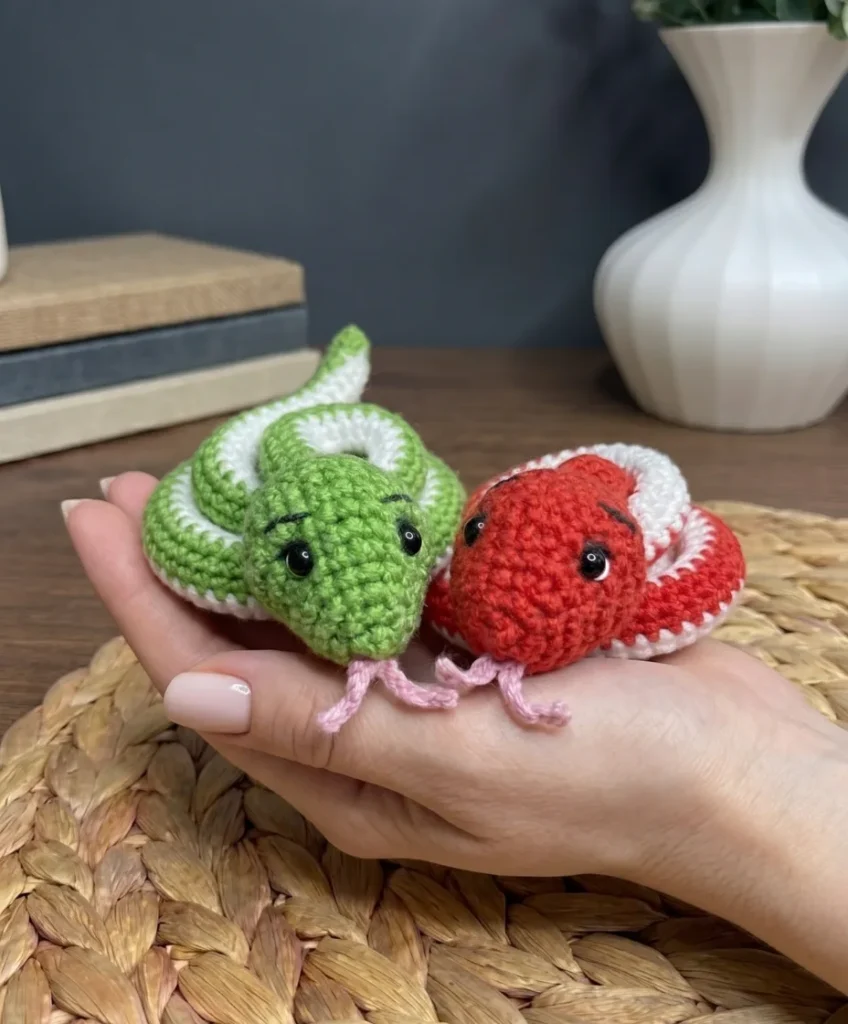
Pattern highlights
- Crochet the body-tail flat in back-and-forth rows, then fold it lengthwise and join the edges into a tube.
- Slide the wire armature through the folded tail section and tape both ends before adding stuffing.
- Work the short tail tip section and attach it to finish off the pointed end of the tail.
- Stitch the head in the round through all thirteen rounds, shaping a rounded face with gradual increases and decreases.
- Insert the 6 mm safety eyes into the head and stuff the head and neck area firmly.
- Crochet the small lip piece and attach it around the mouth opening for definition.
- Make the tiny tongue and tuck it into place beneath the lip for a playful detail.
- Embroider the eye whites, lashes, and brows by hand, then join the head to the body-tail and pose the wire tail.
About This Pattern
This crochet snake amigurumi is built around one irresistible party trick: a wire-armature tail that lets you coil, curl, and pose your finished snake exactly how you like. Worked in soft YarnArt Jeans yarn with a tiny 2.0 mm hook, this pattern turns a handful of simple stitches into a charming, expressive little reptile. It's perfect for makers who love amigurumi with a twist — something that feels more alive and playful than a standard round-bodied toy, and makes a fantastic gift for animal lovers, nature-obsessed kids, or anyone who appreciates a quirky handmade critter.
The body-tail section is worked flat in back-and-forth rows before being folded and joined, which is a nice change of pace from typical in-the-round amigurumi and gives you a chance to practice shaping through rows rather than spirals. The head, tail tip, and lip sections shift back to in-the-round and short-row techniques, so you'll get comfortable moving between both methods in one project. Expect to spend a relaxed afternoon or a cozy weekend on this one — it's approachable for confident beginners but rewarding enough for advanced stitchers who enjoy fine detail work like embroidered eye lashes and brows.
The finished snake has a slim, sinuous body with a plump little head, sweet lip and tongue details, and glossy 6 mm safety eyes that give it real personality. Thanks to the wire tail, it can be draped over a shelf, coiled into a wreath shape, or wrapped playfully around a wrist or a stuffed animal friend. It's lightweight, tactile, and endlessly posable — the kind of handmade piece that photographs beautifully and makes people do a double-take when they realize it's crochet.
Variations
I adore this pattern because it breaks the amigurumi mold in the best way — that wire tail means your snake isn't stuck in one static pose forever. I love working the body-tail flat in rows, folding it, and watching it transform into a tube; it feels almost like origami with yarn. The head section is where the magic really happens, with thirteen rounds of careful shaping that give it a rounded, expressive face instead of a lumpy blob. Adding the lip and tiny tongue afterward is such a satisfying finishing touch, and embroidering the eye whites, lashes, and brows by hand lets you give your snake real personality — sassy, sleepy, sweet, whatever you're feeling that day. Inserting the safety eyes and wrapping the wire ends with medical tape feels like proper craftsmanship, not just toy-making. By the time you're stuffing the head and neck and coiling that tail into its first pose, you'll understand why I keep making these — one snake is never enough, and every single one ends up looking a little different depending on how you curl that tail.
Common mistakes
- Skipping the fold-and-join step
- Remember this section is worked flat in back-and-forth rows first — complete all 5 rows, then fold the piece lengthwise and join the edges as directed before moving on to the tail tip.
- Inserting the wire armature
- Insert and position the wire through the tail section before you add stuffing, then wrap both ends with medical tape or an adhesive bandage to insulate sharp tips before stuffing around it.
- Working the 13-round head too loosely
- Since gauge isn't critical here, focus on tension instead — work tightly enough that stitches sit close together, especially in the increase rounds, so the eye posts stay secure and stuffing stays hidden.
- Placing the 6 mm safety eyes
- Dry-fit the eyes before snapping the backs on — hold them against the head, check both angles match, and only insert them permanently once you're happy with placement relative to the increase rounds.
- Embroidering the eye whites, lashes
- Add all embroidered eye details while the head is still open or lightly stuffed so you have a flat surface and room to maneuver your needle, then finish stuffing afterward.
- Attaching the lip and tongue pieces
- Weave in and secure all loose ends on the lip and tongue pieces before sewing them to the head, and pin them in place first to check the expression looks right from the front.


Intermediate
Progress Tracker
0 of 0 rounds
Tap a round to tick it off — your place is saved on this device.
Materials
Yarn
- YarnArt Jeans (50g / 160m) — fingering/sport weight — in main color and white
Hook
- US B-1 / 2.0 mm
Safety eyes
- 6 mm, quantity 2
Thread
- for embroidering eye whites, lashes, and brows
Pink yarn
- small amount for the tongue
Wire
- for the tail armature
Medical tape or adhesive bandage
- to wrap and insulate wire ends
Stuffing / fiberfill
- for the head and neck area
Yarn needle / tapestry needle
- Yarn needle / tapestry needle
Scissors
- Scissors
Body-Tail
Work flat in back-and-forth rows. At the end of every row, chain 1 (turning chain). Do not stuff this piece.
Begin with main color yarn. Foundation chain: ch 50. Starting in the 2nd ch from hook:
- Row 149 sc. (49) Switch to white yarn. Ch 1, turn.
- Row 249 sc. Ch 1, turn. (49)
- Row 349 sc. (49) Switch back to main color. Tie off white yarn by knotting both ends together and trim. Attach main color and ch 1, turn.
- Row 449 sc. Ch 1, turn. (49)
- Row 549 sc. (49) Do not fasten off. Fold the piece in half lengthwise so that Row 1 and Row 5 align. Working through both layers, sc across the entire edge: 49 sc. As you reach approximately the first 10 sc, insert the wire (with taped ends) into the fold before continuing to close. Do not fasten off — the working yarn continues directly into the tail tip.
Tail Tip
Worked in continuous rounds from the folded end of the body-tail. Continue with the same yarn — do not cut.
- Round 1Ch 1, then pick up 5 sc evenly across the top of the folded end. (5)
- Round 25 sc. (5)
- Round 3dec, 1 sc, dec. (3)Pull the remaining opening closed using a tapestry needle threaded with the yarn tail. Fasten off and weave in ends.
Head
Worked in continuous rounds. Begin at the opposite end of the body-tail from the tail tip — pick up stitches from the back side, starting at the 2nd white stitch.
- Round 1Ch 1, pick up 5 sc across the open end. (5)
- Round 2inc in each st around. (10)
- Round 31 sc, inc repeat 5 times. (15)
- Round 42 sc, inc repeat 5 times. (20)
- Round 53 sc, inc repeat 5 times. (25)Stuff the neck area firmly with fiberfill before continuing.
- Round 625 sc. (25)
- Round 725 sc. (25)
- Round 825 sc. (25)
- Round 93 sc, dec, 1 sc, dec, 9 sc, dec, 1 sc, dec, 3 sc. (21)
- Round 102 sc, dec, dec, 9 sc, dec, dec, 2 sc. (17)
- Round 114 sc, 1 sc, dec repeat 3 times, 4 sc. (14)Insert safety eyes between Rnds 9 and 10. Place each eye after the double decrease section in Rnd 10, with 7 sc between the two eye positions. Secure backs firmly.
- Round 121 sc, dec repeat 2 times, 2 sc, dec, 1 sc repeat 2 times. (10)
- Round 13dec 5 times. (5)Pull the opening closed using a tapestry needle. Fasten off, weave in end, and hide inside the head.
Lip
Worked flat in main color yarn.
- Row 16 sc. Ch 1, turn. (6)
- Row 26 sc. (6)Fasten off, leaving a long yarn tail for sewing. Sew the lip piece over the tongue attachment point on the head.
Eye Embellishment
Using embroidery thread, stitch white highlights onto the safety eyes. Add lashes and brows in a color of your choice to give your snake its expression.
Tongue
Worked flat with pink yarn.
Ch 7. Starting in the 2nd ch from hook: 4 sl st, ch 3.
Fasten off, leaving only a short tail — trim close. Sew the tongue onto the underside of the head at the tip.
Assembly
- Step 1The body-tail, tail tip, and head are all worked in one continuous sequence — no separate joining is required for the main body.
- Step 2Once the head is complete and closed, confirm safety eyes are locked securely in place.
- Step 3Sew the tongue piece onto the front tip of the head using the short yarn tails, centering it beneath the lip position.
- Step 4Sew the lip piece directly over the tongue base, using whipstitch along all four edges to secure it flat.
- Step 5Weave in all remaining yarn ends and trim neatly.
- Step 6Shape the snake by gently curling the wire through the tail into any pose you like.
Important notes
💡 Work tightly throughout — YarnArt Jeans is a cotton-blend yarn that behaves beautifully at a tight tension; this prevents any stuffing or wire from peeking through the stitches.
💡 Use an invisible decrease for the head — because the head tapers sharply over just a few rounds, working an invisible decrease (inserting your hook through the front loops only of the next two stitches) keeps the surface smooth and the decreases nearly invisible.
💡 Tape those wire ends generously — wrap each wire tip with at least two full layers of medical tape before inserting it into the tail; this protects the yarn from fraying and the end user from scratches.
💡 Stuff the neck — not the body — only Rnds 1–5 of the head (the neck zone) need fiberfill; a firmly stuffed neck holds the head upright and gives the snake its characteristic raised-head posture.
💡 Twist the finished body around the wire — once everything is assembled, try rotating the crocheted body gently around the wire armature; this creates a beautiful spiral texture along the snake's body that looks intentional and stunning.
💡 This pattern is written in US crochet terminology — double check your stitch abbreviations if you're used to UK terms to avoid sizing mismatches.
Original pattern: https://amigurumiarts.com/crochet-snake-amigurumi-with-a-wire-tail/
FAQ
Can I use a different yarn weight for this crochet snake pattern?
Yes, but keep in mind that the finished size will change significantly. A heavier yarn like worsted weight will produce a much larger, chunkier snake, and you'll need a proportionally thicker wire to support the tail. YarnArt Jeans at 2.0 mm is ideal because the tight gauge keeps the stuffing hidden and gives the snake a neat, firm shape.
Is this snake pattern safe for young children?
Because this pattern includes a wire armature in the tail and small safety eyes, it is not recommended for children under 3 years of age unsupervised. If you'd like to make it child-safe, omit the wire entirely and embroider the eyes instead of using safety eyes. The stuffed version will still be poseable to a limited degree due to the folded body construction.
How do I keep the white stripe from showing loose ends inside the body?
Knot the two white yarn ends together firmly before trimming, as noted in the pattern. Since the body-tail piece is folded and seamed, those knots will be completely enclosed inside. Trim the tails short enough that they don't create bulk when you fold and join the layers.
What does "twist the crocheted body around the wire" mean in practice?
After assembly, hold the head in one hand and gently rotate the body section along its length, as if wringing it very lightly. The crochet fabric will spiral around the wire core, creating a decorative twisted texture along the snake's body. It's a purely aesthetic step — do it gradually and stop when you're happy with the look.