
Free Pattern
Step-by-Step
Crochet
Stitch GuidesCrochet spiral stitch guide: circle to square
Learn to crochet a spiral stitch from a magic ring, build a colorful circle, then convert it into a square with this easy step-by-step guide.
Level IntermediateTime 3-5 HoursYarn Worsted
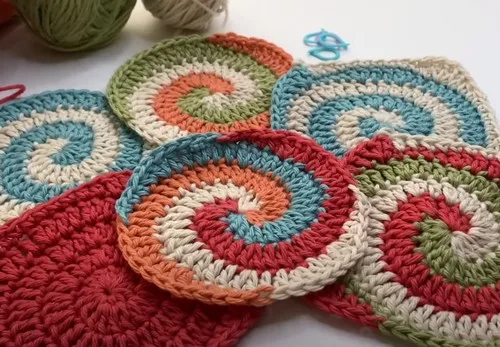
Pattern highlights
- Start with a magic ring or a small chained ring and work your first round of mixed stitches to set up 12 foundation stitches.
- Decide on your color plan now, splitting the 12 starting stitches into two, three, or more sections if you want a spiral effect.
- Work the second round by doubling every stitch to expand your circle evenly outward to the next multiple of 12.
- Continue working increase rounds, spacing them out further each time so the circle keeps growing smoothly without rippling.
- Once your circle reaches the size you want, work a tapering round using shorter stitches to smooth and close off the edge.
- If you'd like a square instead, divide your final stitch count into corners and work extra stitches into each corner point.
- Straighten the sides between corners with a mix of stitch heights, then weave in all your color-change ends to finish.
About This Pattern
This pattern builds a hypnotic spiral disc using nothing more than a magic ring and a clever mix of single, half double, and double crochet stitches worked in careful increase sequences. What makes it special is the built-in color-blocking technique — split your twelve starting stitches into two or three color sections and watch a swirling pinwheel emerge round by round. It's perfect for crocheters who love math-meets-magic projects and want a mesmerizing centerpiece motif for coasters, appliques, or the start of a bigger project.
The core technique here is the classic circle increase formula, moving from 12 to 24 to 36 stitches by spacing out your increases evenly each round. You'll also practice color transitions that stay aligned with your original stitch color blocks, plus an optional conversion round that reshapes your finished circle into a square using strategic corner increases. This is best suited to confident beginners through intermediates — someone who already knows sc, hdc, dc, and can count stitches accurately as the round grows.
The finished piece is a flat, tidy motif with a bold spiraling color pattern radiating from the center, and its size is entirely up to you depending on how many increase rounds you work. It feels substantial and graphic rather than delicate, with clean lines that pop whether you stick to one color family or go bold with contrast. Because it works up flat and fast, it makes a lovely gift topper, a statement coaster set, or the foundation square for a future blanket.
Variations
The easiest way to change up this pattern is through color placement. Try a two-color version in high-contrast shades like navy and mustard for a bold pinwheel look, or go soft and tonal with three shades of the same color family for a subtle ombre spiral. For a rainbow effect, divide your stitches into six small sections instead of two or three, adding a new color every couple of stitches in Round 1 so the spiral reads as a full color wheel by Round 3. Yarn weight is another easy swap — worsted weight cotton gives you a sturdy, coaster-ready fabric, while a bulkier yarn and larger hook will grow your spiral into a rug or pillow-sized piece much faster. If you want a smaller, delicate version, use a fingering or sport weight yarn for a dainty motif perfect for earrings or ornament-style hangers. Consider working the spiral for several rounds beyond what's suggested here, continuing the increase-by-12 pattern to build a full-sized blanket square instead of stopping at a small motif. For texture play, alternate your stitch types round to round — try working an entire increase round in half double crochet instead of double crochet for a slightly shorter, denser spiral. If you love the Square Conversion, experiment with working it earlier for a smaller square with fewer color bands, or later for a large square with a dramatic multi-ring spiral centered inside. You can also skip the square conversion entirely and instead work a taper/closing round early to create a smaller, flatter circle badge. Finally, try combining two finished spiral motifs — one circle and one square — into a matching coaster or hot pad set using the same color palette for a cohesive collection.
I adore this pattern because it turns a basic increase circle into something that looks way more complicated than it actually is. The moment you start splitting your stitches into color sections in Round 1, you can already see the spiral taking shape, and it's so satisfying watching those color blocks stagger perfectly with each increase round. Working the two-color or three-color version feels like solving a fun little puzzle every round, but the formula never changes — you're always just tracking where your last color started. I also love that the Square Conversion round is completely optional, so you get two projects in one: a classic spiral circle, or a bold spiral square with crisp corners. It's endlessly customizable too, since you control exactly how big your circle grows before tapering or squaring it off. Whether you're making a quick coaster or a larger statement piece, this pattern rewards you with a professional, eye-catching result for relatively low effort. It's the kind of project that photographs beautifully and gets people asking how you did it.
Common mistakes
- Losing track of where each round begins
- Place a stitch marker in the first stitch of every round and move it up as you complete each one, since the spiral shape makes the round's start easy to lose visually.
- Increasing unevenly, causing the circle
- Count your stitches at the end of every round to confirm you've hit the correct multiple of 12 before moving on, and space increases as evenly as possible around the round.
- Miscounting stitch sections
- Divide your total stitch count by 3 ahead of time and mark each section boundary with a stitch marker before you start crocheting the round.
- Rushing the Square Conversion corners
- Work all 3 dc into the exact same corner stitch and use markers to pre-mark all four corners evenly around the circle before starting the conversion round.
- Forgetting to taper the closing round
- Follow the closing round instructions to work hdc and sc around the last increase sequence, which smooths the outer edge before weaving in ends.

Intermediate
Progress Tracker
0 of 0 rounds
Tap a round to tick it off — your place is saved on this device.
Materials
- Stitch markers (highly recommended to track the start of each round and corner placements)
Main Pattern
Each spiral starts with 12 stitches and follows a specific increase pattern to expand the circle.
Use stitch markers to keep track of the start and end of rounds.
For a two-color spiral: split the initial 12 stitches between two colors, starting with a magic ring or chained circle, and always start a round with the same color you began the last round.
For a three-color spiral: divide the 12 stitches into sets of 4 for each color, adding a new color after completing the sequence with the previous color.
For a four-color spiral: divide the initial round into sets of 3 stitches per color, increasing in the same manner and starting each round with the same order of colors.
Always ensure you finish a round with an increase according to the pattern.
- Round 1Begin with a magic ring or chain 4 and slip stitch to form a ring. Work 2 sc, 2 hdc, and 8 dc into the ring. (12 sts)
- Round 22 dc in each st around. (24 dc)
- Round 3(Dc, 2 dc in next st) around, building to the next multiple of 12. (36 dc)
- Round 4 and BeyondContinue the increase pattern (2 dc then inc, 3 dc then inc, etc.), increasing in multiples of 12 (e.g., 24, 36, 48 sts) to expand the circle to the desired size.Closing Round Closing Round: Use hdc and sc to taper the circle down, based on the last increase sequence.
Square Conversion (Optional)
Work this conversion after completing your desired spiral size.
Use stitch markers to mark corner placements when transitioning from a circle to a square.
- Conversion RoundDivide the total stitch count by 4 to determine corner placement, then work 3 dc in each corner stitch to create the square shape. Use a combination of dc, hdc, and sc to straighten the sides between corners.
Important notes
Always use a stitch marker to track the first stitch of each round — the spiral pattern makes rounds visually blend together, so this is the easiest way to avoid losing your place.
Count your total stitches at the end of every round; you should land on a clean multiple of 12 (12, 24, 36, and so on) before continuing to the next round.
color spirals, plan your color sections mathematically before you begin — divide 12 by the number of colors you want to use so each section is even from the very first round.
Keep your tension consistent throughout, especially through color changes, since tight or loose stitches at transition points will visibly distort the spiral lines.
If converting to a square, wait until you've finished your desired circle size first, then divide your final stitch count by 4 to find balanced, evenly spaced corner placements.
Weave in ends from each color change as you go rather than waiting until the end, since a multi-color spiral can leave you with many tails to manage at once.
Experiment with color changes and sequences to create unique spiral designs.
More photos
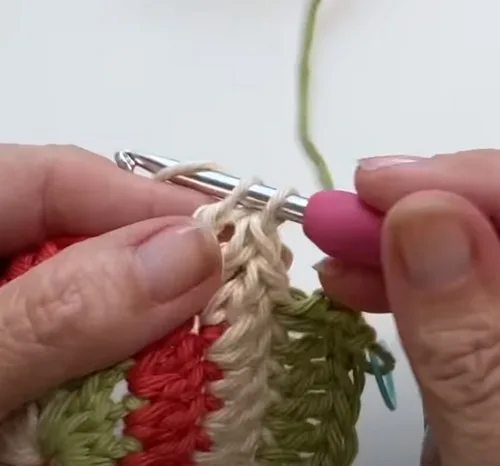
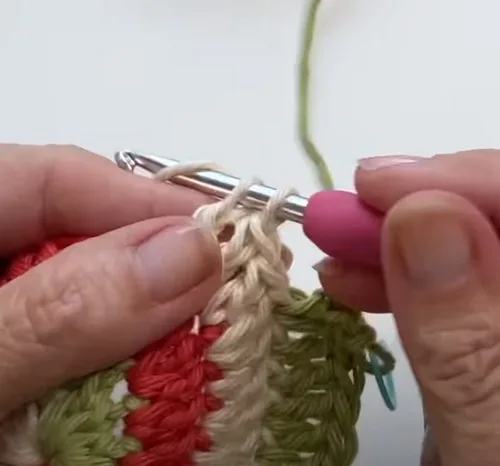
Original pattern: https://crocheteverything.com/crochet-a-spiral-stitch-guide/
FAQ
How many rounds do I need to work before adding the Square Conversion round?
You can work as many increase rounds as you like to reach your desired circle size — the Square Conversion is done as a final round after you stop increasing in the round. There's no fixed number, so just increase until your circle is the size you want.
Can I make this spiral with just one color instead of multiple colors?
Absolutely — the increase structure works exactly the same whether you use one color or several. The color-block sections are purely optional and only affect the look, not the stitch pattern.
Why does my spiral look uneven or wavy instead of flat?
This usually means the increases weren't spaced evenly around the round, causing extra fullness in some spots and tightness in others. Always confirm your stitch count matches the expected multiple of 12 before starting the next round.
Do I need to use stitch markers for this pattern?
Yes, they're highly recommended since the spiral construction makes it easy to lose track of where each round starts and where color sections begin. A simple locking stitch marker moved up each round will save you a lot of frogging.
Can I stop the pattern as a circle and skip the square conversion entirely?
Yes, the Square Conversion is completely optional. You can work your closing round to taper the circle and finish it as a round motif without ever working the corner increases.