Free Pattern
Step-by-Step
Crochet
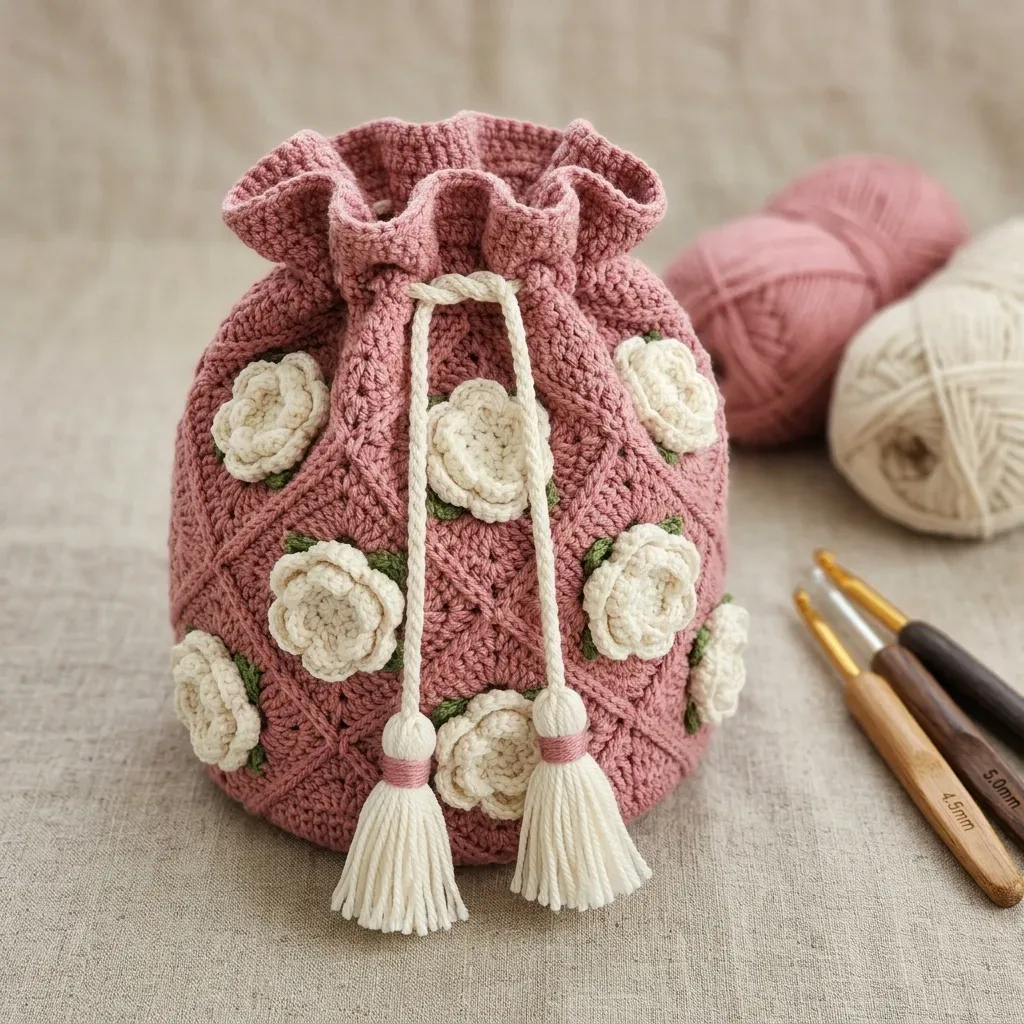
Bags & AccessoriesDusty rose peony drawstring bag with leaf appliques
A crochet drawstring bag with peony appliques, leaf details, and a twisted cord closure.
- Level
- Intermediate
- Time
- 6-9 hours
- Hook
- 4.0 mm
- Yarn
- Worsted
Pattern highlights
- I start the base with a magic ring, building the circle outward in continuous rounds.
- I keep working the body upward in Yarn A before shifting focus to the appliques.
- Each peony starts with a small center, then a petal layer worked into its front loops.
- A flat outer petal row gets added, then all three peony layers are stitched together.
- Leaf appliques come together fast, working up one side of a chain and back down.
- I finish by sewing on the peonies and leaves, then threading the twisted cord through and tying on tassels.
About This Pattern
I keep a shelf for bags that double as practice pieces. This one earns its spot. The body is a plain single crochet circle. It works in continuous rounds, the kind of base I use to test new cotton yarn. What makes it a project, not just a swatch, is what gets added after. Nine peony appliques and eighteen leaves in sage green join the plain circle. It sits between my amigurumi bin and my home decor pile. It belongs a little to both.
The bag itself is nothing exotic. Single crochet increases spread out over seventeen rounds. One round works in back loops only. That crease marks the fold between base and sides. The peonies are where the notebook gets interesting. Each flower builds three layers. The center works in back loops only. A front-loop petal ring grows into the round below it. The outer layer is flat, worked in rows. The leaves are a single row. It runs up one side of a chain and back down the other.
Finished, it is a drawstring pouch sized by its own base circle. It comes in dusty rose with cream petals and sage leaves. The optional twill tape lining adds structure at the opening. The twisted cord gives it a finished closure too. A plain single crochet bag would not have this on its own. It reads more like a textile piece than a tote. Even so, it still closes and carries just fine.
This is an intermediate-level pattern. It assumes comfort working in continuous rounds, reading stitch counts carefully, and constructing separate applique pieces. Plan for roughly 12 to 18 hours total if you're an experienced intermediate crocheter. The peony motifs alone take about 4 to 6 hours, so if this is your first time making layered applique flowers, add another 3 to 5 hours to your timeline.
Worth knowing
What I like here is the layering. The peony's center works in back loops only. That leaves the front loops free for the petal ring. It's a trick that lets two rounds share one set of stitches. The outer petal layer is worked flat, in rows, and sewn on separately. You are never fighting a tight circle for petal length that way. The leaf applique is a single row, turned at both ends of a chain. Fourteen stitches read as a full leaf, no second row needed. Multiply that by nine flowers and eighteen leaves. The bag becomes a study in how much shape a few basic stitches can hold. That is, if you place them with intention.
Common mistakes
- Losing the round marker Move the marker up every round from the start. The increase pattern is easy to lose without it.
- Back loops on the wrong round Only Round 13 uses back loops only. Working it elsewhere skips the fold line.
- Joining petals into the wrong loops The middle petal layer joins into Round 2's front loops, not Round 3's back loops. Check before you start the petals.
- Choosing fuzzy or textured yarn A fuzzy cotton blurs the petal and leaf shapes. Pick a smooth, plied yarn instead.
- Skipping the gauge swatch The base circle depends on even tension. Swatch first and adjust the hook size as needed.
Intermediate
Progress Tracker
0 of 0 rounds
Tap a round to tick it off — your place is saved on this device.
The kit
- Option 1: Lion Brand 24/7 Cotton in Rose, Ecru, and Sage. This 100% mercerized cotton holds stitch definition beautifully and is machine washable.
- Option 2: Paintbox Yarns Simply DK in Dusty Rose, Paper White, and Leaf Green. Note that DK weight at a tighter gauge produces a smaller bag, about 8 inches tall, perfect as a cosmetics pouch.
- Option 3: WeCrochet Dishie in Blush, Cream, and Pistachio. The smooth cotton blocks beautifully and gives excellent stitch definition for the lattice pattern.
Substitution tip
- Choose a smooth, plied yarn. Avoid fuzzy or textured yarns because they’ll hide that gorgeous diamond lattice texture you’re working so hard to create. Cotton or cotton blends work best since they hold the structured shape without needing a lining.
Yarn
- Yarn A (Dusty Rose): approximately 350 yards of worsted weight yarn, 100% cotton or cotton-acrylic blend
- Yarn B (Cream): approximately 180 yards of worsted weight yarn, same fiber content
- Yarn C (Sage Green): approximately 25 yards of worsted weight yarn, same fiber content
Hooks
- US size G-6 / 4.0 mm crochet hook for bag body and appliques (or size needed to obtain gauge)
- US size F-5 / 3.75 mm crochet hook for drawstring cord (optional, makes the cord slightly firmer)
Notions
- Yarn needle for weaving ends and sewing appliques
- 6 stitch markers
- Scissors
- Pins for blocking appliques
Optional
- 1 yard of cotton twill tape or fabric lining for interior support
Main Pattern
Work in continuous rounds with Yarn A and G-6 hook. Place a stitch marker at the beginning of each round and move it up as you work.
Checkpoint: Your base should be a flat circle measuring about 6 inches across. It must lie flat without cupping or ruffling. If it cups, your tension is too tight. If it ruffles, your tension is too loose.
Continue with Yarn A. Work in BLO for Round 13 only. This creates a crisp fold line between the base and body.
Note: 72 stitches divides evenly by 6, which is required for the diamond lattice pattern. Count your stitches before moving on.
Work Lattice Round A and Lattice Round B alternately throughout this section. All rounds maintain 72 stitches.
Round 1MR, ch 1, work 6 sc into ring. (6 sc)
Round 2Work 2 sc in each st around. (12 sc)
Round 3(Sc in next st, 2 sc in next st) 6 times. (18 sc)
Round 4(Sc in next 2 sts, 2 sc in next st) 6 times. (24 sc)
Round 5(Sc in next 3 sts, 2 sc in next st) 6 times. (30 sc)
Round 6(Sc in next 4 sts, 2 sc in next st) 6 times. (36 sc)
Round 7(Sc in next 5 sts, 2 sc in next st) 6 times. (42 sc)
Round 8(Sc in next 6 sts, 2 sc in next st) 6 times. (48 sc)
Round 9(Sc in next 7 sts, 2 sc in next st) 6 times. (54 sc)
Round 10(Sc in next 8 sts, 2 sc in next st) 6 times. (60 sc)
Round 11(Sc in next 9 sts, 2 sc in next st) 6 times. (66 sc)
Round 12(Sc in next 10 sts, 2 sc in next st) 6 times. (72 sc)
Round 13Sc in BLO of each st around. (72 sc)
Round 14Sc in each st around. (72 sc)
Round 15Sc in each st around. (72 sc)
Round 16Lattice Round A (Skip 1 st, hdc in next st, hdc in skipped st) 36 times. (72 hdc)
Round 17Lattice Round B Hdc in first st, (skip 1 st, hdc in next st, hdc in skipped st) 35 times, hdc in last st. (72 hdc)
Peony Flower
Make 9Each peony has three layers: a small center, a middle ring of petals, and a large outer ring. Don't be intimidated. Take it one layer at a time.
Center Ring: Fasten off leaving a 10-inch tail for sewing.
Middle Petal Layer: Join Yarn B in any front loop of Round 2. Fasten off leaving a 10-inch tail.
Outer Petal Layer: With Yarn B, ch 30 to begin. Fasten off leaving a 12-inch tail. Roll this strip into a loose spiral and sew the base to the center unit. This creates those gorgeous ruffled outer petals.
Round 1Center Ring MR, ch 1, work 6 sc into ring, join with sl st to first sc. (6 sc)
Round 2Center Ring Ch 3 (counts as first dc), work 2 dc in same st, (work 3 dc in next st) 5 times, join with sl st to top of ch-3. (18 dc)
Round 3Center Ring Working in BLO, sc in each st around, join with sl st. (18 sc)
Round 1Middle Petal Layer Join Yarn B in any front loop of Round 2; Working in FLO of Round 2 sts, (ch 4, 3 tr in same st, ch 4, sl st in same st, sl st in next st) 9 times. (9 petals formed)(9)
Row 1Outer Petal Layer With Yarn B, ch 30; Sc in second ch from hook and in each ch across. (29 sc)
Row 2Outer Petal Layer Ch 1, turn, sc in first st, (skip 1 st, 5 dc in next st, skip 1 st, sc in next st) 7 times. (7 fan petals)
Leaf Applique
Make 18Fasten off leaving an 8-inch tail.
Row 1ch 8; Sl st in second ch from hook, sc in next ch, hdc in next ch, dc in next ch, hdc in next ch, sc in next ch, sl st in last ch; Do not turn. Working on the opposite side of the foundation chain: sl st in first ch, sc in next ch, hdc in next ch, dc in next ch, hdc in next ch, sc in next ch, sl st in last ch. (14 sts total around leaf)
Tassel
Make 2Cut 40 strands of Yarn B, each 6 inches long. Hold all strands together and fold in half. Use a separate 12-inch strand to tie tightly around the folded center, about 0.5 inches from the fold. Wrap several times and knot securely. Trim the bottom ends even.
Twisted Drawstring Cord
Make 2Cut 6 strands of Yarn B, each 60 inches long. Hold all 6 together and knot at both ends. Attach one end to a doorknob or other fixed point. Twist clockwise until very tightly twisted and beginning to kink. Fold in half and allow it to twist back on itself. Knot both ends. The finished cord will be about 24 inches long.
Assembly
Step 1Blocking: Block all 9 peonies and 18 leaves flat before sewing. Lightly spray with water, pin to shape, and allow to dry completely. This step makes a huge difference in how professional your finished bag looks.
Step 2Peony Placement: Divide the bag body into 3 vertical columns, each about 24 stitches wide. Within each column, place 3 peonies at evenly spaced heights: One in the lower body (around Round 20) One in the mid body (around Round 26) One in the upper body (around Round 32) Offset the middle column so its peonies fall at the gaps between the first and third columns. This staggered arrangement places the flowers at the diamond intersection points of the lattice. Sew each peony using the long tails and a yarn needle, stitching through the back loops of the bag body. Place 2 leaves per peony, one at approximately the 7 o’clock position and one at the 5 o’clock position. Sew each leaf using its tail.
Step 3Drawstring Assembly: Attach one tassel to one end of each cord. Thread Cord 1 through the eyelet channel beginning at the right-side eyelet, going all the way around, and exiting from the same right-side eyelet. Both ends of Cord 1 will hang from the right side. Thread Cord 2 beginning at the left-side eyelet, going all the way around, and exiting from the same left-side eyelet. Wrap a short length of Yarn A tightly around both cords together about 1 inch above the tassel body. Wrap 6 to 8 times and knot. This creates the pink wrapped band visible at the base of the tassel group.
Finishing
- I weave in every tail before attaching anything, since appliques multiply loose ends fast.
- I pin and block each peony and leaf flat before sewing them to the bag.
- I sew the peonies and leaves on, then thread the twisted cord and tie on tassels.
Why it works
The first five rounds add six stitches each, the standard flat-circle increase.
Round 13 works in back loops only, creating the fold line between base and body.
The peony's middle petal layer joins into front loops left open by Round 2.
What it becomes
- I use it as a project bag, since the drawstring keeps small notions from spilling out.
- It works as a gift bag for something already finished, paired with tissue instead of paper.
- It sits well as a decorative catch-all on a shelf, next to other textured fiber pieces.
FAQ
Can I use a different yarn weight?
The pattern is written for worsted weight cotton or a cotton-acrylic blend. Swapping weights changes the finished bag size. A fuzzy yarn also hides the petal and leaf detail.
Why does the leaf use only one row?
Working both sides of the same foundation chain gives a full leaf shape. It keeps the leaf flat and quick to make in quantity.
Do I need the twill tape lining?
No, it is listed as optional. I would add it only for more structure at the opening.
What does the back-loop-only round actually do?
Working Round 13 in back loops only leaves a visible ridge. That ridge becomes the fold line between base and body.