Free Pattern
Step-by-Step
Crochet
Bags & AccessoriesElegant Crochet Bag Pattern With A Professional Finish
Make a boutique-style elegant crochet bag with a fabric-lined interior, chain handle, and magnetic clasp closure using this detailed pattern.
Level IntermediateTime 4-6 HoursHook 13 mmYarn Super Bulky
Pattern highlights
- Chain a long foundation row to set the width for the bag's base and sides.
- Work split stitches across sections of the round to build the woven-textured surface.
- Alternate in single crochet stitches to smooth out other portions of each round.
- Increase at the corners by working three single crochet stitches into the same spot.
- Repeat the split stitch and single crochet pattern across the body rounds to build height, changing colors as directed and decreasing at the top.
- Block the finished crochet piece so its shape settles evenly before adding the lining.
- Cut and sew fabric lining to fit the interior, then attach the magnetic clasps.
- Crochet the handle strip, attach it to the bag, and finish by stitching on the handmade tag.
About This Pattern
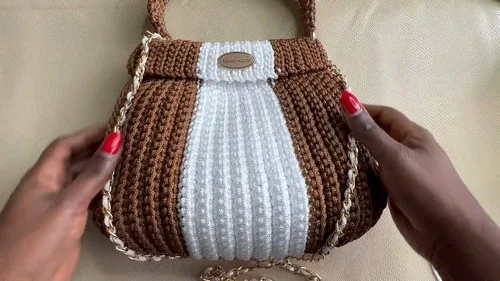
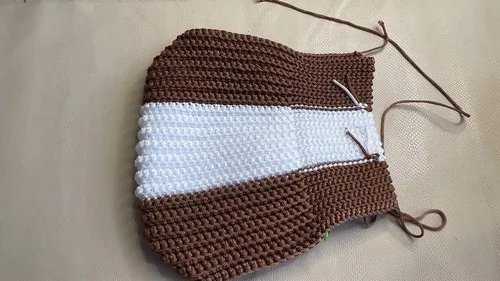
This elegant crochet bag pattern creates a structured, boutique-style handbag built from a sturdy chain-70 foundation and worked up in bold 13mm yarn for maximum texture and presence. What sets it apart is the combination of split stitches and single crochet that gives the surface a woven, fabric-like appearance rather than a typical bumpy crochet look. It's perfect for makers who want to create something that feels genuinely upscale — ideal for gifting, selling, or simply treating yourself to a statement accessory that doesn't look homemade in the amateur sense.
The finished bag has a substantial, tailored silhouette thanks to the 13mm yarn and 3.75mm hook combination, which keeps stitches dense and the fabric firm enough to hold its shape without sagging. With its fabric lining, magnetic clasp closure, handmade tag, and chain handle, it reads as a genuinely finished, professional accessory rather than a craft project. It makes a wonderful gift for a birthday, anniversary, or just-because moment — and it's easily customized in color to match the recipient's style.
Variations
I adore this pattern because it bridges the gap between 'cute crochet project' and 'actual accessory I'd carry downtown.' The split stitch technique paired with regular single crochet gives the surface such a rich, tailored texture — it genuinely looks different from your average granny-square bag. Working the increases as 3 single crochet stitches into the same chain or spot to turn the corners is so satisfying; you can watch the rectangular base take shape round by round. I also love that this isn't just a crochet pattern — it walks you through lining the interior with fabric, attaching magnetic clasps, and finishing with a chain handle and handmade tag, so you end up with something that feels finished, not homemade. Using chunky 13mm yarn means the piece grows fast and the stitch definition is bold and eye-catching. It's the kind of project where the assembly steps matter just as much as the crochet itself, and that final reveal — clasp snapped shut, handle attached, tag sewn on — feels like unwrapping a boutique purchase you made yourself.
Common mistakes
- Miscounting the increase stitches
- After completing each increase corner, physically count the 3 stitches out loud and mark the center stitch of that group with a scrap of yarn or a locking marker to keep your corners symmetrical.
- Using a hook that's too small
- Stick with the recommended 3.75mm hook even though it feels small compared to the yarn thickness — this size difference is intentional and creates the dense, structured fabric this bag needs.
- Skipping gauge/tension checks early
- Work your first full round and lay it flat to check that it measures evenly and isn't curling or rippling before continuing to round two.
- Attaching the fabric lining
- Steam or lightly block your finished crochet piece into its final shape first, let it rest, and only then cut and pin your lining fabric to match the settled dimensions.
- Rushing the magnetic clasp placement
- Pin the clasp pieces in place and test-close the bag several times before permanently sewing them down to ensure both sides line up perfectly.
Intermediate
Progress Tracker
0 of 0 rounds
Tap a round to tick it off — your place is saved on this device.
Materials
- 13 mm yarn in two color combinations (e.g., brown & white, purple & white)
- Two caps
- Handmade tag
- Magnetic clasps
- 3.75 mm crochet hook
- Fabric for lining
- Thread and scissors
- Chain for the handle
Main Pattern
- Round 1Chain 70
- Round 216 split stitches, 18 single crochet stitches, 3 single crochet stitches in the same chain, 18 single crochet stitches, 16 split stitches
- Round 316 split stitches, 19 single crochet stitches, 3 single crochet stitches in the same spot, 19 single crochet stitches, 16 split stitchesStep by step: Row 3 is worked in the back loops only, which creates a subtle ridge line that separates the lower rounds from the rest of the body.
- Round 416 split stitches, 20 single crochet stitches, 3 single crochet stitches in the same stitch, 20 single crochet stitches, 16 split stitches
- Round 516 split stitches, 21 single crochet stitches, 3 single crochet stitches in the same stitch, 21 single crochet stitches, 16 split stitches
- Round 616 split stitches, 22 single crochet stitches, 3 single crochet stitches in the same stitch, 22 single crochet stitches, 16 split stitches
- Round 716 split stitches, 23 single crochet stitches, 3 single crochet stitches in the same stitch, 23 single crochet stitches, 16 split stitches
- Round 8-1616 split stitches, 49 single crochet stitches, 16 split stitches
- Round 17-29Change to white yarn. 16 split stitches, 49 single crochet stitches, 16 split stitches
- Round 30-36Switch back to brown yarn. 16 split stitches, 49 single crochet stitches, 16 split stitches
- Round 3716 split stitches, 23 single crochet stitches, one triple decrease, 23 single crochet stitches, 16 split stitches
- Round 38-44Decrease one single crochet stitch in each row until you reach 18 stitches
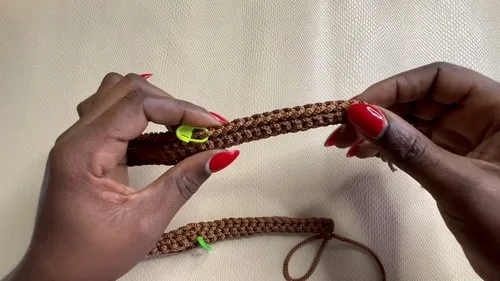
- HandleCrochet 4 single crochet stitches. Chain 1, turn. Work 4 single crochet stitches in the back loops only. Continue until the strip measures approximately 9.5 inches (33 cm).
Assembly
- Step 1Line the inside with fabric
- Step 2Sew the fabric to the bag’s interior
- Step 3Crochet split stitches along the bag’s top edges
- Step 4Fold the bag and sew the sides together securely
- Step 5Add the second loop
- Step 6Attach the handle to the bag
- Step 7Weave white yarn through the chain for a decorative finish
Important notes
💡 Because this pattern uses 13mm yarn with just a 3.75mm hook, your stitches will feel tight to make — take breaks to avoid hand fatigue, especially through the split stitch sections.
💡 Keep a stitch marker on the very first stitch of each round so you never lose track of where one round ends and the next begins.
💡 When working the '3 single crochet in the same chain/spot' increases, keep tension consistent so all three stitches sit neatly without gapping or bunching at the corners.
💡 Cut your lining fabric slightly larger than the finished crochet piece, then trim to fit after pinning — it's much easier to remove excess fabric than to add more.
💡 If you're using two color combinations, weave in yarn ends securely as you go rather than leaving them all for the end, since bulky yarn tails can be bulky to manage later.
💡 Test your magnetic clasps on a scrap of the lining fabric first to make sure the fabric is sturdy enough to hold the hardware without tearing.
More photos
Original pattern: https://crocheteverything.com/elegant-crochet-bag-pattern-with-a-professional-finish/
FAQ
What weight yarn works best for this bag if I can't find 13mm yarn?
Look for super bulky or jumbo weight yarns labeled around 12-15mm, such as Bernat Blanket Extra or Wool-Ease Thick & Quick. Just be aware slight thickness differences may change your finished bag's size slightly.
Do I need sewing skills to add the fabric lining?
Basic hand-sewing skills are enough — you'll mainly be sewing straight seams around the lining and tacking it to the crochet interior. If you're not confident sewing, a simple whip stitch by hand works perfectly well here.
How long does this bag pattern typically take to complete?
Most crocheters finish the crochet portion in about 4-6 hours thanks to the bulky yarn working up quickly. Add extra time for lining, clasp attachment, and finishing touches like the handmade tag.
Can I make this bag without the magnetic clasps?
Yes, you can substitute a button and loop closure, a zipper, or even leave it open-top if you prefer a more casual look. Just adjust your lining construction slightly to accommodate whichever closure you choose.
What's the purpose of the split stitches in this pattern?
The split stitches create a distinct woven texture that contrasts with the smoother single crochet sections, giving the bag its elevated, boutique-style appearance. They also add extra density and structure to the fabric.