Free Pattern
Step-by-Step
Crochet
Blankets & ThrowsForget-Me-Not Granny Square Blanket Crochet Pattern
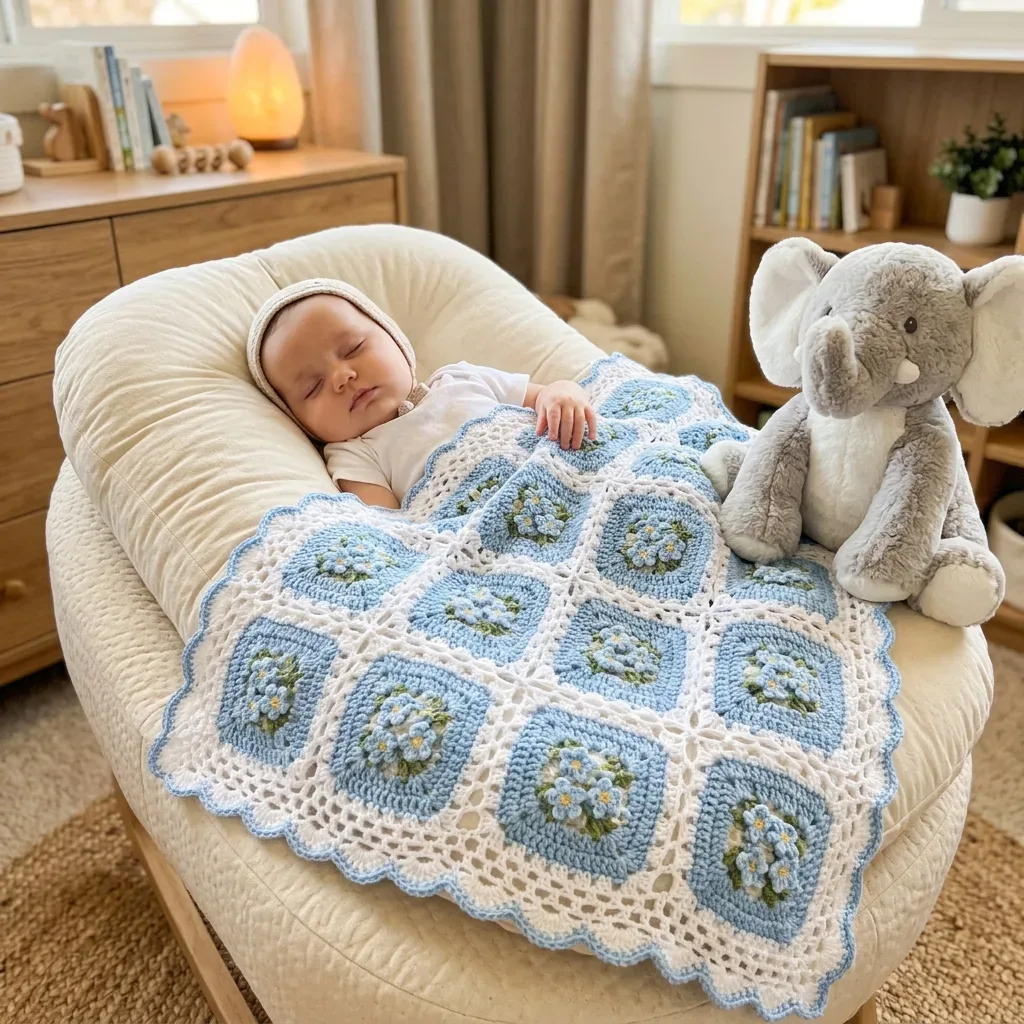
Crochet a dreamy forget-me-not granny square blanket with layered flower squares and a lace border. Full written pattern for 20 squares.
Level IntermediateTime 20-25 HoursHook 4.0 mmYarn DK
Pattern highlights
- Start each square with a pale yellow magic ring and work the first round of single crochet stitches around it.
- Build the first layer of periwinkle petals directly into every other stitch from that opening round.
- Add a second, slightly larger layer of white petals into the sc stitches left unworked behind the first layer.
- Complete the square in soft blue, working corner and side stitches into the chain spaces to square off the motif.
- Repeat the full flower-and-frame sequence until you have twenty finished, blocked squares.
- Arrange the squares into five rows of four and join them row by row, then connect the rows together.
- Finish the whole piece with a two-round cream lace border worked around the entire joined blanket.
About This Pattern
This blanket builds twenty individual granny squares, each one blooming with a tiny layered forget-me-not flower right at its center. Instead of a plain solid motif, every square starts with a pale yellow magic ring, then grows two rounds of petals in periwinkle and white before the surrounding dc rounds fill out the square in soft blue. It's the kind of project that feels special from the very first round, perfect for crocheters who love florals but want something more textured than a printed cotton print.
You'll work with magic rings, front-loop petal clusters, ch-sp corners, and a two-round lace border that ties every square together in cream. Six colors are in play across the project, so you'll get comfortable joining and fastening off cleanly — a great skill-builder if you've made a few granny squares before but haven't tackled multi-color flower motifs yet. Between the squares, the border, and assembly, budget a relaxed few weekends rather than a single sitting.
Finished and joined, the blanket lands in the roomy throw range once all twenty squares and the lace border come together, with a soft, slightly textured surface from the raised petal clusters. The overall look reads classic cottage-garden with a modern soft-blue palette, equally at home on a nursery chair or a living room sofa. It's a lovely one to make as a baby gift, a wedding present, or simply a cozy statement piece for yourself.
Variations
The six-color palette here is begging to be played with. For a moodier version, swap Color A's soft blue for a deep navy or slate, keep the periwinkle and white petals, and let the flowers pop against the darker background. Want a garden-mix look instead of uniform forget-me-nots? Make five squares with pink petals (swap Color C and D for dusty rose and blush), five in lavender, five in the original blue, and five in soft yellow — same construction, wildly different bouquet. For a baby gift, try a gender-neutral palette: sage green squares (swap Color A) with cream petals and butter-yellow centers throughout. Yarn-wise, this pattern is written for DK weight with a G-6 hook, but it scales beautifully. Go down to a fingering weight with a D or E hook for a lighter, lacier lapghan, or size up to worsted weight with an I hook for a chunkier, faster-growing throw — just remember your finished square size will shift, so block a test square first and adjust your border round counts if needed. Size-wise, the 5-by-4 layout makes a generous throw, but you can easily make it a lapghan by dropping to 12 squares (3 rows of 4), or go queen-bed-sized by expanding to 30 squares (6 rows of 5), just budget more yarn proportionally, especially Color A and Color B since they cover the most ground. If you want a scrappier, no-stash-left-behind version, let Colors C, D, and F vary square to square using leftover DK scraps while keeping A and B consistent, it keeps the blanket unified while using up your odds and ends.
I adore how much personality this blanket packs into one small motif — each square is basically a tiny bouquet. Building the flower in layers, pale yellow center, periwinkle petals, then a second round of white petals peeking out behind them, is such a satisfying little sequence, and watching the dc rounds frame it into a proper granny square feels like the payoff. I love that the color changes aren't just functional; Color E's leaf-green round between the flower and the blue background genuinely reads like foliage. And that lace border in cream? It's the finishing touch that pulls all twenty squares into one cohesive, heirloom-looking piece instead of just a grid of motifs. This isn't a mindless repeat-forever pattern, but it's not fussy either, it's the kind of project where each square feels like a small win, and by the time you're joining Row 5 to Row 1 you'll genuinely miss making them. It's become one of my favorite ways to spend an evening with a stitch marker pouch and a cup of tea.
Common mistakes
- Losing track of which sc stitches are 'used' versus 'unworked' between Round 2 and Round 3.
- Place a stitch marker in each of the 5 unworked sc from Round 1 right after finishing Round 2, so you can find them instantly for Round 3 without recounting.
- Pulling the magic ring too loose in the center of the flower, leaving a visible gap.
- Tug each of the 10 loops individually after cinching the ring, and check the center is fully closed before fastening off Color F.
- Making squares in inconsistent sizes because of tension changes between colors.
- Block every square to the same 6.5-inch measurement before joining, and if a square runs small or large, adjust your hook by half a size on the next one rather than fighting your gauge mid-square.
- Joining squares in the wrong order and ending up with mismatched corners or a twisted layout.
- Lay all 20 blocked squares out in the 5-by-4 grid on the floor first, then join strictly row by row before connecting rows to each other.
- Skipping a stitch marker in the corner ch-2 spaces during the lace border rounds and losing the corner placement.
- Mark all four outer corner spaces before starting Border Round 1, and re-mark the new corner ch-3 spaces before starting Border Round 2.
- Weaving in ends before blocking, which can loosen stitches or distort the petal clusters.
- Leave tails a few inches long and wait to weave them in until after each square is blocked and fully dry.
Intermediate
Progress Tracker
0 of 0 rounds
Tap a round to tick it off — your place is saved on this device.
Materials
- Paintbox Yarns Simply DK is a budget-friendly option with excellent stitch definition that really shows off the flower clusters.
- Cascade 220 Superwash DK is the luxury choice if you want a drapier, softer blanket in natural fiber that’s still machine washable.
Substitution tip
- Any DK weight yarn around 220 yards per 100 grams will work. Avoid fuzzy or hairy yarns like mohair blends since they’ll obscure your dimensional flower detail.
Color A
- Soft blue (main square color), approximately 600 yards
Color B
- Off-white or cream (joining lattice and lace border), approximately 500 yards
Color C
- Light blue or periwinkle (flower petals and outer edging), approximately 200 yards
Color D
- White (flower petal highlights), approximately 100 yards
Color E
- Sage green (flower leaves), approximately 100 yards
Color F
- Pale yellow (flower centers), approximately 30 yards
Hook
- US size G-6 / 4.0 mm crochet hook, or size needed to obtain gauge
Notions
- Yarn needle for weaving ends
- At least 6 stitch markers
- Scissors
Forget-Me-Not Granny Square
Make 20With Color F (pale yellow), make a magic ring before starting Round 1.
Join Color C (periwinkle blue) with sl st into any sc of Round 1 before working Round 2.
Join Color D (white) with sl st into any unworked sc from Round 1 (these sit behind the petals) before working Round 3.
Join Color E (sage green) with sl st into any sl st join point between petals before working Round 4.
Checkpoint: the flower motif should measure approximately 2 to 2.5 inches in diameter, showing blue and white petals layered over the yellow center.
Join Color A (soft blue) with sl st into any ch-2 sp of Round 4 before working Round 5.
Join Color A into any corner ch-2 sp before working Round 6.
Join Color A into any corner ch-2 sp before working Round 7 for Square 1; use JAYG for Squares 2 through 20.
Make 20 squares total. Square 1 is completed fully. Squares 2 through 20 are joined during Round 7 using the JAYG method.
Checkpoint: the joined blanket body should measure approximately 26 inches wide by 32.5 inches long before the border.
- Round 1Ch 1. Work 10 sc into the ring. Join with sl st to first sc. Fasten off Color F. (10 sc)
- Round 2Working each petal into a separate sc, work the following sequence 5 times: ch 3, work 1 cl in 3rd ch from hook, ch 3, sl st into the next sc of Round 1. After the 5th petal, sl st into the starting sc. You'll use every other sc, leaving 5 unworked sc sitting behind the petals. Fasten off Color C. (5 petals)(5)
- Round 3Working in the 5 unworked sc: work the following sequence 5 times: ch 4, work 1 cl in 4th ch from hook, ch 4, sl st into the next unworked sc. Fasten off Color D. (5 larger white petals)
- Round 4Ch 5. (dc, ch 2, dc) into same sp. Ch 2. Sk 1 petal cluster. Sc into the sl st between the next petal pair. Ch 2. Rep around all 5 petal pairs, ending with sl st into 3rd ch of beginning ch-5. Fasten off Color E. (10 ch-2 spaces, 5 dc pairs, 5 sc)
- Round 5Ch 3 (counts as dc). Work 2 dc in same sp. Ch 1. In next ch-2 sp, work (3 dc, ch 2, 3 dc). Ch 1. (First corner made.) In next ch-2 sp, work 3 dc. Ch 1. In next ch-2 sp, work (3 dc, ch 2, 3 dc). Ch 1. (Second corner made.) In next ch-2 sp, work 3 dc. Ch 1. In next ch-2 sp, work (3 dc, ch 2, 3 dc). Ch 1. (Third corner made.) In next ch-2 sp, work 3 dc. Ch 1. In next ch-2 sp, work (3 dc, ch 2, 3 dc). Ch 1. (Fourth corner made.) In next ch-2 sp, work 3 dc. Ch 1. Sl st into top of beg ch-3 to join. Fasten off Color A. (24 dc, 4 corner ch-2 sps, 8 side ch-1 sps)
- Round 6Ch 3 (counts as dc). (2 dc, ch 2, 3 dc) into same corner sp. Ch 1. 3 dc into next ch-1 sp. Ch 1. 3 dc into next ch-1 sp. Ch 1. (3 dc, ch 2, 3 dc) into next corner sp. Ch 1. 3 dc into next ch-1 sp. Ch 1. 3 dc into next ch-1 sp. Ch 1. Rep for remaining 2 corners. Sl st into top of beg ch-3. Fasten off Color A. (36 dc, 4 corner ch-2 sps, 12 side ch-1 sps)
- Round 7For Square 1 (no joining): Ch 3 (counts as dc). (2 dc, ch 2, 3 dc) into same corner sp. Ch 1. (3 dc, ch 1) into each ch-1 sp along the side (3 groups). (3 dc, ch 2, 3 dc) into next corner. Ch 1. Rep for all 4 sides. Sl st into top of beg ch-3. Fasten off Color A. (48 dc, 4 corner ch-2 sps, 16 side ch-1 sps) For Squares 2 through 20: Work through Round 6, then use JAYG on Round 7 for any sides being joined to completed squares.
Lace Border
- Round 1Join Color B with sl st into any outer corner ch-2 sp before working Border Round 1.
- Round 2Join Color B with sl st into any corner ch-3 sp before working Border Round 2.
- Round 3Border Round 1: Ch 6 (counts as dc, ch 3). Dc into same corner sp. Along each side: (Ch 3, sc into next ch-1 sp or join point, ch 3, sc into next ch-1 sp or join point) across, ending with ch 3 before next corner. At each corner: (dc, ch 3, dc) into corner ch-2 sp. Continue around. Sl st into 3rd ch of beg ch-6. Fasten off Color B. (86 ch-3 arches plus 4 corner sets)
- Round 4Border Round 2: Ch 3 (counts as dc). (2 dc, ch 2, 3 dc) into same corner sp. Along each side: (3 dc, ch 1) into each ch-3 arch across. At each corner: (3 dc, ch 2, 3 dc) into corner ch-3 sp. Continue around. Sl st into top of beg ch-3. Fasten off Color B. (282 dc total, 4 corn(282)
Assembly
- Step 1Arrange squares in 5 rows of 4 squares each.
- Step 2Join Row 1 first (Square 2 to 1, Square 3 to 2, Square 4 to 3).
- Step 3Then join Square 5 to Square 1 along the bottom.
- Step 4Continue across and down until all 20 squares are joined.
Important notes
Six colors and a lot of fastening off are involved, so keep a small project bag of bobbins or short lengths per color to avoid constantly cutting full skeins.
The gauge note is important here: one square should measure 6.5 inches after light blocking, and squares that run off that number will throw off the border math across all 20 squares.
Use at least 6 stitch markers as suggested, one for the unworked Round 1 sc's is genuinely a lifesaver, not just a nice-to-have.
Block every square before joining, not after, uneven squares are much harder to correct once they're locked into the grid with border stitches.
Since the flower rounds are small and detailed, work them under good light or during a focused sitting rather than fitting them into distracted TV-watching time.
Save your yardage estimates as a checklist before you start; Color A and Color B are used in the largest quantities and running short mid-blanket means dye-lot matching stress.
Gauge: One completed granny square = 6.5 inches (16.5 cm) square after light blocking. Alternatively: 18 stitches and 10 rows in double crochet (dc) = 4 inches with a G-6 hook.
If your squares are smaller than 6.5 inches, go up a hook size; if larger, go down. Consistent square size ensures your blanket lies flat and the border math works correctly.
Original pattern: https://crochetwithmia.com/baby-blue-forget-me-not-granny-square-blanket-free-pattern/
FAQ
How much yarn do I need in total for this blanket?
Across all six colors you'll need roughly 1,530 yards of DK weight yarn: about 600 yards of Color A, 500 of Color B, 200 of Color C, and smaller amounts of Colors D, E, and F. Buying slightly extra of your two main colors is a smart cushion.
What size hook should I use for this pattern?
The pattern calls for a US G-6 / 4.0mm hook, but the real target is the gauge: one finished, lightly blocked square should measure 6.5 inches square. If your squares run smaller or larger, size your hook up or down until you hit that measurement.
Can I make this blanket without following the exact 5-color petal sequence?
Yes, the layered petal construction (Colors C, D, E, F) is what gives the forget-me-not its dimension, but you can substitute any of those four accent colors as long as you keep the same stitch counts per round. Just keep Color A and Color B consistent across all 20 squares for a cohesive look.
How big is the finished blanket?
20 squares arranged in 5 rows of 4, plus the two-round lace border, this comes together as a generous throw-sized blanket. Exact finished dimensions will depend on your blocked square size, but at the 6.5-inch gauge you're looking at a substantial lap-and-a-half throw before the border, larger once bordered.
Do I need to block each square before joining them?
Yes, blocking each of the 20 squares to a consistent 6.5-inch measurement before joining is essential. It evens out any tension differences between squares and makes the final assembly and border rounds go together much more smoothly.