Free Pattern
Step-by-Step
Crochet
Home DecorGorgeous Free Crochet Flower Pattern for Accessories & Home Decor
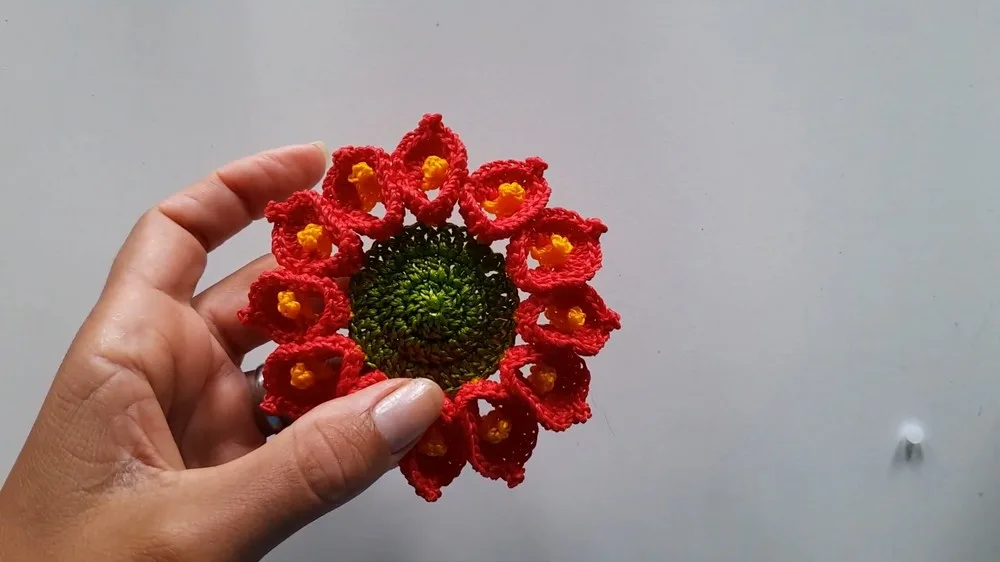
Make this gorgeous crochet flower with a magic ring center and layered petals—perfect for accessories, doorstops, towel holders, or thoughtful gifts.
Level BeginnerTime 1-2 HoursHook 1.75 mmYarn Medium (Worsted)
Pattern highlights
- Start the Flower Center with a magic ring to create a tight, hole-free base to build from.
- Work through the three rounds of the Flower Center, keeping your stitch count steady as the base grows.
- Move into the Petal Rounds, building outward from the finished center in continuous rounds.
- Shape each petal during the Petal Shaping step so they curl and stand up with dimension.
- Weave in all yarn ends neatly with a tapestry needle for a clean, finished look.
- Optionally glue a half pearl bead into the center for a decorative finishing touch.
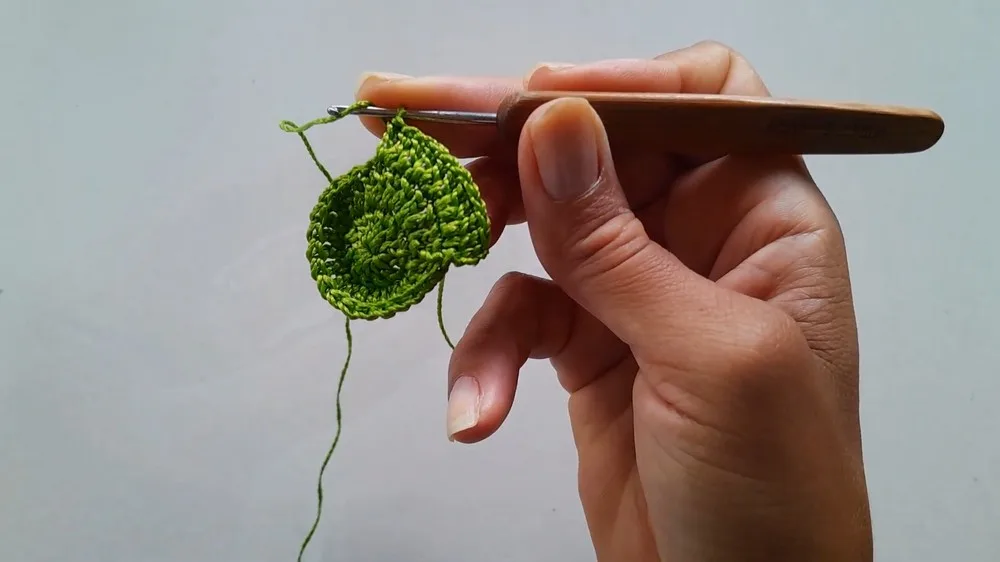
- Crochet small green leaves separately if you'd like to attach them behind the flower.
- Use the sturdy base ring as-is, or slip it over a doorknob or towel bar for functional display.
About This Pattern
This gorgeous crochet flower pattern turns a handful of cotton yarn into a big, cheerful bloom that works just as hard as it looks pretty. Built from a magic ring center and layered petal rounds, it's designed to be endlessly versatile—pin it to a bag, glue it onto a headband, or let it stand alone as a decorative accent. It's perfect for crafters who want a fast, rewarding project that doesn't require a huge yarn stash or a long weekend to finish.
The techniques here are refreshingly approachable: a magic ring start, worked-in-the-round construction, and simple petal shaping that gives the flower its dimensional, ruffled look. There are no tricky increases or advanced stitch combinations to worry about, which makes this a genuinely beginner-friendly pattern even though the finished flower looks impressively full and polished. Most crocheters can complete the entire flower, center and all, in about one to two relaxed sittings.
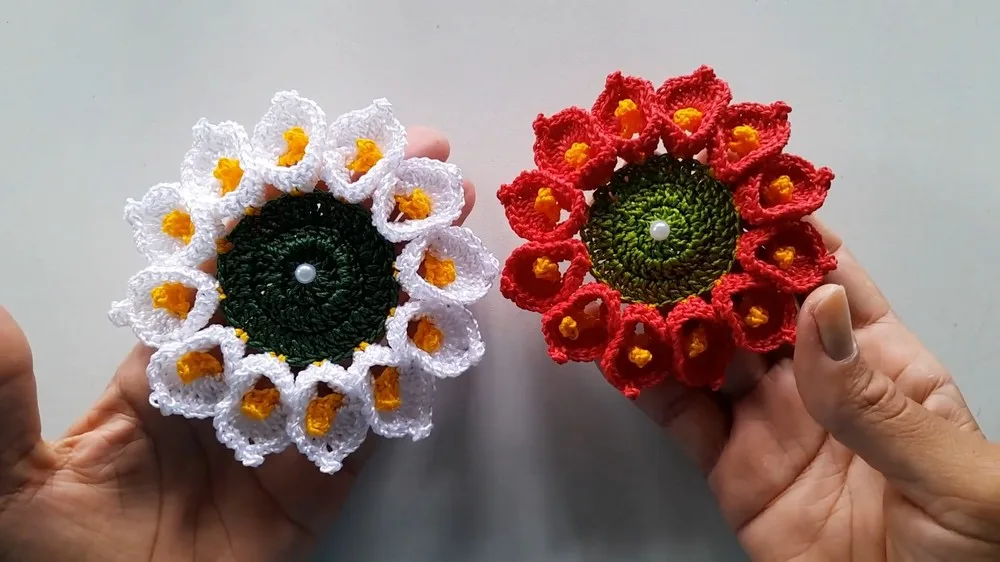
Once finished, you'll have a plump, textured flower with a rounded base that can double as a functional ring—perfect for slipping over a doorknob as a doorstop or looping around a towel bar. Add a half pearl bead to the center for extra sparkle, or stitch on a few green leaves for a more realistic touch. Whether you keep it for your own home or wrap it up for a friend, it's a small project with a big, joyful payoff.
Variations
One of the best things about this flower is how easy it is to customize. For a classic look, stick with the Red, White, and Golden Yellow combo from the original—but a soft blush pink center with cream petals feels romantic for wedding decor, while a sunny orange-and-yellow pairing gives you a marigold vibe for fall. If you're using this as a towel holder, consider matching the flower color to your kitchen linens for a coordinated look. For a mini version, try dropping down to a size 2.25mm hook with a sport-weight cotton like 24/7 Cotton in a lighter weight, which will naturally shrink the petals for use as a brooch or hair clip embellishment. Want it bigger and bolder for a statement doorstop? Size up to a worsted or aran weight cotton such as Sugar 'n Cream or Bernat Handicrafter, and pair it with a matching 3.5mm hook—just keep the same round structure and let the thicker yarn do the scaling for you. Swap the green leaves for two-tone variegated yarn to mimic a tropical hibiscus look, or skip the pearl bead entirely and stack two smaller flowers in contrasting colors for a layered, ombré center effect. For gifting, try making a trio in coordinating shades—one for a doorstop, one for a towel holder, and one as a simple decorative piece—to create a cohesive handmade set. However you style it, the underlying construction stays exactly the same, so feel free to experiment with color and yarn weight without worrying about the pattern falling apart.
I adore this pattern because it proves you don't need a complicated stitch dictionary to make something that looks genuinely impressive. Starting the Flower Center with a magic ring gives you that clean, hole-free base every time, and working the three rounds builds up a sturdy foundation before the petals even begin. What I love most is how the Petal Rounds and Petal Shaping steps transform a flat circle into something with real dimension—those petals curl and layer in a way that photographs beautifully and feels satisfying to shape with your own hands. It's also wonderfully practical: the same base doubles as a ring, so you can turn your flower into a doorstop or towel holder without any extra engineering. Adding a half pearl bead to the center with a dab of silicone glue is my favorite finishing touch—it takes two minutes and instantly makes the flower look store-bought. This is the kind of pattern I keep coming back to when I want a quick, joyful project that still feels like a finished, gift-worthy piece.
Common mistakes
- Pulling the magic ring closed
- Cinch the magic ring tail firmly after your first round of stitches and give it a gentle tug from both ends before weaving in, so the center closes completely flat.
- Losing track of which round you're
- Place a stitch marker in the first stitch of each new round and move it up as you go, since all three rounds are worked continuously without a clear color change to guide you.
- Making the petals too tight
- When working the Petal Shaping, keep your tension slightly looser than usual on the outer stitches of each petal so they naturally curl outward instead of lying flat against the base.
- Using yarn that's too slippery or thin
- Stick with a smooth, tightly-spun medium weight cotton, which holds its shape better at this small hook size and keeps your petal rounds looking crisp rather than floppy.
- Skipping the tapestry needle step
- Weave every end in securely along the back of the petal rounds using your tapestry needle, running the tail through several stitches so it stays hidden even after the flower is handled or washed.
- Gluing the half pearl bead on before
- Wait until all other yarn ends are woven in and the flower is fully shaped, then apply the silicone glue to the bead and press it into the center, holding it in place for a few seconds until it sets.
Beginner
Progress Tracker
0 of 0 rounds
Tap a round to tick it off — your place is saved on this device.
Materials
Yarn
- Medium weight cotton yarn in Red, White, Golden Yellow, Green (choose colors as desired for flower, center, and leaves)
Crochet Hook
- Size 1.75 mm
Tools
- Scissors
- Tapestry Needle
- Half Pearl Bead (for flower center, optional)
- Silicone Glue (for attaching bead, optional)
Flower Center (Base)
With Green Yarn: Magic Ring: Create a magic ring.
- Round 1Ch 3 (counts as first dc), 11 dc in ring. Join with sl st to top of beg ch-3. (12 dc)
- Round 2Ch 3, dc in same st, 2 dc in each st around. Join with sl st to top of beg ch-3. (24 dc)
- Round 3Ch 3, dc in same st, dc in next st, 2 dc in next st ; rep from * to * around. Join with sl st to top of beg ch-3. (36 dc)
This establishes the flower base.
Petal Rounds
Switch to Golden Yellow Yarn: Setup for Petals: Join yarn in any stitch. (For each petal:)
- Petal RoundCh 8, turn, 4 sc (one in each of next 4 ch), ch 1, turn. In same sp at base, work 1 dc. Ch 1, skip 2 sts, dc in next st, ch 5, turn. 4 sc in ch-5 loop, ch 1, dc in same sp. Continue around, forming a loop for each petal. At end of round you should have 12 petals. Join with sl st to base of first ch-8.(12)
Petal Shaping
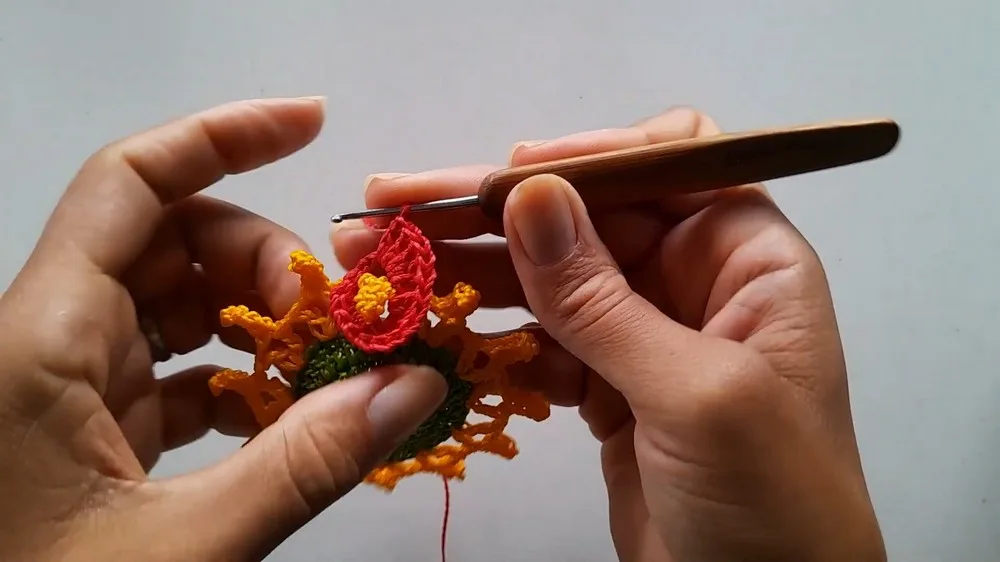
Switch to Red Yarn: Petal Formation: Join red in any dc at top of yellow petal base.
- Petal ShapingFor each petal: Ch 5, sl st in same space. Side 1: 5 dc in next petal space. Sl st at next petal base, Side 2: 5 dc in next petal space (working around the petal). Sl st back to base at side. Ch 5, sl st in the next petal space to start the next petal. Continue around all 12 petals. At the top of some petals, ch 3 to create a picot for extra detail. After all petals are formed, sl st to beginning to close.(12)
Assembly
- Step 1Cut yarn, fasten off, and weave in all yarn ends securely.
- Step 2Attach Half Pearl Bead (If using): Use silicone glue to affix the half pearl to the flower center.
- Step 3Optional: For an extra touch, create small green leaves and attach behind the flower, or use the base as a ring to hang the flower as a doorstop or towel holder.
Important notes
💡 Use a smaller, tightly-spun cotton yarn with your size 1.75mm hook—slippery or fuzzy yarns make it harder to see your stitches in the small Flower Center rounds.
💡 Keep a stitch marker handy for the Flower Center base since all three rounds are worked continuously and it's easy to lose your place.
💡 If you're adding the half pearl bead, apply silicone glue sparingly and let it cure fully before handling the flower, so the bead doesn't shift out of place.
💡 For the Petal Shaping step, experiment with slightly looser tension on the outer edges so your petals curl outward for a fuller, more three-dimensional bloom.
💡 When making green leaves to attach behind the flower, keep them a bit smaller than the flower itself so they peek out subtly rather than overpowering the design.
💡 If you plan to use the base as a ring for a doorstop or towel holder, double-check that the opening is stretchy enough to fit over your doorknob or towel bar before you weave in your final ends.
Correction: Ensure the ch 3 at the start of each dc round counts as a dc.
Tip: Keep stitches loose for easier petal formation and a softer, larger flower. If your petals curl too much, increase the number of dc on each side for a fuller look.
Tip: For beginners, mark the beginning of each round to keep track.
More photos
FAQ
Can I really use this flower as a doorstop or towel holder?
Yes—the Flower Center base is worked as a sturdy ring, so once it's finished you can slip it directly over a doorknob or loop it around a towel bar. Just make sure your yarn choice and hook tension keep the ring flexible enough to stretch slightly.
Do I need to add the half pearl bead to the center?
No, the bead is completely optional and just adds a decorative sparkle to the flower's center. If you skip it, the magic ring center on its own still looks clean and finished.
What yarn weight works best for this pattern?
A medium weight (worsted) cotton yarn paired with the size 1.75mm hook gives you the tight, defined stitches shown in the pattern. Cotton also holds its shape well, which is ideal since the flower needs to keep its structure as a ring.
How long does this flower take to make?
Most crocheters can finish the Flower Center, Petal Rounds, and Petal Shaping in about one to two hours. It's a quick, satisfying project you can easily complete in a single sitting.
Can I make leaves to go with the flower?
Absolutely—the pattern suggests crocheting small green leaves separately and attaching them behind the finished flower for a more realistic, botanical look. This is a lovely optional step if you want extra detail for gifting or display.