Free Pattern
Step-by-Step
Crochet
Bags & TotesLavender Fields Crochet Tote: An Appliqued Summer Bag
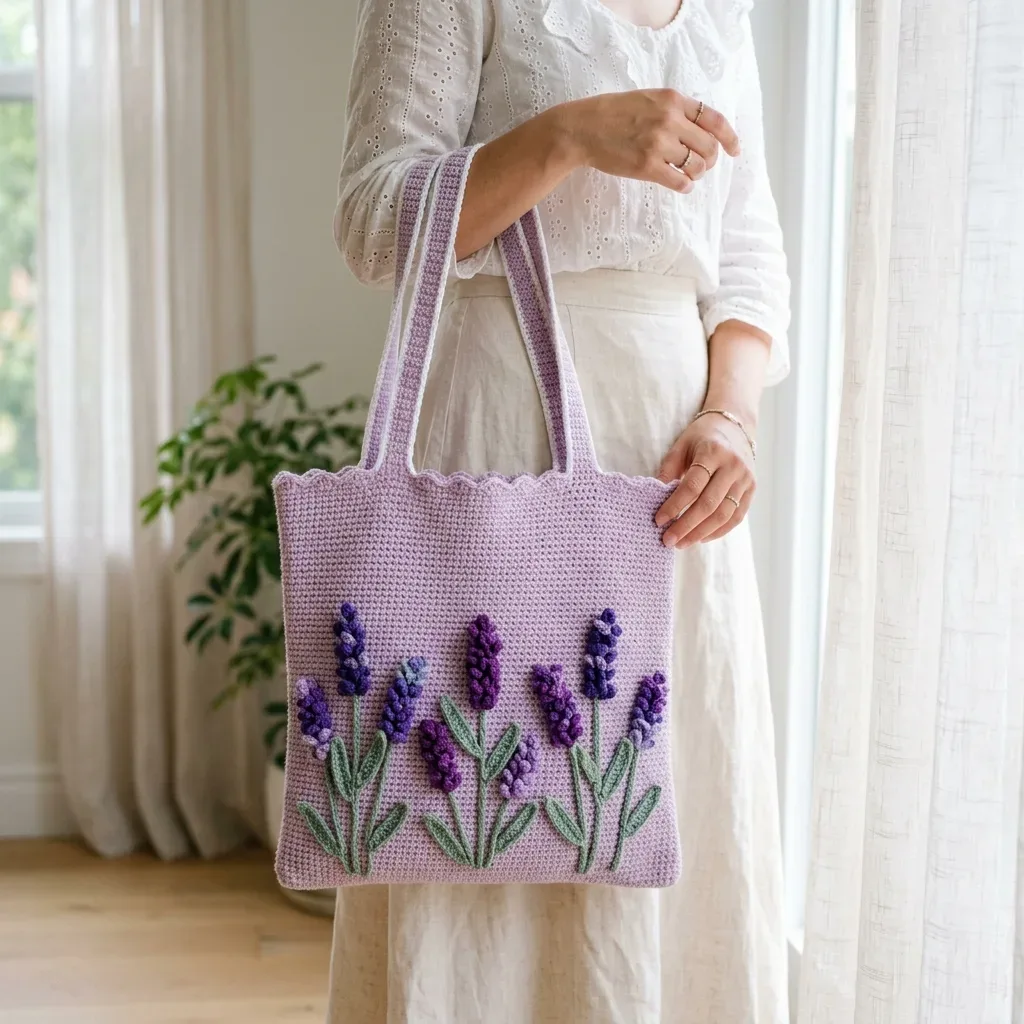
A crochet tote with sc panels, dc scallop edging, and stitched lavender stalk appliques.
- Level
- Intermediate
- Time
- 4-6 hours
- Hook
- 4.0 mm
- Yarn
- Worsted
Pattern highlights
- Work two identical single crochet panels flat, back and forth, until each reaches the target size.
- Seam the panels together along both short sides and the bottom, leaving the top open.
- Fold and seam two long single crochet strips lengthwise to form flat straps.
- Join the top opening in a single adjustment round, decreasing evenly to set up the edging.
- Work the scallop edging in one continuous round around the top opening.
- Crochet the lavender stalk appliques and small leaves separately with the finer hook.
- Pin and stitch the appliques and leaves onto the front panel only.
About This Pattern
Every collection needs a bag that earns its shelf space, and this one does it with color rather than shape. I keep coming back to projects where a plain single crochet panel becomes a canvas for something else — here, six yarns doing the work of a small garden. It sits between my market bags and my more decorative pieces, useful but not shy about it.
The body is nothing fancy: two identical single crochet panels worked flat, joined at the sides and bottom, then finished with a shell-stitch scallop around the top. The interest comes later, in the lavender stalk appliques and the small leaves, worked separately in a finer hook and set onto the front panel. It is a project in two very different registers, plain fabric and fussy trim.
Finished, it stands on its own with a flat bottom, two straps, and a ruffled edge that reads more garden than grocery run. The lavender stalks vary in height, which keeps them from looking stamped out. It is the kind of tote I would carry somewhere I wanted to be noticed, gently.
Common mistakes
- Losing the turning chain count Count stitches at the end of a few rows early on to catch a dropped or added stitch before it compounds across sixty rows.
- Uneven scallop spacing Mark the join point before starting the Scallop Round so the skip-2, 5 dc repeat lands evenly and closes without a gap.
- Mismatched panel row counts Keep a tally as you work; both panels need the same number of rows or the top edge will sit crooked once seamed.
- Straps twisted before seaming Fold each strip with wrong sides facing outward and check the edges lie flat before slip stitching the seam.
- Appliques placed before blocking Block the front panel first, then pin appliques in place with rust-proof pins so placement doesn't shift once you sew.
Intermediate
Progress Tracker
0 of 0 rounds
Tap a round to tick it off — your place is saved on this device.
The kit
Yarn
- Yarn A (main color, light lavender): approximately 650 yards of worsted weight cotton yarn
- Yarn B (dark purple): approximately 60 yards of worsted weight cotton yarn
- Yarn C (medium purple or violet): approximately 45 yards of worsted weight cotton yarn
- Yarn D (light periwinkle or blue-purple): approximately 25 yards of worsted weight cotton yarn
- Yarn E (medium sage green): approximately 80 yards of worsted weight cotton yarn
- Yarn F (light green): approximately 20 yards for leaf accents
Tools
- US size G-6 (4.0 mm) crochet hook for bag body and straps
- US size F-5 (3.75 mm) crochet hook for appliques (optional, but recommended)
- Tapestry needle for seaming and weaving ends
- At least 4 stitch markers
- Scissors
- Rust-proof pins for blocking and applique placement
- A note on yarn choice: I strongly recommend cotton or a cotton blend for this project. Acrylic will stretch and sag over time, especially when you load up the bag. Cotton holds its structure beautifully. Lion Brand 24/7 Cotton, Paintbox Yarns Cotton DK worked doubled, or Cascade Ultra Pima are all excellent options.
Main Body Panels
Make 2Both panels are identical; the lavender appliques only go on the front panel after everything is seamed together.
After Row 70, your panel should measure approximately 13 inches wide and 14 inches tall. If it is a bit short, keep working rows until you hit 14 inches. Just make sure both panels have the same number of rows.
Fasten off the second panel. Leave the first panel with yarn still attached if you want to use it for seaming later.
Round 1(RS): Using Yarn A and G-6 hook, chain 61; sc in 2nd ch from hook and in each ch across. Turn. (60 sc)
Round 2Ch 1, sc in each st across. Turn. (60 sc)
Round 3through 70: Ch 1, sc in each st across. Turn. (60 sc each row)(60)
Straps
Make 2After Row 6, fold the strip in half lengthwise with wrong sides facing outward. Join the two long edges using a slip stitch seam. This creates a flat strap approximately 1 inch wide and 22 inches long.
Fasten off, leaving a 12-inch tail for sewing to the bag.
Make a second strap identically.
Round 1Using Yarn A and G-6 hook, chain 101; sc in 2nd ch from hook and in each ch across. Turn. (100 sc)
Round 2through 6: Ch 1, sc in each st across. Turn. (100 sc each row)(100)
Lavender Appliques - Standard Stalk
Make 4This is for standard-height sprigs (1, 2, 4, and 5).
Turn your work 180 degrees to work along the other side of the foundation chain before starting Row 2.
5-Stitch Bobble (bo5): Yarn over, insert hook into the indicated stitch. Yarn over and pull up a loop (3 loops on hook). Yarn over and draw through 2 loops (2 loops remain - this is one unfinished double crochet). Repeat these steps 4 more times into the same stitch (6 loops total on hook). Yarn over and draw through all 6 loops at once. Chain 1 to lock the bobble in place (this chain does not count as a stitch).
Fasten off, leaving a 10-inch tail.
Foundation row (spine): Using Yarn B (or Yarn C depending on your color plan) and F-5 hook, chain 16; sc in 2nd ch from hook and in each ch across. Turn. (15 sc)
Round 1Bobble row, RS Ch 1, (bo5 in next st, sc in next st) rep 7 times, bo5 in last st. (8 bobbles, 7 sc)
Round 2Bobble row, second side Ch 1, sc in first exposed chain loop, (bo5 in next loop, sc in next loop) rep 6 times, bo5 in last loop, sc in last loop. (7 bobbles, 8 sc)
Lavender Appliques - Center Stalk (Taller)
This is for the center sprig (sprig 3, taller).
Turn your work 180 degrees to work along the other side of the foundation chain before starting Row 2.
Fasten off, leaving a 10-inch tail.
Foundation row (spine): Using Yarn B and F-5 hook, chain 20; sc in 2nd ch from hook and in each ch across. Turn. (19 sc)
Round 1Bobble row, RS Ch 1, (bo5 in next st, sc in next st) rep 9 times, bo5 in last st. (10 bobbles, 9 sc)
Round 2Bobble row, second side Ch 1, sc in first chain loop, (bo5 in next loop, sc in next loop) rep 8 times, bo5 in last loop, sc in last loop. (9 bobbles, 10 sc)
Main Leaves
Make 10Each lavender sprig has three parts: the bobble-covered stalk, main leaves, and optional small accent leaves.
Round 1Using Yarn E and F-5 hook, chain 8; sc in 2nd ch from hook, sc in next 4 ch, hdc in next ch, 3 hdc in last ch (this is the tip of the leaf); rotate work to continue along the opposite side of the foundation chain; hdc in next ch, sc in next 4 ch, sl st in last ch; fasten off, leavi
Scallop Edging
The scallop edging goes around the entire top opening as one continuous round.
Round 1Adjustment Round: Using Yarn A and G-6 hook, join with sl st to the top right corner of the bag with RS facing; ch 1; work 1 sc in each st around the top opening, decreasing 4 sts evenly spaced (work sc2tog at 4 distributed points) to reach 120 sts total; join with sl st to first sc. (120 sc)
Round 2Scallop Round: Ch 1, sc in same st as join; skip 2 sts, 5 dc in next st, skip 2 sts, sc in next st; repeat around; join with sl st to first sc; fasten off. (20 scallops)(5)
Assembly
Step 1Place both panels with wrong sides together. The seam will be on the inside of the bag.
Step 2Using Yarn A and a tapestry needle (or slip stitch seam with your hook), join the panels along one short side from bottom corner to top edge.
Step 3Join the panels along the bottom edge from one corner to the other.
Step 4Join the remaining short side from bottom corner to top edge.
Step 5The top stays open. Your bag should now stand on its own with a flat bottom.
Step 6Position each strap with the open short ends tucked 1.5 inches inside the top edge of the bag. Place the inner edges of each strap end approximately 3.5 inches from the side seams.
Step 7Sew each strap end securely using a square stitch pattern. Work around the perimeter of the strap end, then cross-stitch through the center for extra reinforcement. This bag will carry weight, so do not skimp on the stitching here.
Step 8Repeat for the second strap on the back panel.
Step 9Weave in all ends.
Finishing
- Weave in ends from the panels, straps, and each individual applique before assembly.
- Seam the two body panels together, then attach the straps to the top edges.
- Pin and sew the lavender appliques and leaves onto the front panel, then block the finished bag flat.
Why it works
The two Main Body Panels are worked as flat single crochet rectangles, which keeps the fabric dense enough to hold a bag's shape without curling.
The Adjustment Round decreases the stitch count evenly before the Scallop Round so the shells land in a consistent repeat all the way around.
Appliques are worked as separate small rounds with a finer hook, which lets the lavender stalks sit slightly raised above the flatter body fabric.
What it becomes
- An everyday market or grocery tote, sturdy enough for the walk home with cotton yarn's natural body.
- A project bag for a smaller work in progress, roomy given the panel dimensions.
- A casual outing bag paired with plain cotton or linen clothing, since the appliques carry the color.
Original pattern: https://crochetwithmia.com/lavender-fields-crochet-tote-free-pattern/
FAQ
Can I use a different yarn than cotton?
The pattern is written for worsted weight cotton, which gives the panels structure and holds the bag's shape. A different fiber would change drape and stiffness, so I'd swatch first.
Do both hooks matter, or can I use just one?
The G-6 hook is for the body and straps; the F-5 is optional but recommended for the appliques. The smaller hook keeps the stalks tighter and more defined against the looser body fabric.
Why is the Center Stalk applique taller than the others?
It's worked with an extra round to stand above the four Standard Stalks. That height difference is what keeps the front panel from reading as too uniform.
What if my panel comes out a different width?
The notes allow some leeway in finished panel width, so a little variation is fine. Just make sure both panels match each other in row count before seaming.