
Free Pattern
Step-by-Step
Crochet
AmigurumiLittle owl keychain: a small amigurumi crochet pattern
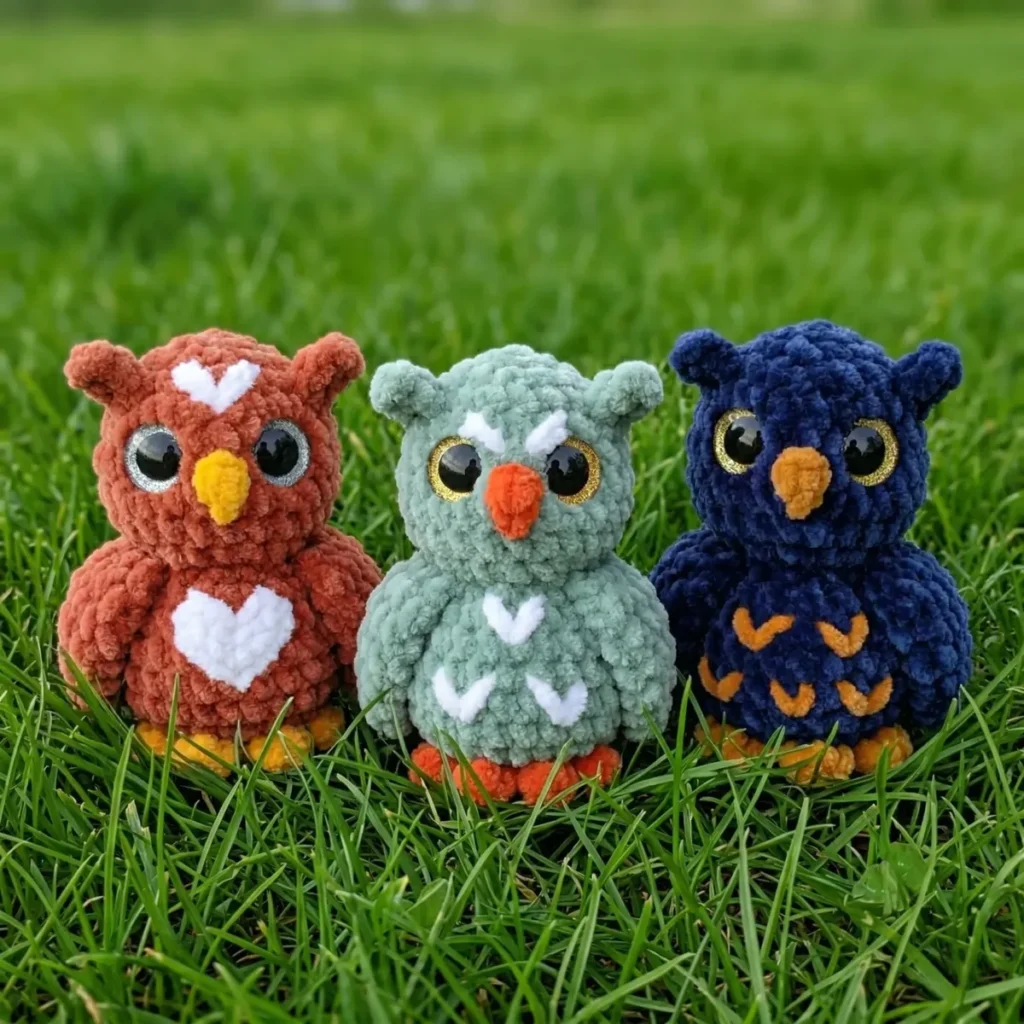
A tiny crochet owl keychain worked in the round, with flat wings and knotted feet.
- Level
- Intermediate
- Time
- 4-6 hours
- Hook
- 14 mm
- Yarn
- Fingering
Pattern highlights
- Start the body and head as one continuous spiral, working both sides of a short foundation chain.
- Keep a stitch marker on the side of the body throughout, shifting it as the shaping asks.
- Increase and decrease your way through the rounds, shaping belly, head, and face in one unbroken piece.
- Set the safety eyes before you close the top, since they need access from inside the head.
- Work each wing flat in turning rows, shaping with increases then closing with decreases.
- Make the feet from a folded chain with two toes each, knotted rather than seamed.
- Sew feet to the base of the body and wings into the head-to-body seam before attaching the clip.
About This Pattern
Small charms earn their keep in a collection. They travel — bag clip, keyring, gift for someone who won't sit still for a full-size toy. This owl belongs in that shelf of quick makes, the ones you reach for when a project needs to finish in a weekend, not a month.
The body and head come from one continuous piece, no seam at the neck. The wings work flat in turning rows and get sewn on after. The feet are barely a swatch — a folded chain with two toes and a knot, no sewing required to shape them.
What comes off the hook is a rounded, fluffy little owl, eyes forward, wings tucked at the sides. Contrast color feet and beak give it a face before the embroidery even starts. Clip a cord to it and it's ready to ride along on a bag or a keyring.
Worth knowing
I like a pattern that teaches its whole shape in one round. Here it's the Rnd 1 foundation chain worked both sides — inc, sc, inc at each end — so the oval base for the body appears before I've thought about it. The spiral construction means no seam up the belly, and the stitch marker becomes a quiet companion, not a chore. Wings in flat rows are a nice contrast to the spiral body, a chance to feel the fabric turn in my hand. The feet are almost a joke — a chain, a slip stitch, a knot — and yet they read as toes the moment I trim the ends. Small parts, real technique variety, finished object in an evening or two.
Common mistakes
- Losing track of the round start The body is worked in a continuous spiral with no join, so a wandering stitch marker is the main risk. Check its position after every round through Rnds 1–10, not just at the end.
- Forgetting to reposition the marker The pattern calls for shifting the marker to keep it on the side of the body. Skip this and your decreases will land off-center at the belly. A locking stitch marker holds its place better than a loop marker for this reason.
- Setting eyes too late Safety eyes need to go in while the head is still open enough to reach the backs — between Rnds 12–13, spaced 5 sc apart. Place them before you're deep into the final decrease rounds.
- Sewing wings without pinning first Pin both wings symmetrically before stitching, leaving about a 3 sc gap between them at both the front and back. One crooked wing throws off the whole face.
- Leaving foot knots loose The feet close with knots, not seams, so remove any fuzz from the chenille yarn ends and tie several firm knots before trimming short. A single knot can work loose with handling.
- Over-stuffing around Rnd 14 Fill the lower body after Rnd 8 and the head after Rnd 15, using small pieces of fiberfill packed gently but firmly — over-stuffing can distort the eyebrow detail worked in Rnd 14.


Intermediate
Progress Tracker
0 of 0 rounds
Tap a round to tick it off — your place is saved on this device.
The kit
- Himalaya Dolphin Baby yarn (main color) — approx. 12g for body and wings
- Himalaya Dolphin Baby yarn (contrast color) — less than 2g for feet and beak
- Himalaya Koala yarn — small amount for embroidery and detailing
- 14mm safety eyes — 1 pair
- Polyester fiberfill stuffing
- Sewing needle (for attaching feet and wings)
- Tapestry needle with large eye (for embroidery)
- Scissors
- 4mm crochet hook (or size comfortable for you)
- Keychain clip with cord — to finish as a keychain charm
Body & Head (worked as one piece)
Chain 6. Starting from the 2nd chain from the hook, work along both sides of the foundation chain:
Round 1Inc, 3 sc, 4 sc in last ch; working along opposite side: 3 sc, inc. (14)
Round 22 inc, 3 sc, 4 inc, 3 sc, 2 inc. (22)
Rounds 3–422 sc. (2 rounds) Keep your stitch marker on the side of the body at all times. Reposition with shift stitches as needed.
Round 514 sc, 2 dec, 4 sc. (20) Decreases fall at the center of the belly.
Round 620 sc. (20)
Round 7(2 sc, dec) × 5. (15)
Round 8(3 sc, dec) × 3. (12) Use a shift stitch if needed — marker must remain on the side.Stuff the lower section firmly at this point and shape the sides.
Round 9(Inc, 1 sc) × 6. (18)
Round 10Inc, 7 sc, 2 inc, 7 sc, inc. (22) Increases fall on the sides — watch your marker.
Rounds 11–1222 sc. (2 rounds)
Round 13Dec, 5 sc, 3 dec, 5 sc, 2 dec. (16)The next round forms the eyebrows.
Round 141 sc, ch 3; working back from 2nd ch from hook: 3 sc (3rd sc into base of ch), 6 sc across, ch 3; working back: 3 sc (3rd sc into base of ch), 9 sc. (16)Install safety eyes between Rnds 12–13, spaced 5 sc apart (leg to leg of each eye). Work those chain-3 eyebrows slightly looser than usual so they don't curl or pucker, and press them flat with your fingers (or a damp cloth) after completing the round.
Round 15Dec, 4 sc, dec, 8 sc. (14) Work decreases at the first and last stitches of each ear bump.Stuff the head at this point, shaping the cheeks gently.
Round 16Work 8 dec until the opening is fully closed. Pull tight, secure yarn, and weave in the end. (0)
Wings (make 2)
Chain 4. Starting from the 2nd chain from the hook, work in flat turning rows. All decreases are worked through both loops.
Row 13 inc, ch 1, turn. (6)
Rows 2–36 sc, ch 1, turn. (2 rows)
Row 4Inc, 4 sc, inc, ch 1, turn. (8)
Row 54 dec, ch 1, turn. (4)
Row 62 dec. (2)
Row 7Dec, ch 1. Pull ch tightly — do not cut yarn. To hide yarn ends in the wings: lay the working yarn alongside the starting tail along the nearest edge, leaving about 10cm. Thread this yarn onto a needle and sew a running stitch along that same edge back to the loop of the starting tail. Smooth the wing flat — it should not be gathered. Trim, leaving a small tail; remove any fuzz, tie several knots, and trim the excess.
Feet (make 2)
Chain 4. Starting from the 2nd chain from the hook, work back along the chain: 2 sc, sl st into last ch (first toe). Immediately chain 3 more; starting from the 2nd chain from the hook: 2 sc, sl st into the beginning of the work (second toe).
Remove any fuzz from the yarn ends, tie several knots, and trim the excess.
Assembly
Step 1Attaching the Feet: Mark the placement of the feet at the beginning and end of Round 1 of the body. Pin symmetrically before sewing. Sew the feet in place following the direction of the toes (refer to your layout pins for correct angle).
Step 2Attaching the Wings: Pin the wings symmetrically on both sides of the body. The gap between the wings should be approximately 3 sc at both the front and back. Sew each wing into the seam between the head and body sections, stitching along the top edge of each wing. Secure yarn, cut, and weave in the end.
Step 3Embroidering the Beak: Between Rounds 12 and 13 (the same rows where the safety eyes were inserted), mark the center stitch — this is the top of the beak. Count 2 rows down from there and mark the center — this is the bottom point of the beak. Embroider a triangle using 5–7 stitches in the contrast color yarn.
Step 4Embroidering Decorative Chevrons: Using the Koala yarn and tapestry needle, embroider small V-shaped chevron marks on the body and head to your taste, adding texture and personality.
Step 5Finishing: Attach the keychain cord and clip to the top of the owl’s head to complete the charm.
Finishing
- Stuff the body and head as you close the final rounds, firming the shape before it's sealed.
- Weave in all ends, including the two loose yarn tails from each folded-chain foot.
- Pin feet and wings symmetrically, then sew them in place before clipping on the keychain cord.
- Chenille and velvet-style yarns can be tricky to weave in. Rather than threading the fuzzy end through a needle, tie multiple firm knots close to the fabric, trim short, and tuck the remaining nub inside the piece.
Why it works
Round 1 works both sides of the same foundation chain, which is why the increases sit at each end — it builds an oval, not a circle.
The body and head are worked in one continuous spiral with no joins, so the stitch marker is the only way to track where a round starts.
Wings are worked flat in turning rows instead of in the round, since a small flat shape sewn onto the body needs a straight edge, not a tube.
Gauge is not critical for this project, but consistent tension ensures a neat finish. Aim for a fabric tight enough that stuffing does not show through.
This pattern uses US crochet terminology throughout.
What it becomes
- Clip it to a backpack zipper alongside other small amigurumi charms for a collected, well-traveled look.
- Hang it from a keyring with your house or car keys as a small, tactile marker.
- Give it as a stocking-stuffer-sized gift paired with a handwritten note, no wrapping paper required.
Original pattern: https://amigurumicorner.com/crochet-owl-keychain/
FAQ
What skill level is required for this owl keychain pattern?
This pattern is suitable for confident beginners who are comfortable with single crochet, increases, and decreases. The eyebrow detail in Round 14 and the shift stitches require a little extra attention, but the instructions walk you through each step clearly. Most beginners with a few small projects under their belt will find this achievable in one or two sessions.
Can I substitute the Himalaya Dolphin Baby yarn with another brand?
Yes — any chenille or velvet-style yarn of a similar weight will work well. Look for a yarn labeled as bulky chenille or velvet (commonly size 5 or 6) to match the original gauge closely. Brands like Bernat Blanket, Feels Like Butta, or similar soft chenille options are all good substitutes. Avoid very stiff or smooth yarns, as the fluffy texture is key to the owl's charm.
How long does this owl keychain take to crochet?
Most crocheters complete this owl in approximately 1.5 to 3 hours depending on experience level. The body and head take the longest, while the wings and feet are very quick. Assembly and embroidery add another 20–30 minutes. It makes an excellent one-evening project.