Free Pattern
Step-by-Step
Crochet
BlanketsOcean waves ombre granny square blanket crochet pattern
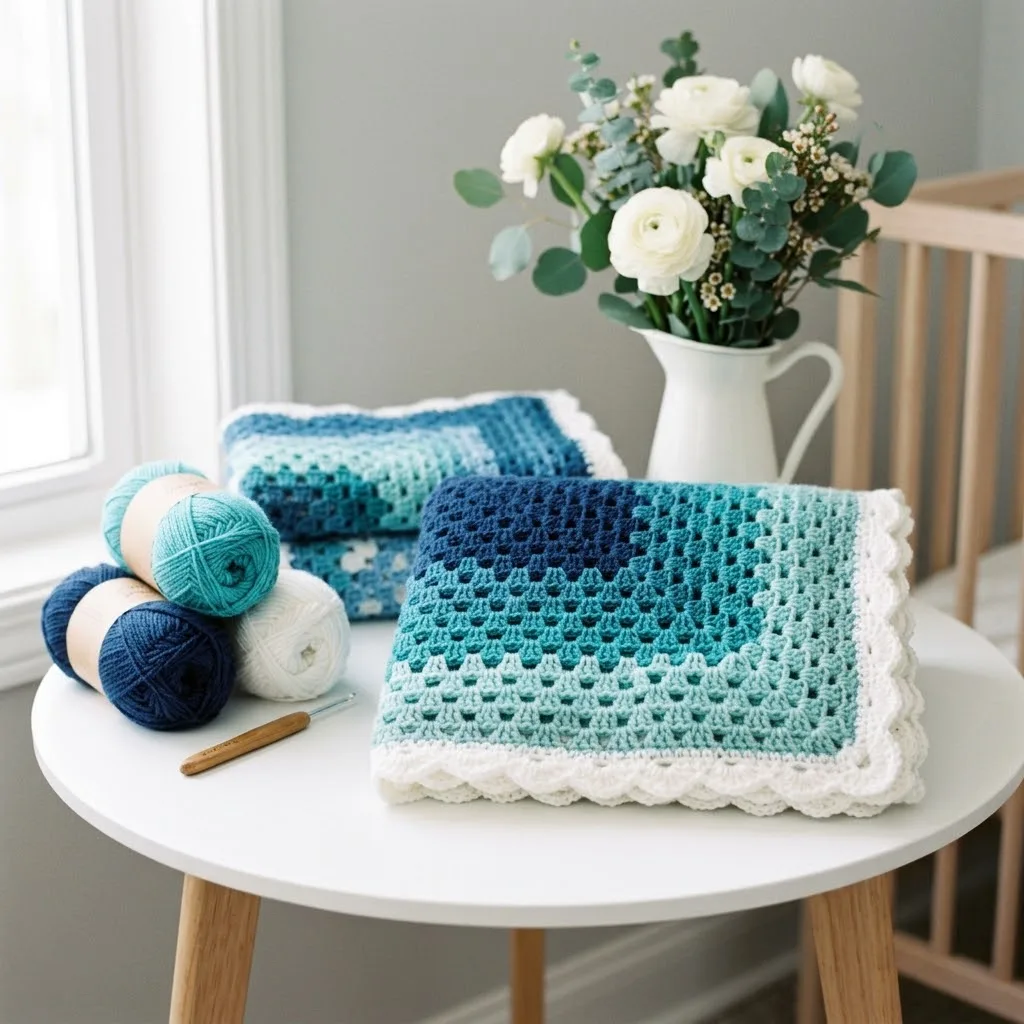
A five-color ombre granny square blanket worked in rounds from navy to white.
- Level
- Intermediate
- Time
- 4-6 hours
- Hook
- 5.0 mm
- Yarn
- Worsted
Pattern highlights
- Start with a small ring and work the first round of clusters into it to set the four corners.
- Work each following round by placing a corner cluster in every ch-2 space from the round before.
- Fill the sides between corners with 3-dc clusters separated by chain spaces, growing the square outward.
- Join each round with a slip stitch to the top of the starting chain before beginning the next.
- Keep working corner and side rounds until the square reaches its final size at round 29.
About This Pattern
A granny square blanket earns its place in any notebook of favorites. This one leans on a five-color gradient, navy sliding into white, and that alone sets it apart from the single-color versions I usually file under 'basics'. It is the kind of piece that teaches patience as much as stitches.
The technique here is the classic corner-increase square worked in joined rounds, dc clusters built around ch-2 corner spaces and ch-1 side spaces. Nothing exotic, but the ombre forces we to think about yardage per color before casting on. Twenty-nine rounds is a long commitment to one shape.
The finished object is a single large square, not strips joined later. That changes how I think about blocking and about where I set it down to grow. By round 29 the color shift should read clearly from center to edge, which is really the whole point.
Worth knowing
I like a pattern that turns a repeat into a slow reveal, and that is what the ombre does here. Every few rounds the color shifts, so the square keeps giving we a reason to keep going. The construction itself stays simple: ch-2 corners, ch-1 sides, 3-dc clusters, round after round. That simplicity is useful, because it leaves attention free for the color sequence instead of the stitch count. Twenty-nine rounds also means the fabric has real heft by the end, not a token square. I appreciate that the corners stay sharp throughout rather than drifting, since every round reads off the same ch-2 spaces set up in round 1.
Common mistakes
- Losing track of the corner spaces Mark each ch-2 corner space with a stitch marker before starting a new round. It saves you from hunting for it after a color change.
- Joining into the wrong stitch Always slip stitch to the top of the starting ch-3, not into a random dc nearby. A misplaced join shifts every round after it.
- Running short on the lightest color Check the yardage for Color E before the final rounds, since the outer rounds use the most yarn per round.
- Skipping the ch-1 between clusters Keep the ch-1 spacer between every 3-dc side cluster. Without it the sides pull tight and the square won't lie flat.

Intermediate
Progress Tracker
0 of 0 rounds
Tap a round to tick it off — your place is saved on this device.
The kit
- Yarn
Worsted weight yarn (weight category 4) in five colors
- Color A (Navy): approximately 120 yards / 110 meters
- Color B (Teal): approximately 150 yards / 137 meters
- Color C (Aqua): approximately 180 yards / 165 meters
- Color D (Mint): approximately 200 yards / 183 meters
- Color E (White): approximately 220 yards / 201 meters
Total yarn needed
- approximately 870 yards / 796 meters
- Suggested yarn brands: Lion Brand Pound of Love, Caron Simply Soft, Bernat Softee Baby, or any worsted weight yarn with good stitch definition.
- Hook
- Size H/8 (5.0 mm) crochet hook
- Adjust your hook size up or down if needed to achieve gauge. A slightly larger hook will create a lacier, more open fabric. A smaller hook will make the blanket denser and smaller.
- Notions
- Yarn needle for weaving in ends
- Scissors
- Stitch markers (optional but helpful for marking corners)
- Measuring tape
- Gauge
- First 4 rounds = approximately 4 inches corner to corner
- Gauge is less critical for blankets than for garments. If your gauge is slightly off, your blanket will simply be a bit larger or smaller. Just use consistent tension throughout.
Main Pattern
Round 1Ch 3 (counts as first dc here and throughout), 2 dc into ring, ch 2, *3 dc into ring, ch 2* repeat 3 more times. Sl st to top of ch-3 to join. (12 dc, 4 ch-2 spaces)
You should now have a small square shape with 4 corners (the ch-2 spaces) and 4 sides (the 3-dc clusters).
Round 2Sl st into next 2 dc and into corner ch-2 space. Ch 3, 2 dc in same ch-2 space, ch 2, 3 dc in same ch-2 space (first corner made), ch 1, *(3 dc, ch 2, 3 dc) in next corner ch-2 space, ch 1* repeat around. Sl st to top of ch-3 to join. (24 dc, 4 corner ch-2 spaces, 4 ch-1 spaces)
Round 3Sl st to corner ch-2 space. Ch 3, 2 dc in same space, ch 2, 3 dc in same space (corner), ch 1, 3 dc in next ch-1 space, ch 1, *(3 dc, ch 2, 3 dc) in corner, ch 1, 3 dc in next ch-1 space, ch 1* repeat around. Sl st to join. (36 dc, 4 corners, 8 ch-1 spaces)
Round 4Work corner in each corner ch-2 space. Work 3 dc in each ch-1 space along the sides with ch 1 between each cluster. Sl st to join. (48 dc, 4 corners, 12 ch-1 spaces)
Round 5Continue pattern. Corner in each corner. 3-dc clusters in each ch-1 space with ch 1 between. Sl st to join. Change to Color B (Teal) on final sl st. (60 dc, 4 corners, 16 ch-1 spaces)Cut Color A, leaving a 6-inch tail for weaving in.
Color B Section (Teal)
Round 6through 10: Continue the established pattern. Each round adds one more 3-dc cluster per side.
Round 672 dc, 20 ch-1 spaces
Round 784 dc, 24 ch-1 spaces
Round 896 dc, 28 ch-1 spaces
Round 9108 dc, 32 ch-1 spaces
Round 10120 dc, 36 ch-1 spaces Change to Color C (Aqua) on the final slip stitch of Round 10.
Color C Section (Aqua)
Rounds 11 through 16: Continue pattern.
Round 11132 dc, 40 ch-1 spaces
Round 12144 dc, 44 ch-1 spaces
Round 13156 dc, 48 ch-1 spaces
Round 14168 dc, 52 ch-1 spaces
Round 15180 dc, 56 ch-1 spaces
Round 16192 dc, 60 ch-1 spaces Change to Color D (Mint). Color D Section (Mint)Rounds 17 through 23: Continue pattern.
Round 17204 dc, 64 ch-1 spaces
Round 18216 dc, 68 ch-1 spaces
Round 19228 dc, 72 ch-1 spaces
Round 20240 dc, 76 ch-1 spaces
Round 21252 dc, 80 ch-1 spaces
Round 22264 dc, 84 ch-1 spaces
Round 23276 dc, 88 ch-1 spaces Change to Color E (White). Color E and Scallop Border (White)Rounds 24 through 26: Continue granny pattern for 3 more rounds.
Round 24288 dc, 92 ch-1 spaces
Round 25300 dc, 96 ch-1 spaces
Round 26312 dc, 100 ch-1 spaces Scallop Border
Round 27(Scallop Round): Ch 1. Work 1 sc (single crochet) in same st. *Skip 2 sts, work 5 dc in next st or space (shell made), skip 2 sts, 1 sc in next st.* Repeat around entire blanket, adjusting slightly at corners to keep the scallops even. At each corner ch-2 space, work (2 dc, ch 2, 2 dc) to maintain the corner shape. Sl st to first sc to join.
Round 28Ch 1, sc in each st around, working 3 sc in each corner ch-2 space. Sl st to join. Fasten off.
Finishing Your Blanket
Weave in all ends using your yarn needle. Work each tail through several stitches on the wrong side, then double back in the opposite direction. This prevents ends from working loose during washing.
Block your blanket for a professional finish. Wet blocking works beautifully for this project. Soak the blanket in lukewarm water for 15 minutes, gently squeeze out excess water (don’t wring), lay flat on blocking mats or towels, and pin the corners to square them up. Let dry completely.
Steam blocking also works well if you’re short on time. Hold your steam iron a few inches above the fabric and let the steam relax the fibers without touching the iron to the yarn.
Customization Ideas
Make it bigger: Simply continue the granny pattern for additional rounds before starting the border. Each round adds approximately 1 inch to the overall size.
Change the colorway: Try sunset shades (yellow to orange to red to burgundy), rainbow progression, or monochromatic tones in your favorite color family.
Finishing
- Weave in every color-change end along the back of the work before the final round is finished.
- Block the square flat and pin the corners square, since 29 rounds of dc can curl at the edges.
- Check the corner ch-2 spaces lie flat and even once blocked, since that is where shape shows first.
Why it works
Every corner traces back to the four ch-2 spaces made in round 1, so the square grows from a fixed set of anchor points rather than new corners appearing later.
The piece is worked in joined rounds, not flat rows, which is why each round closes with a slip stitch to the top of the starting chain before the next one begins.
Side length increases each round because a new ch-1 space and 3-dc cluster get added between corners, which is the standard way a granny square grows without distorting its shape.
What it becomes
- A lap blanket for the couch, paired with a plain throw pillow so the ombre stays the focus.
- A stroller or crib blanket in a nursery done in blues, since the navy-to-white gradient reads as water without being literal.
- A gift blanket for someone who likes color gradients, paired with a simple wooden gift box rather than wrapping paper.
Original pattern: https://bunnypatterns.com/ocean-waves-ombre-granny-square-blanket-free-crochet-pattern/
FAQ
Can I use fewer than five colors?
Yes, though the ombre effect depends on gradual shifts. Fewer colors means more rounds per color, which will look like wider bands instead of a smooth gradient.
Why does the pattern call for joined rounds instead of rows?
Granny squares are built outward from a center ring, so each round has to close before the next begins. Working flat rows would break the corner structure.
Is gauge important for this blanket?
Not critically. The pattern notes that gauge is less important for blankets than garments, so a slightly different hook size just changes the final size.
How do I keep the corners from going wavy?
Make sure every corner cluster lands in the ch-2 space from the previous round, not the ch-1 side spaces. Blocking at the end also helps flatten any minor unevenness.