
Free Pattern
Step-by-Step
Crochet
AmigurumiPlush velvet amigurumi goose crochet pattern
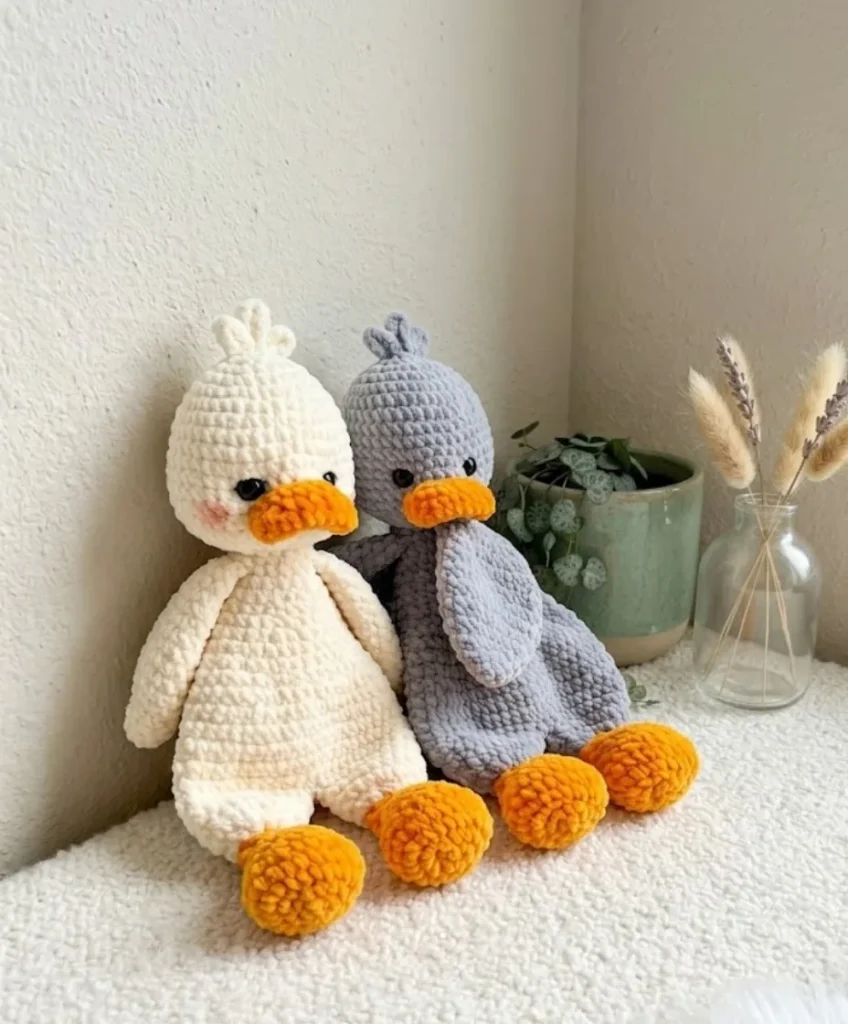
A velvet-yarn amigurumi goose with topknot, wings, and orange beak and legs.
- Level
- Intermediate
- Time
- 4-6 hours
- Hook
- 4.5 mm
- Yarn
- Bulky
Pattern highlights
- Start with the head, working single crochet in a continuous spiral in the main color.
- Chain a small foundation row for the beak and build it up in the contrast orange.
- Work the topknot as a quick accent piece for the top of the head.
- Crochet two wings using half double crochet after an initial single crochet increase round.
- Work a small tail in single crochet in the main color, lightly stuff it, and flatten it closed to sew on later.
- Build the legs and body together as one continuous piece in half double crochet.
- Stuff the body firmly before closing, then attach the head with a neat whipstitch seam.
- Set the safety eyes and pull the indentation between them for the final expression.
About This Pattern
Every collector's shelf needs a bird eventually. This goose earns its spot with a topknot and a beak worked as a separate flat piece, which is more engineering than most amigurumi bother with. It reads as a farmyard companion, not a generic round blob with a face glued on.
The build mixes two structures: continuous spiral rounds for the head, beak, tail, and legs, and half double crochet for the wings and body. That split matters. Spiral parts stay seamless and curved; the hdc sections give a firmer, more upright fabric for the goose to actually stand on.
Finished, it is a plush white or gray bird with an orange beak and legs, two wings sewn on, and safety eyes set with a pulled-in dent for expression. It sits rather than sprawls. Velvet yarn gives it a soft, almost fabric-like finish, not the usual fuzzy acrylic look.
Common mistakes
- Losing count in the spiral rounds Place a stitch marker at the start of each round on the head, beak, tail, and legs since there is no join to mark the spot for you.
- Treating the beak like a round amigurumi part Remember it starts as a flat chain with corner increases on both sides, not a magic ring, so the shaping logic is different.
- Mixing up stitch heights on the wings Check you have moved from single crochet in the earlier rounds to half double crochet as the pattern calls for, since the taller stitch changes the drape.
- Underfilling the body before closing Stuff firmly through the top opening before you attach the head, since it is much harder to add fiberfill after the seam is sewn.
- Rushing the eye pull Pass the yarn back and forth between the eye posts slowly and pull gradually until the indentation looks right, rather than yanking it tight in one go.


Intermediate
Progress Tracker
0 of 0 rounds
Tap a round to tick it off — your place is saved on this device.
The kit
Yarn
- Himalaya Dolphin Baby (bulky plush/velvet weight) — Color 80308 (main color: white or gray) and Color 80316 (contrast color: orange, for beak and legs)
Hook
- US size 7 / 4.5 mm
Safety eyes
- 14 mm, 1 pair
Stuffing
- Polyfill / fiberfill
- Stitch markers
- Yarn needle / tapestry needle
- Scissors
Head
(worked in main color)
Step by step: (worked in main color).
Round 16 sc in MR. (6)
Round 2inc in each st around. (12)Step by step: sc in each st around. (12).
Round 31 sc, inc repeat 6 times. (18)
Round 42 sc, inc repeat 6 times. (24)
Round 53 sc, inc repeat 6 times. (30)
Round 64 sc, inc repeat 6 times. (36)
Round 75 sc, inc repeat 6 times. (42)
Rounds 8–10sc in each st around. (42)
Round 116 sc, inc repeat 6 times. (48)
Rounds 12–15sc in each st around. (48)
Round 166 sc, dec repeat 6 times. (42)
Round 175 sc, dec repeat 6 times. (36)Insert safety eyes now: place them between Rounds 12 and 13, spaced 8 stitches apart. Stuff the head firmly before continuing.
Round 182 sc, dec repeat 9 times. (27)
Round 191 sc, dec repeat 9 times. (18)
Round 209 dec. (9)Pull the opening closed and fasten off, weaving the tail through to secure.
Beak
(worked in orange contrast color)
Round 1Foundation chain of 9 ch.
Round 27 sc along one side, 4 sc in last ch (corner), 6 sc along other side, 4 sc in first ch (corner). (21)
Round 3inc, 7 sc, inc, 1 sc, inc, 8 sc, inc, 1 sc. (25)
Round 425 sc. (25)Fasten off and leave a long yarn tail for sewing. Sew the beak on after completing the eye-pull shaping on the assembled head.
Topknot
(worked in main color)
The topknot creates three looped tufts at the crown of the head — that little wisp that makes the goose look so full of personality.
Insert your hook into the stitch adjacent to the MR at the crown of the head. Chain 8. Sl st into the MR.
Chain 10. Sl st into the next stitch.
Chain 8. Fasten off.
Weave all ends securely inside the head. Embroider eyelashes and add blush if desired after the goose is fully assembled.
Wings (make 2)
(worked in main color)
Round 16 sc in MR. (6)
Round 2inc in each st around. (12)
Round 312 hdc. (12)
Round 41 hdc, inc repeat 6 times. (18)
Round 52 hdc, inc repeat 6 times. (24)
Round 63 hdc, inc repeat 6 times. (30)
Rounds 7–9hdc in each st around. (30)
Round 103 hdc, dec repeat 6 times. (24)
Round 112 hdc, dec repeat 6 times. (18)
Round 121 hdc, dec repeat 6 times. (12)
Round 1312 hdc. (12)
Fold the wing flat and, working through both layers, work 3 dec across to close. Fasten off and leave a long yarn tail for sewing. If you plan to attach the wings by crocheting them into the body, hide the yarn tail inside the wing instead.
Tail
(worked in main color)
Round 16 sc in MR. (6)
Round 2inc in each st around. (12)
Rounds 3–4sc in each st around. (12)
Round 51 sc, inc repeat 6 times. (18)Lightly stuff the tail. Fold flat and, working through both layers, work 9 sc across. Fasten off and leave a long yarn tail for sewing.
Legs and Body
(legs worked in orange contrast color; body worked in main color)
Work both legs identically through Round 31.
Round 1Foundation chain of 9 ch.
Round 27 hdc along one side, 4 hdc in last ch (corner), 6 hdc along other side, 4 hdc in first ch (corner). (21)
Round 3inc, 7 hdc, inc, 1 hdc, inc, 8 hdc, inc, 1 hdc. (25)
Round 425 hdc. (25)
Round 5dec, 8 hdc, 2 dec, 9 hdc, dec. (21)
Round 61 hdc, dec repeat 7 times. (14)
Round 7dec, 4 hdc, 2 dec, 2 hdc, dec. (10)
Optionally lightly stuff the foot at this point, working fiberfill down into the toe with a pencil or chopstick.
Rounds 8–28hdc in each st around. (10) — 21 rounds total.
Round 29inc in each st around. (20)
Round 308 hdc, 2 inc repeat 2 times. (24)
Round 3124 hdc. (24)On the first leg , fasten off with a sl st and leave a tail. On the second leg , do not fasten off — continue directly into the body.
Body (switch to main color here if working legs in contrast color)
Round 3224 hdc across the first leg, 1 hdc in sl st joining point, 24 hdc across the second leg, 1 hdc in joining point. (50)
Round 33inc, 11 hdc, inc, 12 hdc, inc, 11 hdc, inc, 12 hdc. (54) Increases fall at the sides, front center, and back center.
Round 348 hdc, inc repeat 6 times. (60)
Rounds 35–36hdc in each st around. (60)
Round 378 hdc, dec repeat 6 times. (54)
Round 387 hdc, dec repeat 6 times. (48)
Round 396 hdc, dec repeat 6 times. (42)
Rounds 40–41hdc in each st around. (42)
Round 425 hdc, dec repeat 6 times. (36)
Round 434 hdc, dec repeat 6 times. (30)
Round 4430 hdc. (30)
Round 453 hdc, dec repeat 6 times. (24)
Round 462 hdc, dec repeat 6 times. (18)
On the next round, crochet the wings directly into the body so they sit squarely at each side. If you are sewing the wings on instead, work Rounds 47–48 without modification.
Rounds 47–48hdc in each st around. (18)Work sl sts as needed to position the yarn end at the center back. Fasten off and leave a tail for attaching the head.
Assembly
Step 1Stuff the body firmly through the top opening before attaching the head.
Step 2Attach the head to the top of the body, centering it carefully. Sew with a yarn needle using whipstitch, working through the outermost loops of both pieces. A thinner, smooth yarn in a matching tone gives a nearly invisible seam.
Step 3Complete the eye pull — the indentation between the safety eyes — using your preferred method, passing yarn back and forth between the eye posts and pulling gently until you get the dimension you want.
Step 4Sew the beak onto the head after the eye pull, centering it beneath the eyes.
Step 5Attach the wings to either side of the body at Rounds 46–47 using the long yarn tails and whipstitch. Pin them first and stand the goose upright to check symmetry before sewing.
Step 6Sew the tail to the lower back of the body at the center back seam.
Step 7Add the topknot chains to the crown of the head and weave all ends inside.
Step 8Embroider eyelashes and add blush if desired.
Step 9Weave in all remaining ends securely.
Finishing
- Weave in any loose ends from color changes between the main and contrast yarns before assembly.
- Stuff the body firmly through the top opening so no fiberfill shows through the plush fabric.
- Attach the head with whipstitch through outermost loops, then set the eyes and complete the eye pull.
Why it works
The head starts with a magic ring and doubles its stitch count every round early on, which is the standard shaping for a rounded amigurumi head before it levels off.
The beak begins as a flat foundation chain worked around both sides with corner increases, which is why it comes out as a flat, pointed shape rather than a ball.
The wings and body are worked in half double crochet rather than single crochet, giving those parts a slightly looser, firmer fabric suited to a flatter or more structural shape.
Gauge is not critical for this project, but your fabric should be firm enough that no stuffing shows through.
This pattern is written in US crochet terminology.
What it becomes
- A shelf piece for a small collection of amigurumi birds, next to other plush farm animals.
- A soft toy for a child's room, paired with other Himalaya Dolphin Baby velvet makes for a matching set.
- A gift for a fellow collector who already keeps a notebook of finished amigurumi patterns.
Original pattern: https://amigurumiarts.com/amigurumi-crochet-goose-pattern-free-pattern/
FAQ
Can I use a different yarn instead of Himalaya Dolphin Baby?
Any bulky plush or velvet-weight yarn should work with a US size 7 / 4.5 mm hook. Just keep your fabric firm enough that stuffing does not show through.
Why are the wings and body worked differently from the head?
The head, beak, tail, and legs are worked in a continuous spiral with no join, while the wings and body use half double crochet throughout. That combination gives a firmer stance and a smoother rounded head.
Do I need to be experienced with amigurumi to make this?
Some amigurumi experience helps, especially with the beak's flat construction and the eye pull step. If you have made a spiral-based animal before, this pattern is a reasonable next step.
What size are the safety eyes I need?
The pattern calls for a 14 mm pair of safety eyes. Have your yarn needle ready at the same stage since you will use it right after for the eye pull.