Free Pattern
Step-by-Step
Crochet
Bags & TotesRibbon Yarn Tote Bag With a Sweet Bow Accent
A ribbon yarn tote with a fluffy bow accent, built in rounds with a flat band and handles.
- Level
- Intermediate
- Time
- 4-6 hours
- Hook
- 4.5 mm
- Yarn
- Bulky
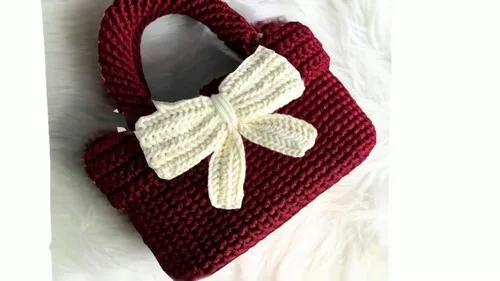
Pattern highlights
- Begin the base with rounds of single crochet, increasing steadily so it lies flat and round.
- Keep working in rounds until the tote body reaches the height you want.
- Chain to match the top opening, then work the band flat in rows of single crochet.
- Crochet two handles from chained rounds of single crochet, stopping at your preferred length.
- Make the bow separately with the fluffier yarn and smaller hook, then sew its pieces together.
- Attach the band with backward single crochet, then sew on the bow and both handles.
About This Pattern
I keep a running list of bag patterns that feel like a proper project, not just an afternoon fidget. This tote lands there. It starts humble, a small round base worked in single crochet, then grows into something with real presence. The bow gives it away as a piece built for looking, not just carrying. I like that the collection needed one entry with a soft, fluffy accent instead of another plain stripe. It earns its spot by combining a sturdy body with a detail that has almost no practical use at all.
What comes out is a structured little tote with a ribbon-yarn body and a soft bow sitting at the center of its band. The handles match the body, chained and crocheted in rounds until they reach a comfortable length. The bow's texture yarn stands apart from the smooth ribbon yarn everywhere else, so it reads as decoration, not accident. It's compact, based on a small round or oval base, so it suits errands more than groceries.
Common mistakes
- Losing the base's flat shape Skipping an increase during the first two rounds makes the base cup instead of lying flat. Count the 2 sc repeats carefully around each round.
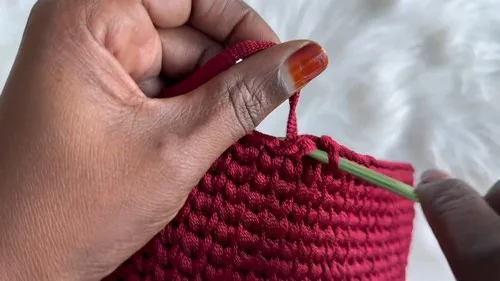
- Mixing up top loops and middle It's easy to default to the top loop out of habit once the sides start. Check the stitch placement note before each round of the body.
- Guessing the band's chain length A chain that doesn't match the counted stitches around the top leaves the band too tight or loose. Count the opening's stitches before chaining.
- Handles ending up mismatched Working the two handles at different times can leave them uneven in length. Crochet them back to back and compare often.
- Bow pieces sewn off-center Sewing the short and long bow pieces together without checking alignment skews the finished shape. Pin them at the center before stitching.
Intermediate
Progress Tracker
0 of 0 rounds
Tap a round to tick it off — your place is saved on this device.
The kit
- Base (approx. 6.5 inches round or oval)
- 4.5 mm crochet hook
- Ribbon yarn
- Scissors
- White or off-white yarn for the bow
- Fluff stuff yarn (or similar texture yarn)
- 3.75 mm crochet hook for bow
Base of the Bag
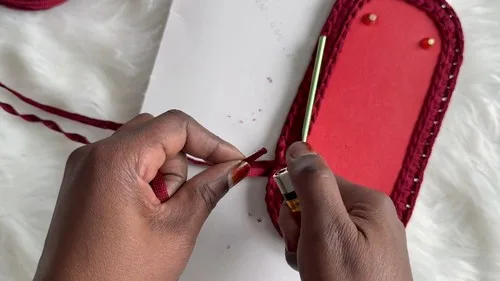
Slip stitch around any holes using the same yarn to seal them.
For next rounds, crochet into the middle of the stitches rather than the top loops.
Continue crocheting in rounds until the tote reaches your desired height.
Round 1Single crochet around the base; 1 single crochet (sc), then 2 sc in the same hole; repeat around.
Round 2Continue with the same pattern as Round 1 using single crochets.
Band
Round 1Count the stitches around the top of the bag; chain the same number.
Round 2Work 6 rows of single crochet back and forth. (6 rows)
Handles
Make 2Repeat to make a second handle the same way.
Fasten off.
Round 1Chain 8; single crochet into each stitch, continue around; crochet into the loops and continue until you reach your preferred handle length.
Bow
Round 1Long Piece Chain 50; single crochet starting from the second chain; work 7 rows in total (including the initial chain). (7 rows)
Round 2Short Piece Chain 25; repeat the same as above; make 4 rows total. (4 rows)
Assembly
Step 1Find the center front of the bag and use backwards single crochet to attach the band securely.
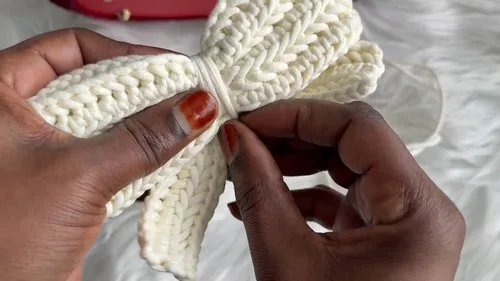
Step 2Place the short bow piece on top of the long one and sew together at the center to create the bow shape.
Step 3Sew the finished bow onto the center of the tote bag's band.
Step 4Position handles aligned with the bow's corners and sew them securely to the bag.
From the collection
Finishing
- Weave in ends on the base, band, and both handles before joining anything.
- Sew the two bow pieces together at the center first, so the shape holds before it goes on the bag.
- Attach the band with backward single crochet, then sew the bow and handles into their final positions.
Why it works
The base doubles its stitch count with 2 sc in the same hole across its first two rounds, which is what keeps it flat instead of cupping.
The band is worked flat in rows rather than in the round, so it can be seamed onto the bag as a separate accent strip using backward single crochet.
What it becomes
- A market or errand tote, compact enough for a wallet, keys, and a water bottle.
- A day bag for a bookstore trip or coffee run, paired with simple, solid-color outfits.
- A project bag for another crocheter, sized to carry a small skein or two.
FAQ
Can I substitute the ribbon yarn for something else?
The pattern specifies ribbon yarn for the body, and its flat structure gives the tote its particular drape. I'd test a swatch first if you swap it, since a rounder yarn will behave differently at the same hook size.
Why crochet into the middle of the stitch instead of the top loops?
It's a deliberate shift noted for the sides, and it changes the fabric's texture partway up the body. I haven't found the reasoning documented, so I just follow the instruction.
How do I know when the handles are long enough?
The pattern leaves handle length up to you, so hold the chain against your shoulder or hand as you go. Stop once it feels right and fasten off.
Do I need a second yarn for the bow?
Yes, the bow uses a fluffier texture yarn and a smaller hook, separate from the ribbon yarn body. That contrast is part of what makes the bow read as an accent.