
Free Pattern
Step-by-Step
Crochet
AmigurumiA round-eared plush bunny amigurumi pattern
A chenille bunny amigurumi with floppy ears, safety eyes, and a tiny embroidered mouth.
- Level
- Intermediate
- Time
- 4-6 hours
- Hook
- 4 mm
- Yarn
- Bulky
Pattern highlights
- Start with the small parts — crochet two ears and four limbs separately before touching the head.
- Set the ears aside unstuffed while the limbs wait, lightly stuffed, for later assembly.
- Build the head and body as one continuous piece, shaping it from a tight circle into a full round form.
- Insert the safety eyes partway through the head before it closes up around the stuffing.
- Sew the ears, limbs, tail, and mouth onto the finished body, then embroider the cheeks last.
About This Pattern
This bunny lands in the plush corner of my collection notebook. I keep a shelf for amigurumi that trade detail for softness. This one uses a single skein of cream chenille in bulky weight. That makes it an easy entry point into plush fiber work. It is small enough to finish in a weekend despite four limbs and a separate mouth piece.
The construction is straightforward spiral crochet throughout. No joining, no turning, just single crochet worked round after round. What sets it apart is the hook swap. A 4mm handles the body parts, a 2mm handles the mouth. Safety eyes go in directly, and the ears and tail get sewn on afterward with sturdy thread. It is a tidy lesson in mixing scales within one project.
Finished, it is a cream bunny with a round head and body. Two small ears, four short limbs, and a tail finish the shape. The 10mm safety eyes give it a fixed, slightly surprised expression. Pink cheeks soften that look, and the mouth adds the only flat piece. Stuffed firmly with polyester fiberfill, it sits upright on a shelf without support.
This pattern is written in US crochet terms, and gauge is not critical here — it only affects the finished size of the bunny, not how the pieces fit together. Stitch counts appear in parentheses at the end of each round. Safety eyes are inserted mid-round into the Head/Body, so place them before continuing, since they cannot be added once the piece is closed.
Common mistakes
- Stuffing the ears Leave the ears unstuffed as the pattern directs. Stuffing makes them sit stiff instead of soft against the head.
- Losing count in increase rounds Use a stitch marker at the start of each round on the head and body, since the increase pattern shifts every round.
- Splitting the chenille yarn Work with a slightly looser tension than usual. Chenille splits easily if you yank it through a tight stitch.
- Placing cheeks before the eyes Insert the safety eyes first, then embroider the cheeks below and beside them so the spacing reads correctly.


Intermediate
Progress Tracker
0 of 0 rounds
Tap a round to tick it off — your place is saved on this device.
The kit
Yarn
- Bulky (5) weight plush/chenille yarn in cream or off-white (approximately half a skein), plus small amounts of pink yarn for the cheeks and mouth, and black yarn (or embroidery floss) for the face details
Hook
- US G-6 (4mm) for the body pieces, and US B-1 (2mm) for the small mouth piece
Safety eyes
- 10mm, 1 pair
- Polyester fiberfill stuffing
- Stitch markers
- Yarn needle (tapestry needle) with a large eye
- Scissors
- Sturdy body-colored thread for sewing on the ears
- Small scrap of felt (optional, for reinforcing the backs of the safety eyes)
Ears (make 2)
Round 15 sc in MR. (5)
Rounds 2–4sc in each st around. (5)Sl st to close, fasten off, leaving a long tail for sewing.
Limbs (make 4)
Round 16 sc in MR. (6)
Rounds 2–3sc in each st around. (6)Sl st to close, fasten off, leaving a long tail for attaching.
Head/Body
Round 16 sc in MR. (6)
Round 2inc around. (12)
Round 3sc, inc repeat around. (18)
Round 42 sc, inc repeat around. (24)
Round 53 sc, inc repeat around. (30)
Round 64 sc, inc repeat around. (36)
Round 75 sc, inc repeat around. (42)
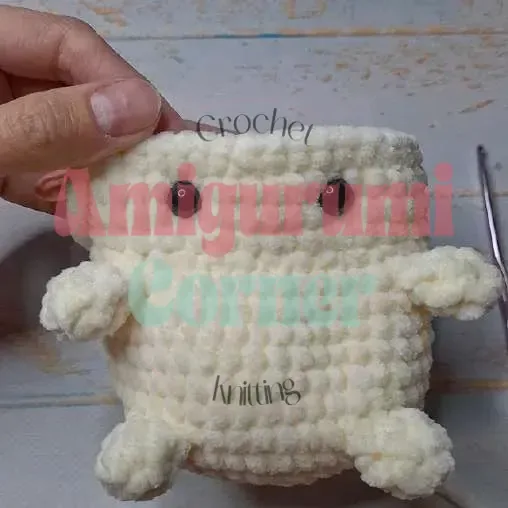
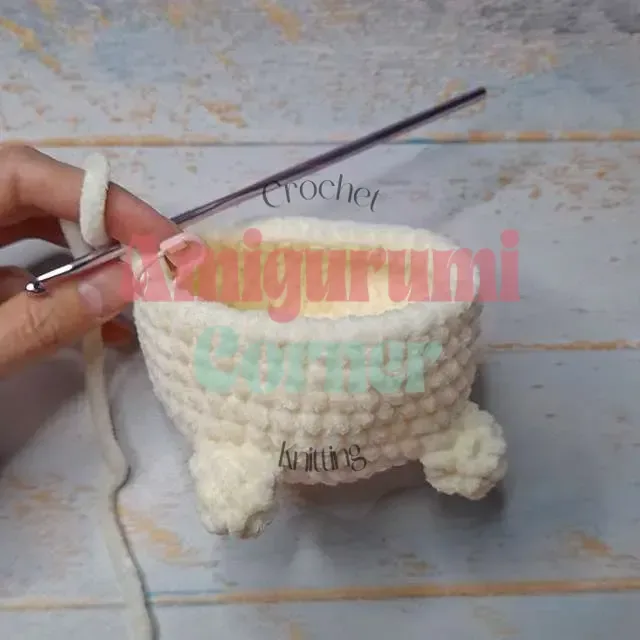
Round 8Attach legs here. 25 sc, sc3tog joining a Limb piece, 7 sc, sc3tog joining a second Limb piece, 4 sc. (42)
Rounds 9–13sc in each st around. (42)
Round 14Attach arms here. 23 sc, sc3tog joining a Limb piece, 13 sc, sc3tog joining the last Limb piece. (42)
Round 1524 sc, sc, dec repeat around. (36)
Round 1624 sc, sc, inc repeat around. (42)
Rounds 17–18sc in each st around. (42)
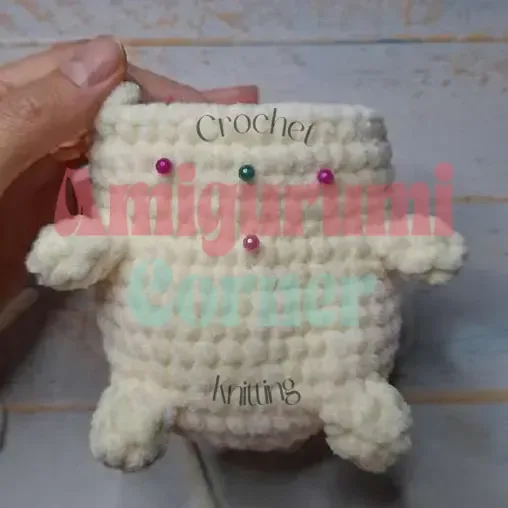
Round 195 sc, dec repeat around. (36)Insert the safety eyes now, positioning them between Rnds 17 and 18, spaced 8 stitches apart. For extra hold, back each eye post with a small circle of felt before securing the washer.
Round 204 sc, dec repeat around. (30)
Round 213 sc, dec repeat around. (24)
Round 222 sc, dec repeat around. (18)
Round 23sc, dec repeat around. (12)
Round 24dec around. (6)Add or top off stuffing before closing so the body stays firm. Fasten off, cinch the opening closed, and weave the tail into the body.
Tail
Round 16 sc in MR. (6)
Round 2sc in each st around. (6)Sl st to close, fasten off, leaving a tail for sewing. Do not stuff this piece.
Mouth
Using the smaller B-1 (2mm) hook and pink yarn: Ch 3. Working into the 2nd ch from hook: 1 sc, 4 sc in the next stitch, 1 sc.
Fasten off, leaving a tail for sewing.
Assembly
Step 1Position the two Ears at the top of the Head/Body, just behind the cinched closure point, sitting side by side. Whipstitch each one in place using the sturdy body-colored thread.
Step 2Attach the Tail by counting up 8 rounds from the base of the Head/Body and sewing it flat against the back, using its own yarn tail.
Step 3Using pink yarn and the yarn needle, embroider the cheeks as two soft rounded patches sitting just below and beside each eye.
Step 4Center the crocheted Mouth piece between the eyes and sew it in place with its yarn tail.
Step 5With black yarn or embroidery floss, embroider the smile lines extending outward from the top corners of the mouth toward each eye.
Step 6Weave in any remaining loose ends throughout the piece.
From the collection
Finishing
- Stuff the head and body firmly before the last few rounds close, working fill into the curves with the handle of the hook.
- Weave in every yarn tail, especially on the limbs and ears, before sewing anything to the body.
- Attach ears, limbs, and tail with the sturdy body-colored thread, then embroider the cheeks and mouth placement last.
Why it works
The head and body add increases every round from round two to round five, turning a flat circle into a dome before the straight rounds begin.
Ears and limbs are both worked as small spiral tubes with no shaping beyond the first round, closed with a simple cinch.
The mouth is the only piece made with the smaller 2mm hook, which keeps it in scale with the face instead of the bulkier body.
What it becomes
- A shelf piece next to other plush amigurumi animals, where its soft chenille texture stands out against smoother cotton pieces.
- A handmade gift for a young child, since the safety eyes and sewn-on parts hold up to handling once secured well.
- A starter project for anyone building a small amigurumi collection who wants to practice spiral shaping before harder pattern pieces.
Original pattern: https://amigurumicorner.com/molang-bunny-amigurumi-pattern/
FAQ
What weight yarn works best for this bunny amigurumi pattern?
A bulky weight chenille or plush yarn gives the softest, most authentic look for this pattern. It hides individual stitches nicely, which suits the smooth, rounded shape of the bunny. A standard worsted weight cotton yarn can be substituted, but the texture and finished size will differ.
Can I make this bunny without safety eyes?
Yes, you can embroider the eyes with black yarn or felt circles instead of using safety eyes. This is a good option if the toy is intended for a very young child, since sewn or embroidered eyes eliminate any small parts. Just be sure to secure any stitched eyes very firmly if the piece will see heavy use.
Why are the arms and legs attached mid-round instead of sewn on afterward?
Joining the limbs directly into Rnd 8 and Rnd 14 creates a stronger connection than sewing them on after the body is finished. It also gives the bunny a seamless, rounded silhouette without visible attachment points. This technique does take a little practice, but it results in a much more secure and polished finish.
How much stuffing does the Head/Body need?
Stuff the piece firmly enough that it holds its rounded shape without any dents, but not so tightly that the stitches stretch and gap. Add stuffing gradually starting around Rnd 10 and check the shape by pressing gently with your fingers. The final decrease rounds should feel dense and well-packed before you close the opening.