Free Pattern
Step-by-Step
Crochet
Small AccessoriesRound medallion crochet keychain charm with tassel
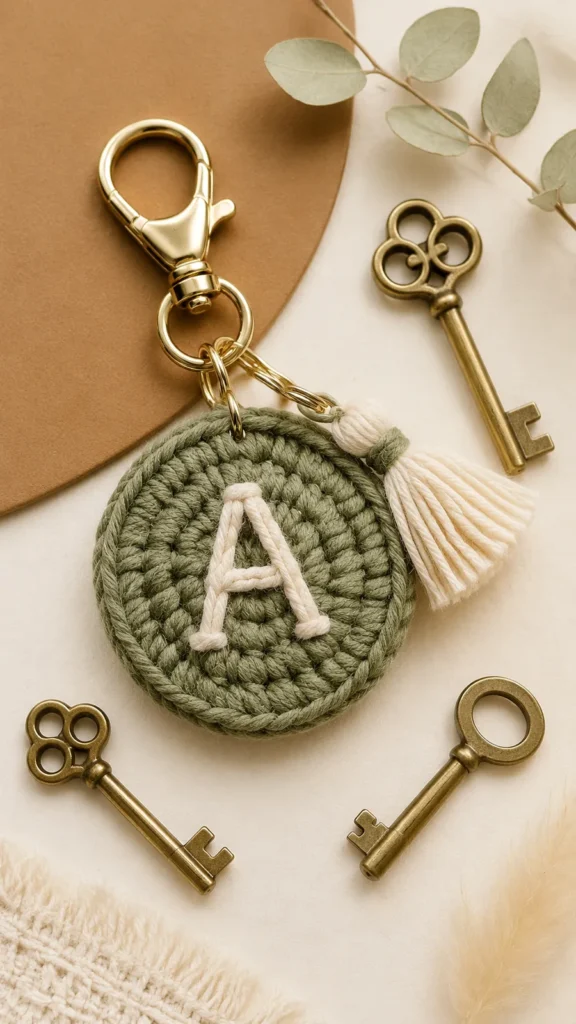
A small round crochet charm pattern with tassel and clasp, made from two joined panels.
- Level
- Intermediate
- Time
- 4-6 hours
- Hook
- 3.5 mm
- Yarn
- Worsted
Pattern highlights
- Start each circle panel with a magic ring and build outward with evenly placed increases.
- Work the panel in joined rounds, closing each one with a slip stitch for a clean edge.
- Repeat the same shaping on a second panel so the front and back match.
- Add a small embroidered detail to the front panel before joining the two pieces.
- Join the panels together to form the finished round charm shape.
- Make and attach the yarn tassel for movement and contrast.
- Fix the metal clasp and jump ring so the charm can hang from keys or a bag.
About This Pattern
Every collection needs a small, portable piece like this one. It is the kind of project I keep in a side pocket for waiting rooms and short bus rides. A round charm does not ask for much shelf space, but it still teaches real shaping. That combination is rare, and I notice it every time I pick one up.
The technique here is the flat circle, built with a magic ring and single crochet increases spaced evenly around each round. Two panels are worked separately, then joined, which is a quieter way to get a clean front and back. I like that the increases are the whole story. No shaping tricks, just steady math.
What comes out the other end is a firm little medallion, light enough for a keyring but sturdy enough to survive a bag. The tassel adds motion, the clasp adds purpose. It reads as a finished object the moment the hardware goes on, not a swatch pretending to be one.
Finished size is approximately 2.25 inches (5.7 cm) in diameter, with a gauge of approximately 20 single crochet stitches by 22 rounds in 4 inches (10 cm). The pattern is written using US crochet terms.
The pictured style uses a medium neutral yarn shade, but this pattern works well with many color combinations. Try natural cotton tones for a minimalist look, bright colors for a playful accessory, or coordinated shades to match a favorite bag.
Worth knowing
There is something satisfying about a shape that behaves. Each round of the circle panels adds its increases on schedule, and the stitch count climbs in a way you can predict before you even count. I like watching a flat circle resolve itself round by round. Working two panels instead of one continuous spiral means a cleaner edge on both sides, and the slip-stitch join at the end of each round keeps that edge tidy rather than skewed. The textured center detail is the fun part, a small embroidered mark that turns an anonymous circle into something personal. By the time the tassel and clasp go on, the piece has moved from stitch practice to an actual object you would hand to someone.
Common mistakes
- Circle becomes wavy Your increases may be too frequent. Check tension and stitch placement.
- Circle curls upward Try using a larger hook size or relaxing your tension.
- Charm feels floppy Use firmer yarn or add a small amount of stuffing.
- Edges look uneven Count stitches after every round to maintain the correct number.
- Hardware pulls on yarn Reinforce the attachment point with extra stitches.
Intermediate
Progress Tracker
0 of 0 rounds
Tap a round to tick it off — your place is saved on this device.
The kit
- Worsted weight cotton yarn in main color: approximately 25 yards (23 meters).
- Small amount of contrasting yarn for optional letter embroidery.
- 3.5 mm (US E-4) crochet hook.
- Metal keychain clasp or lobster clasp.
- Small metal jump ring.
- Yarn needle.
- Scissors.
- Optional small amount of fiberfill for a slightly padded charm.
Crochet Circle Panels (Make 2)
This pattern creates two matching circular panels. Each round begins with chain 1, which does not count as a stitch. Join each round with a slip stitch to the first single crochet. Make two panels, then join them together.
Round 1Make a magic ring. Ch 1, work 8 sc into ring. Sl st to first sc. (8 sts)
Round 2Ch 1, inc in each stitch around. Sl st to first sc. (16 sts)
Round 3Ch 1, [sc in next stitch, inc in next stitch] repeat around. Sl st to first sc. (24 sts)
Round 4Ch 1, [sc in next 2 stitches, inc in next stitch] repeat around. Sl st to first sc. (32 sts)
Round 5Ch 1, [sc in next 3 stitches, inc in next stitch] repeat around. Sl st to first sc. (40 sts)
Round 6Ch 1, sc in each stitch around. Sl st to first sc. (40 sts)Fasten off the first panel. Keep the yarn attached on the second panel for joining.
Special Stitch Explanation
Single Crochet Increase (inc): Work two single crochet stitches into the same stitch. This creates the shaping needed to expand the circular panel.
Adding the Textured Center Detail
On the front panel, attach yarn in the center area. Create a small embroidered star, initial, or simple decorative shape using surface slip stitches or backstitch embroidery. Keep decorative stitching flat so the charm remains comfortable to handle.
Joining the Two Panels
Place both circles together with the right sides facing outward.
Using the attached yarn from the back panel, work single crochet through both layers around the edge.
Before closing completely, add a small amount of fiberfill if desired.
Continue single crochet around until the opening is closed.
Sl st to the first stitch and FO.
Weave in all ends securely.
Making the Tassel
Wrap yarn around a piece of cardboard approximately 3 inches (7.5 cm) wide 20 times.
Tie one end tightly with a separate yarn strand.
Cut the opposite loops.
Wrap yarn around the top section to form the tassel head.
Trim the ends evenly.
Attach the tassel to the metal jump ring or charm edge.
Adding the Keychain Hardware
Attach the metal jump ring through the top edge of the crochet circle. Connect the jump ring to the keychain clasp. Make sure the attachment point is secure by passing the ring through several stitches rather than a single strand of yarn.
Assembly
Step 1After completing the crochet keychain accessory, gently shape the circle with your fingers. Light blocking can help flatten the edges and improve the overall appearance.
Step 2For cotton yarn, hand washing in cool water and allowing the piece to air dry is recommended. Avoid excessive heat because it may affect the shape of the yarn and attached hardware.
Step 3Important: If creating this accessory for young children, avoid loose metal parts and detachable decorations. Secure all components firmly and consider embroidered details instead of small attachments.
Finishing
- Weave in all loose ends from the magic ring and each round's join before assembling.
- Join the two circle panels together, adding a small amount of fiberfill if a padded feel is wanted.
- Attach the tassel and fix the metal clasp with the jump ring to complete the charm.
Why it works
Each round adds its increases at a consistent interval, which is what keeps the circle flat instead of cupping.
Working two panels separately rather than one spiral shape means both sides get a matching, even edge.
The slip-stitch join at the end of every round closes the circle fully before the next round begins, keeping the spiral drift out of the fabric.
a smaller charm, stop after Round 4 or Round 5. For a larger bag charm, add one or two additional increase rounds, following the same increase pattern while maintaining the circular shape.
Customize with embroidery for initials, symbols, or flowers, create seasonal versions with holiday colors, or combine two yarn colors for striped circles.
What it becomes
- A bag charm that pairs well with a plain canvas tote or a solid-color backpack.
- A keychain for everyday keys, handed off as a quick handmade gift.
- A craft fair or stocking-filler item, worked up quickly from leftover worsted cotton.
Original pattern: https://duniarecipe.com/diy-crochet-keychain-accessories-handmade-cute-bag-charms-gift-ideas/
FAQ
Can I use a different yarn weight than worsted cotton?
The pattern is written for worsted weight cotton at a 3.5 mm hook, so another weight will change the finished size. I would swatch the first two rounds before committing to a substitute.
Do I need fiberfill for this charm?
No, fiberfill is listed as optional for a slightly padded feel. The charm holds its shape from the single crochet fabric alone.
Why work two panels instead of one thicker circle?
Two joined panels give a clean front and back with a small gap for light stuffing if wanted. It also lets the embroidered detail stay on just the front, where it shows.
Is this safe to make for a young child's bag?
The pattern notes to avoid loose metal parts and detachable decorations for young children. I would secure every component firmly or skip the clasp hardware entirely for that version.